It seems that already anyone actively involved in sports knows that positions and exercises in yoga are traditionally called asanas. You will not believe it, but “asana” in translation from the ancient Sanskrit language means “comfortable posture”. How to perform yoga asanas so that you really feel comfortable in them? Some secrets will be shared by our article.
A bit of yoga theory
Yoga asanas are different from ordinary physical exercises, primarily in mood. You cannot stand in training in a warrior position and think about a piece of cake that is waiting for you at home in the refrigerator. Yes, you can correctly build up the asana and perform it perfectly, but it will not be yoga, but ordinary gymnastics. In yoga, you track and record everything that happens to your body - muscle work, the slightest tension, thoughts, emotions, reactions, breathing. Yoga poses - asanas - become comfortable when not only your physical body has finally allowed them to be made, but also when your mind is calm. “Yoga chitta vritti nirodha” - says the ancient Indian treatise, which means “Yoga is a stop of the movements of the mind.”
What is being taught to us under yoga in spa studios and fitness centers is, in fact, only one of its directions - hatha yoga. The asanas that make up the hatha, in theory, serve the great purpose of bringing the body into a state so that it does not interfere with spiritual growth. The next steps are work with breathing, meditation and selfless service to the world. You can not do physical exercises, but, for example, do good deeds - and this will be your personal yoga.
The names of the asanas come from the Sanskrit language, and in the modern yogic environment it is still customary to use them. At first it may be difficult for you to remember them, but with regular practice you yourself will not notice how they enter your daily routine. We will take a closer look at several yoga asanas - a photo and description will help you perform them correctly.
About the variety of schools and copyright methods
It is believed that the first Indian gymnastics was described by the Indian sage Patanjali back in the 2nd century BC. His treatise "Yoga Sutra" included sacred ideas about yoga, asanas with a description and what they are intended for, as well as many other details. Now there are a great many schools of yoga in all countries of the world. More and more modifications are strung on an authentic basis. The main yoga asanas can be performed both statically - with a slow entry, deep immersion, fixation and a slow exit - and dynamically, flowing from one to another and well working out the body.
There are also such interesting varieties:
- aqua yoga - classes are held in water;
- hot yoga - the temperature in the room is specially raised to 30-40 degrees. Have you ever noticed that stretching is easier in summer? That is why there is a hot yoga or bikram yoga, so named after the name of its creator;
- fly yoga or yoga in hammocks - a combination of yoga asanas and work on canvases. The loads can be either very soft, ideal for recovery (after all, the canvases provide additional support for the body) and the inclusion of yoga asanas for beginners, and require almost acrobatic training, with upheavals and hanging upside down.
Breathing first
An ancient saying goes: "The sage has only two holidays in life - inhale and exhale." Breathing is the connecting link between our spirit and our body, which is why yoga gives so much attention to it. Ideally, you should learn full yoga breathing, where each inhalation and exhalation is divided into three stages - the stomach, the main part of the chest and the upper part of the chest:
- first, air enters the stomach;
- then the chest is filled, and the ribs move to the sides;
- the upper part of the chest is involved in completing the inhalation, moving upward;
- exhalation in different techniques can begin either from the abdomen or from the upper part of the chest (that is, in the direct or reverse order), but it is equally divided into three stages.
Advanced practices also add breath holdings as you inhale and exhale. But for beginners, the option of just listening to your breathing and making it as smooth as possible is also suitable. During moments of excessive tension in the body, breath holding can occur automatically - your task is to learn to avoid such delays by tracking all the sensations that arise in the body. And it will be good if you, even without having mastered three-stage breathing, at least understand how it is to breathe with your stomach. Thus, your body will be able to receive more oxygen, not only during training, but everywhere and always, and it will be real yoga.
Complexes of Asanas
Typically, asanas are performed sequentially one after another in the form of complexes. Sometimes you can start with one asana and feel how your body requires a transition to the next asana, and after it to another. In yoga, this is called the “state of flow”, and in this mode, most instructors train. But there are certain complexes that were built at the very dawn of the existence of yoga and practically have not changed over the centuries. The main yoga complex is Surya Na mask, or “Salutation to the Sun”. By tradition, it must be performed after awakening - it consists of several asanas turning into each other, helping to bring the body to a healthy state. It is also believed that this is one of the best yoga asanas complexes for weight loss, because in Surya Namaskar dynamically alternate bows, bends, lunges and emphasis. But in order for this complex to be a truly active sequence, first you need to learn how to perform its asanas in statics. We will consider the main components of hatha yoga - the asanas of which Surya Namaskar is composed.
Tadasana
“Mountain pose”, or Tadasana, is probably the main one with which a beginner should begin his acquaintance with yoga. Moreover, it is she who opens Surya Namaskar. You won’t believe it, but these are just standing positions. What is so difficult, you say, and you will not be quite right. Tadasana implies the inclusion of the whole body and the realization of how exactly we stand. The steps to its implementation are as follows:
- Stand straight, feet together. Feeling support under your feet, distribute the body weight over the entire surface of the feet. You need to make sure that you are not being demolished in either direction, but you are standing exactly in the center.
- Turn the tailbone down, forward the pelvis. You must feel your center and as if to rebuild your whole body from it. The extension to the heels and to the crown goes exactly from the center.
- The knee joints are not snapped in, the legs are not fully straightened, as in ballet - there is always a couple more millimeters left until full straightening. This allows you to extend the life of your joints.
- The chest is open, shoulders to the sides, shoulder blades pointing down.
- With your crown reaching up, leave your chin parallel to the floor.
The position with which all yoga asanas begin is in the photo below.
You should feel your body stretch smoothly from the top of the head to the heels. If you get bored and your thoughts start to wander, try closing your eyes or climbing your toes, or even both. You will see how many mental and physical efforts balance is required.
Uttanasana
The next asana in the Surya Namaskar complex is Uttanasana, or, as it is also called, a bow. Or a slope. Its sacred meaning is that the student seems to bow to the sun and thanks him for the new day. And physiological - in bringing the abdominal organs into tone, stretching the back of the body and relaxing the back. Also, this asana favorably affects the nervous system and pelvic organs, and therefore is considered one of the main yoga asanas for women's health.
The execution technique is as follows:
- From Tadasana, you raise your arms up and stretch out, including your back in the work. Then lean forward with the body, starting movement in the hip joints, and not in the lumbar region. This is one of the key principles in the implementation of all kinds of tilts and pulls of the body to the legs: the back does not bend, but the hip joints scroll. The loin is fixed, the stomach is pulled to the spine.
- Bend your knees and make your feet soft. Start spreading yourself down: the stomach sticks to the hips, then the chest lies on your knees - and you completely hang down with your head down. The neck is relaxed, the head hangs down - you look at your knees, not the floor.
- The hands are relaxed and either "drain" down with the back of the palms on the floor, the fingers look back, or, if the body allows it, the palms grasp the ankles in the back, and the forearms rest on the calves.
- Your task is to relax your back in this position and let the spine simply “drain” from the pelvis down. Yes, this position will not at all look like a perfectly executed slope with straight legs, but it will be physiologically correct.
- Do not hold your breath, breathe evenly and calmly. At first, in order for you not to feel dizzy from a rush of blood, you will have a fairly short fixation in the asana - for 3-4 full breaths. Then time can be increased.
From this asana you can go up again - and the movement will also begin precisely in the hip joints. They usually rise either through a round back - first placing the pelvis, and then vertically aligning the vertebra behind the vertebra - or with a straightened back, stretching out with one hand and the crown in one direction and connecting the power of the press well. In any case, in order to go up, you will have to include your “center” in the work.
Virabhadrasana
From the slope, you can not go back up, but go to another asana - for example, in the pose of a hero or the pose of a warrior. Virabhadrasana has several variations, which differ from each other in the nuances of building a body. This is one of the basic yoga asanas for beginners, as it tones the body well even in a shallow version. The execution technique is as follows:
- If you move to the hero’s pose from an incline, then step back with one foot and lift the body. It’s better to start the complex with the leg on which the exercises are worse to work out both halves of the body evenly - as a rule, work with the second limb goes a little faster and more relaxed.
- It is better for beginners to get out of the slope first to a vertical position and from here to enter the Virabhadrasana. This will allow better control of the position of the lower back. Your tailbone tends to heel, and the pelvis is slightly twisted forward. Pelvic alignment is not due to the tension of the buttocks, but due to the fact that you tighten the stomach and turn on the abs muscles - everything, including the deep ones - in the work. Once again, we recall that the detuning of each asana begins first of all from the center.
- Your second leg stays in front, bent at an angle of 90 degrees. The knee is located strictly above the heel - this creates an optimal load on the joints. If it’s hard for you, then the angle in the knee can be more than 90, but in no case less. The weight of the body is evenly distributed between both legs - they seem to push the rug apart.
- The position of the pelvis is coordinated with the position of the feet. If your hind leg is positioned so that the heel looks clearly back and comes off the floor, and the foot is stretched, then the pelvis is deployed forward. If the back foot lies on the floor and is slightly deployed in the diagonal, then the pelvis will unfold after it.
- The chest is open, the shoulders are pulled from the ears, the shoulder blades tend down. Hands are most often directed to the sides or up (then you need to monitor the position of the shoulder blades and shoulders even more strongly - they should not “bounce” up after the hands).
Hold in the asana for several full breaths, and then repeat it on the other leg.
How variations of this yoga asana may differ, the photo in this section of the article fully illustrates. In the photo above, the back heel lies on the floor and is turned into a diagonal, in the bottom photo it is laid back and looks at the wall.
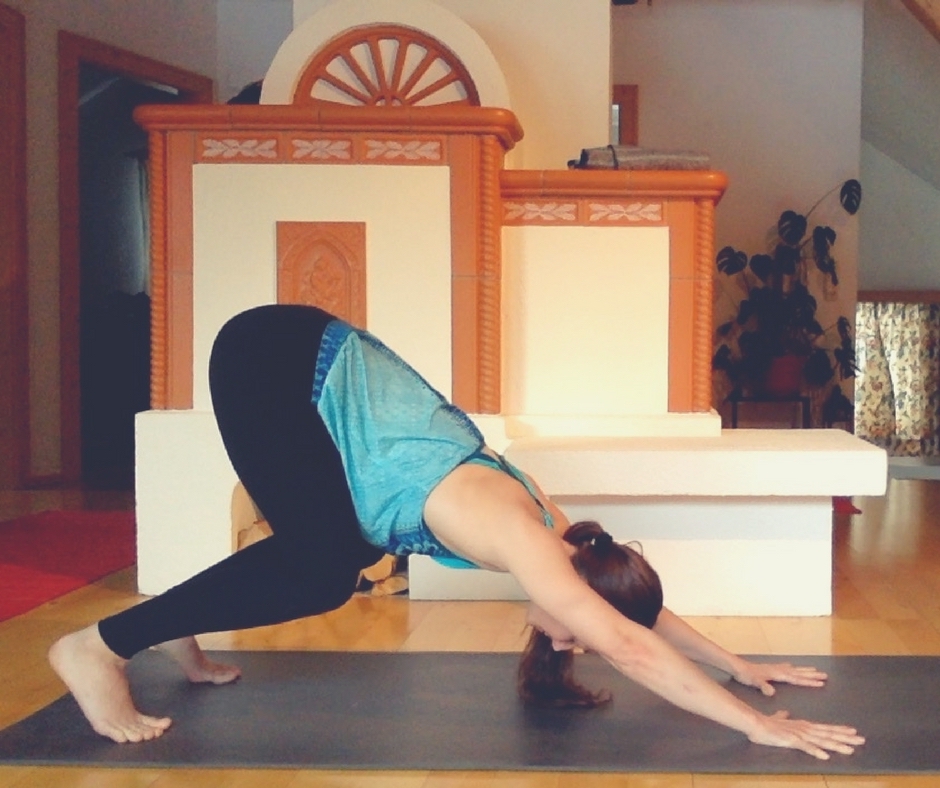
Ardho Mukha Shwanasana
For most ordinary people, this asana is known as the "dog face down." Like all asanas with an emphasis on emphasis, it well includes the whole body in the work, which is why it is added to yoga asanas for beginners. At first, it seems difficult, but later, when you start raising legs one by one or moving to your elbows, the basic pose of a dog suddenly becomes easier and more understandable. This is one of the secrets of yoga: complex asanas gradually become simple and convenient, and the body itself begins to give signals about the need for practice.
Continuing with Surya Namaskar, experienced practitioners can go to Ardho Mukha Shvanasana immediately from Virabhadrasana, lowering the body down and putting his foot back. For beginners, it is better to use a position based on four points: stand on the floor on all fours, leaning on the palms and knees:
- Raise the pelvis up, deploying the sciatic bones and tailbone to the ceiling. Imagine that someone is pulling you by the tail.
- Knees at first are best kept bent. Remember how you spread your belly over your hips in Uttanasan, and try to repeat this in a dog. It is very important that the lower back does not fail. The back is straight, the stomach is pulled to the hips - difficult, but doable, especially under the supervision of a trainer.
- The palms fully rest on the floor - there are no gaps between them and the rug. Fingers are spread out in all directions, and the weight of the body seems to spread over them - do not lean only on the base of the palm. The better the palms are in contact with the floor, the larger your footprint. In this case, you tend to push off the floor and direct the traction along the back up to the tailbone.
- Carefully rebuild the shoulder girdle. The neck is elongated as an extension of the back, the shoulders are pulled away from it to the sides, and not creep onto the ears. The elbows are turned down, and the armpits are looking at each other. Do not round the back - stretch and straighten it.
- Initially, you should not stay in the dog for more than a few seconds. Over time, when your body gets used to such a position in space, you will notice how much more convenient it becomes for you to be in the asana.
Triconasana
This asana is not part of Surya Namaskar, but it is worth special attention, because it is with it that the development of the lateral muscles begins. In another way, Triconasana is also called the pose of the triangle - and indeed, the body in it stretches in three directions. The technique for performing this asana is as follows:
- Stand on the rug in the position of the legs wide, the right foot is deployed clearly to the side, the left foot is only slightly turned in the same direction. The heel of the right foot is located opposite the arch of the left.
- Hands spread apart - feel the extension from the back to the tips of the fingers. The crown reaches up.
- Tilt the pelvis slightly to the left side - it will unfold from the horizontal to the diagonal. The resulting position of the pelvis will allow you to tilt the body to the right - as if someone had pulled you by the right hand. When leaning, you should pull the ribs from the pelvis on both sides of the spine, and not just the left.
- Leaning as much as possible to the right side with a straight back, move your hands from horizontal to vertical. The right hand will drop on the foot, and the left will remain to reach up. If there is no problem with the neck, unfold it so that you look at your left hand. Continue to stretch in three directions - the right leg, left leg, and arm along with the crown.
- It is important that all the time remain in the same plane - as if stuck to the wall. Initially, Triconasana can really be trained against the wall and thus control the correct detuning.
Repeat the sequence the other way. Gradually, you will go deeper into the asana and will be able to try other variations of the pose of the triangle - with the bent knee of the leading leg or even with twisting. But first you need to master the basic implementation well.
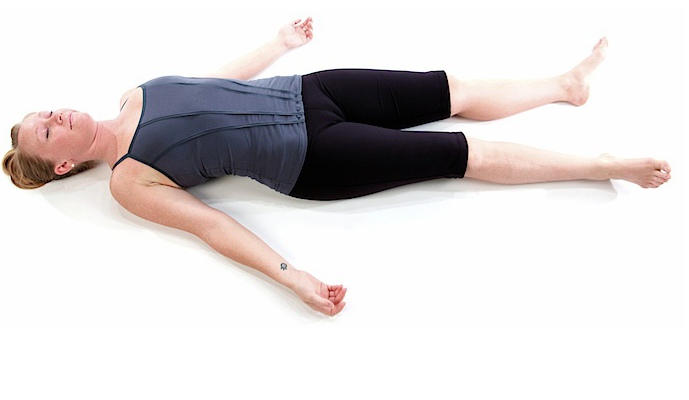
Shavasana
The list of asanas is completed by the traditional final asana - Shavasana or “corpse pose”. Do not be afraid of such a terrible name - in fact, a sharabana is almost a favorite among all yoga asanas. After all, in it you can finally relax and take a break not only from training, but also from everything in the world.
The instructor, as a rule, accompanies the process of entering the asana with a detailed verbal description: “Relax your feet. Relax your ankles. Relax your calves ”and so on. Your task is to listen to the voice of the instructor and release your thoughts into free swimming. If you do it yourself, then try not just to lie on the rug, but show a little self-discipline and say in your inner voice that you are relaxing now. Walk through your body and let your thoughts flow freely. A well-made Shavasana even replaces several hours of sleep. If you manage to let go of yourself and your inner critic, you won’t even notice how these 10-15 minutes of complete relaxation fly by. It is nevertheless advisable not to fall into sleep, but to remain conscious, albeit not as active as usual.