If you built or renovated a house, but your ceilings failed, then you should not despair. Rough surfaces and other flaws can be corrected on their own, and not hire specialists. Drywall will help you with this. With it, you can hide any flaws on the main surface. This article will discuss how to make gypsum plasterboard ceilings with your own hands. Installation in this situation will not take a very long period of time. It is also possible to decorate the resulting ceiling with any materials.
There are many types of drywall ceilings. If you decide to find the answer to the question of how to make
gypsum plasterboard ceilings with your own hands, then you should decide on the shape of the future design. You can choose for yourself an option to your taste, based on the recommendations of friends or on articles in magazines or construction literature. And you can dream yourself. Drywall ceilings are single-level, multi-level, geometric, step and wave-like.
The type of plasterboard ceiling may depend on the choice of fixtures, a variety of decorative elements, or wooden beams.
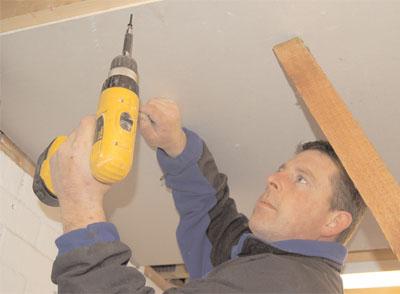
How to make gypsum plasterboard ceilings with your own hands? Installation is a painstaking but not difficult task. Here is an example of the simplest installation of a plasterboard ceiling. Where to begin? First, you need to think through the design to the smallest detail: where the lamps will be built in, calculate the height and choose the elements for its decor. You need to identify all the flaws in the ceiling that you need to hide. Prepare the tool you need before you work: level, tape measure, screwdriver, crown for holes, drill, plane, construction knife, sandpaper and putty knife. For work, you will also need a guide and ceiling profile, direct suspension, self-tapping screws and dowels, crab. Dowels during the fastening process can be replaced with anchor wedges.
Answering the question of how to make gypsum plasterboard ceilings with your own hands, you should create a markup using guides from profiles. It is to them that the material will be attached. It should be noted that they should not be placed too far from each other. Otherwise, the drywall will sag. Fasten sheets with a small gap. A special mixture will be pressed into it, which is used to seal the seams. In the middle of the sheet and its edges will pass the main profiles. Suspensions are fixed in 400 mm increments to metal anchors along these lines. Then the supporting profiles are inserted into the starting frame or into the guides themselves. They are fixed in the room around the perimeter. The frame is inserted so that a small distance remains between it and the wall. Clearance is necessary so that there are no consequences from deformation of the ceiling. And changes should be expected from temperature changes. Then guides are inserted into the suspensions.
The final stage of the work is primer and putty. Even if you decide to make two-level gypsum plasterboard ceilings , photos of which you can see, this step should be performed. An intermediate step in creating a high-quality ceiling is putty. They use a roller with a handle, spatulas, a wide brush, emery paper, a Phillips screwdriver, universal primer, finishing putty, and sickle for puttying. After the primer, which is carried out in two stages, it is necessary to proceed to the finish of the ceiling. In this case, everything will depend on your imagination. You can use wallpaper for cladding, or you can put some image on the ceiling. The choice is yours.
On this, the construction of the ceiling can be considered completed. If you don't like suspended ceilings, then you can turn your attention to the stretch ceiling. In the bedroom and other rooms it will look just amazing.