This article describes in detail all the steps of how to make paving stones with your own hands. The instructions presented to your attention will help you understand the technological features of this process. For ease of perception of information, the entire description is divided into several stages. After reading this article, you will learn about all the types of paving stones that exist today.
Types of coverage
Garden paths are an important component of any landscape. For the refinement of personal plots, it is customary to use paving stones. It is also called paving slabs. This coating can be made of concrete, clay or stone.
Concrete paving stones
For the arrangement of private suburban areas, concrete paving stones are used. Making such a material with your own hands, by the way, will significantly save the whole process. Concrete paving stones as a building material for paving sidewalks have excellent characteristics and affordable prices.
It is made from a special building mixture, the main element of which is concrete. In addition, plasticizers and coloring pigments are also introduced here. Such products are obtained in two ways: by vibration casting and by vibropressing.
Clinker
Clinker is based on clay. Clinker pavers are used to ennoble gardens . Making such tiles with your own hands is a rather complicated matter. But this product is characterized by wear resistance, durability and a longer service life.
Also, this material has frost resistance, which allows you to use it in various conditions. A huge variety of colors and shapes of clinker gives a wide opportunity for its use in landscape design. Such paving stones (you can master this material with your own hands) are in great demand.
A natural stone
Natural stone is traditional for paving stones. It is extremely durable and durable, which serves as its most important advantage. Such material is quite expensive, and price reductions can be achieved through the use of sandstone or siltstone.
According to the processing method, sawn, sawn-chipped or chipped paving stones are distinguished. Do-it-yourself manufacture of this element by the power of almost every person, especially since this material is classic.
Forms for the manufacture of pavers
In the production of paving stones, forms for the manufacture of this building element are of great importance.
They can be:
- plastic;
- rubber;
- polyurethane.
Each of these three species has its own characteristics and technical characteristics. For example, rubber molds can withstand up to 500 production cycles. They do not need to be steamed. In addition, no additional equipment is required for rubber molds.
Very often, paving stones with a raised surface are used to pave the tracks . To create such products, polyurethane molds are used. The building mixture freezes in them extremely quickly. Finished products to remove from these forms is very easy.
Since polyurethane is a high-strength material, practically no marriage occurs during the production process. Such forms withstand up to 100 cycles.
For the production of square, rectangular and non-standard tiles, plastic containers are used. Do these forms for pavers with their own hands withstand the manufacture of a huge number of these elements. The process is designed for 250 production cycles. Plastic containers are the most popular among consumers. Almost every hardware store presents such forms in a huge assortment. These containers may have a pattern or relief. On the finished product, it looks very advantageous.
If for some reason you cannot purchase molds for the production of pavers, try an alternative method. Take the wooden boards, saw them and put together a box. You can also experiment with all kinds of plastic containers and scraps of metal pipes. Just remember that all home-made forms require lubrication before use (machine oil, drying oil).
Vibrating table
So, you decided to start making paving stones with your own hands. Step-by-step instructions include the use of a special vibrating table, necessary for shaking concrete in molds. This method allows you to completely get rid of the formation of bubbles, which at times increases the strength and durability of the product at the exit. Of course, if you are not planning mass production of paving slabs, then you can create the necessary vibration manually. Just tap the table with a mallet. I must say that this is quite inconvenient. Better make a vibration table from the most common materials.
Fold each other three used tires and fasten with self-tapping screws. Attach any electric motor to the old countertop. To generate vibration, it is necessary to shift the center of rotation of the engine. Insert a small blank on the shaft. Turn the table with the motor down, lowering it into an improvised well from tires. Fix the countertop with self-tapping screws in order to avoid possible displacement due to vibration. This is the most primitive way to automate the process. If you want to start mass production of tiles, get a do-it-yourself paving machine.
Mix for pouring into molds
For pouring into molds, you need to prepare a solution consisting of cement, sand and water. Of course, the building mixture may be different, but in any case, these components must be present. In order for the paving stones to be strong, the proportion of cement should be at least ¼ of the total mass, and the proportion of sand should be ¾. Water must be poured so that the solution consistency resembles thick sour cream. To increase strength, you can add fine gravel and plasticizer.
Technological process
The technological process can be divided into several stages:
- The production of pavers begins with the preparation of concrete.
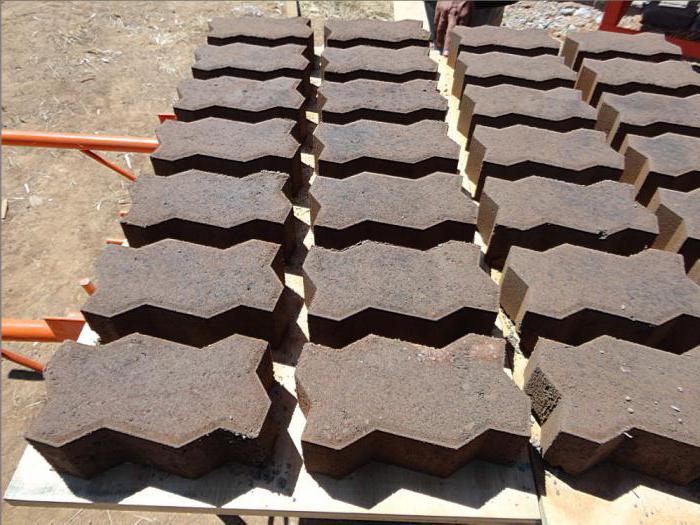
- Shaping products. Concrete is poured into prepared containers, set them on a vibrating table for 45 seconds. The mortar is carefully rubbed in the molds, then they are installed on pallets on top of each other, laying with plastic sheets. There should be no more than 15 such layers.
- Products must be allowed to dry well, while not allowing even the slightest shift of forms. As a rule, the duration of this stage is up to three days.
- The turn of the stripping is coming. These are peculiar water procedures for paving stones, lasting no more than a couple of minutes. The molds with the dried solution are kept in the bath and then knocked out on the table.
- Finished tiles cannot be used immediately after manufacture. After stripping, paving stones are laid on pallets and incubated for at least 4 weeks at plus temperature. The first 2 weeks of the product must be moistened with water to prevent cracking. After 4 weeks, the paving stones can be painted.
After knocking out the tiles, the molds must be prepared for subsequent use - the plastic is easily cleaned from the remains of the solution. Then, the forms should be well treated with a 7% hydrochloric acid solution. Such washing makes it easy to remove products in the future.
Conclusion
This technology of making paving stones with your own hands makes it possible to obtain aesthetically attractive tiles with all the properties inherent in a material produced on an industrial scale.