It seems that people always had a desire to fly through the air, and it was precisely this that prompted scientists to create many wonderful aircraft, but not all of them were safe, could fly long distances. Among them is such an amazing device as a glider, which is relevant to this day. It gave rise to a whole sport, in the framework of which competitions are held. Many have heard of him, but even have no idea what he is.
What is a glider?
This is a kind of non- powered aircraft, the weight of which is much heavier than air. Movement in it occurs under the influence of its own weight. The glider makes its flight using the aerodynamic force of the air flow on its wing. It is as if floating in the air. There are various models of this device: by the number of seats - single, double and multi-seat; by appointment - educational, training and sports. Glider engine missing, this is the simplest aircraft.
For take-off, a towing aircraft is used, which attaches it to its board with a cable. After lifting the towing vehicle into the air, the glider also soars. Then they unhook the cable, the device flies alone. Many say that glider flights are simply magnificent, because everything happens in silence, without the annoying rumble of the engine. After a beginner recognizes in practice what a glider is, he wants to fly on it again and again.
There are two flight options on this unit: hover and planning. Planning is a glider flight with a decrease, which is very similar in sensations to a rapid descent on a sleigh or on a cart along a steep slope. Vaping involves the use of lifting force, which is created using air flow and supports the aircraft while moving in air.
A bit of history
It was the flight on a glider that opened up to mankind new possibilities of hovering in the air, because it was still very far from the invention of the aircraft. These aircraft used to have neither cockpits for pilots nor a retractable landing gear. In some models, the pilot simply lay on the platform or controlled the plane, standing on his hands, using the movements of his own body. Of course, this caused certain inconvenience during the flight. These aircraft were able to maintain their relevance at the present time.
Many amateurs think about how to make a glider with their own hands. It would be nice to have a similar device in your arsenal for personal flights. Children will be very happy with this invention and will find it a good toy. A flight on a glider of real size can give a lot of wonderful sensations of light soaring in the air.
Choosing the Right Model
A home-made device must certainly possess some important qualities that can be clarified when studying a suitable option in a store.
What will the glider look like? It is often difficult for a novice in this business to achieve the correct design, which is why it is so important to adhere to general rules.
For those who have a minimum of experience in designing, it will be quite difficult to make a model, so it is recommended to choose something lightweight, but with no less elegance than purchased counterparts. There are only two main designs of this aircraft, the creation of which will not require special effort and cost. For these reasons, they will be the most optimal choice.
The first option is based on the principle of the designer, it is collected and soars into the air right at the test site.
The second option is prefabricated, has a holistic design and is stable. Its creation is a rather painstaking and hard work. Not every glider is able to make one.
Glider drawing
At the initial stage, you need to make calculations and carefully think through everything. For those who want to make a glider with their own hands, drawings The finished plan needs to be reviewed. It is also necessary to determine in advance the materials that will be used in the future design.
For different models of gliders, a completely standard set of resources is needed: small blocks of wood, twines, high-quality glue, ceiling tiles, a small piece of plywood.
The magnitude of the first model
The first design of the airframe will be quite light, its nodes are fastened using ordinary stationery gum and glue. It is for this reason that it is not necessary to observe accuracy in design here. There are a few basic rules to follow:
- total glider length must not exceed 1 meter;
- wing span - a maximum of one and a half meters.
Other details are at the glider’s discretion.
Format of the second model
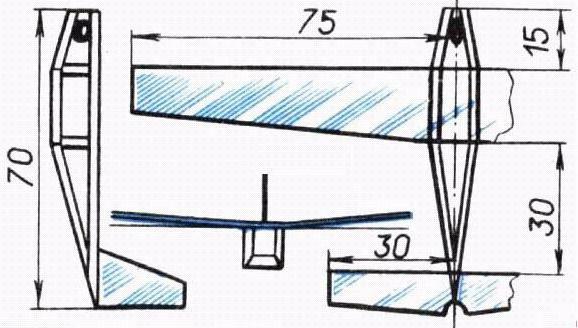
It really is worth thinking about the quality of the model. It is very important that all the details of a makeshift aircraft are calculated to a millimeter. The airframe drawing must correspond to the created model, otherwise the structure will not blow into the air. This model should have the following parameters:
- maximum aircraft length - up to 800 mm;
- wing span is 1600 mm;
- the height, which includes the dimensions of the fuselage and the stabilizer, is up to 100 mm.
After all the necessary quantities have been clarified, you can safely proceed to the simulation.
Training is Half the Success
Before you begin to design real aircraft units, you can train and build a glider out of paper. You can make it out of a small paper sheet and a match, it will fly perfectly. It is only necessary to adjust a small weight of plasticine on the nose of the model. For this simple design you will need a notebook sheet of paper, scissors, matches, a piece of plasticine.
First you need to cut the glider body according to the template, and then bend the wings in a dashed line up. Next, gently stick the match on the inside of the model so that the head of the match protrudes beyond the nose of the center of the wing and does not have protrusions on the back. After the glue dries and the match is fixed, the airframe adjustment process begins. It is necessary to select a weight from plasticine for him so that he regulates the flight process. This balancing is attached to the edge of the match.
A simple kind of glider
The basis for the glider (its wing-shaped part) is cut out of the ceiling tile. After that, create rectangles from a similar material. This is done in such a way as to be enough for all the details: the wing should have dimensions 70 x 150 cm, horizontal stabilizer - 160 x 80 cm, and vertical - 80 x 80 cm. It is necessary to cut out the main parts very carefully.
The perimeter should be turned with toilet paper so that everything is extremely smooth and there is no chipping. Each narrow and thin edge needs to be rounded, so you can give the design a little elegance, its aerodynamic properties will also improve. Ribs can be created from simple slivers, just carefully grind and give them the desired shape in advance. After all these manipulations, you need to carefully glue the piece of wood to the middle of the wing so that it does not go beyond the edges. The main part is almost ready.
Now you need to take up the preparation of the body of the glider, this design is quite simple and consists of a thin stick and small stabilizers. The rounded squares must be glued together so that some kind of letter "t" appears in the three-dimensional dimension. It attaches to the tail. With the help of such manipulations you will make a frame, it remains to attach everything using ordinary stationery gum. A drawing of a glider will come to the aid of a novice designer, relying on which, everything can be done qualitatively.
Complex model of an aircraft
Creating a children's glider is not difficult for beginners. But more serious models require special efforts and much more time to design. Therefore, people who are wondering how to make a glider independently, it is worth studying the process of building an aircraft in more detail. This will help create a robust design. Having a ready-made model, beginners will be able to evaluate in practice what a glider is and what advantages it has.
Toy model with a small motor
The fuselage of this model is made from finely planed matches and glued with plain cigarette paper. A piece of plasticine for adjustment fits into the nose of the model. The wings, stabilizer and keel are cut out of thick cardboard paper. Anyone who knows what a glider is can be overcome with doubt when this “squiggle” is in his hands. However, work has not yet been completed.
Now it remains only to spread the cardboard wings and fix a little clay on the nose. After that, you can in practice check how this model flies.
The capabilities of this match design are very limited, it performs flights with a decrease, in the air it may require constant adjustment. It is much more interesting to launch gliders into the air that can soar independently in the air, so you can additionally make a rubber motor to them. The manufacture of this important part takes no more than half an hour. To do this, you need to carefully make small recesses in the fuselage from matches, where the front screw bearing and the rear hook will be inserted. Both of these parts are made from ordinary soft wire. The latter must be carefully wound with a thread exclusively at the points of its junction with the fuselage. These compounds are carefully coated with glue.
After that, you need to cut a motor screw with a knife from the rail, the length of which is 45 mm, the width is 6 mm, and the thickness is 4 mm. In the center of the screw, you need to skip the wire axis, the end of which is bent by a hook for the future rubber motor. Two threads drawn from a clothesline can be used for a rubber motor, they need to be wound 100-120 turns. A device with such a simple engine will soar into the air very quickly.
After a beginner makes a glider with his own hands, drawings more complicated for him will not seem so complicated. Good luck!