As a rule, we buy a lot of different toys for our children (dolls, cars, soft, educational, and so on). As a result, they are all scattered in different corners of the apartment. To avoid this, we suggest you find out how and from which you can make a toy box with your own hands. At the same time, it will be possible to accustom the child to order.
Use an unnecessary cardboard box
Large boxes of shoes, household appliances and so on can be reused. Just decorate them - and you will get a convenient place to store children's dolls and cars.
A master class on how to make a box for toys with your own hands is described below.
- You will need a cardboard box, a glue gun, a large piece of cloth.
- Coat the bottom of the box around the perimeter with glue from the gun.
- Expand the fabric and cover the bottom of the box with the middle, gently spreading the flap and pressing it to the glue.
- Lubricate all the walls from the inside, pull the fabric and glue it to the sides.
- Wrap the cloth on the outside of the box and glue it to the bottom of the walls.
- Turn the box over and wrap the fabric to the bottom. The patch should be pressed evenly against the wall. Glue the fabric, and cut off the excess.
- To strengthen the bottom, glue the fabric around the perimeter of the box and glue the cardboard on top.
- Turn the box over.
- Pin the clothespins on top, and put something heavy inside so that the fabric adheres well to the box.
The drawer is ready!
Box with handles
Instructions on how to make a box for children's toys with handles will help you in this matter.

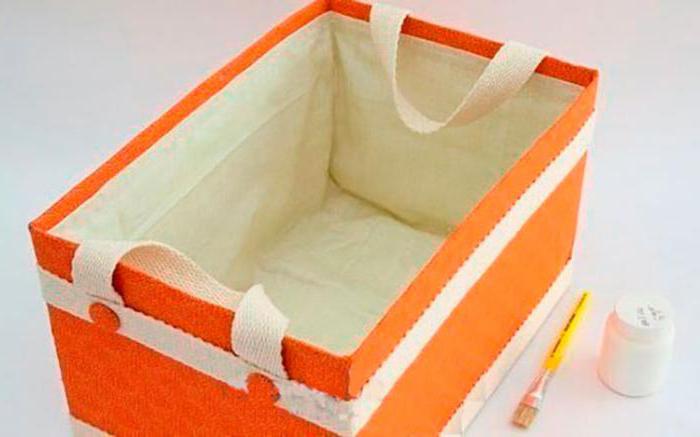
- Take two types of fabric, a tight tape or rope, glue, glue gun.
- Cut a strip of fabric. In width, it should be greater than the height of the box (it is necessary that the flap can close the bottom and slightly wrap inside the box). The length of the fabric should completely cover the perimeter of the box.
- Glue the cut rectangle of fabric to the walls of the box.
- Wrap the excess fabric on one side of the inside of the box and glue it to the bottom on the other.
- Measure out a piece of fabric in a different color. It should cover the bottom and walls inside the box.
- Coat the bottom with glue and glue the fabric.
- Spread the walls inside and also glue the fabric. Along the edges do the twists.
- Glue the gates at the intersection of the two types of fabric.
- Measure the tape and glue it at the bottom, around the perimeter of the box, using a glue gun.
- Measure out two identical pieces of tape. Pens will be made of them.
- Glue two tapes to the walls on the sides of the box.
- Glue one more tape around the perimeter of the box. It should overlap the bottom of the handles.
The toy box is ready!
Glued box
The easiest way to take self-adhesive wallpaper for this purpose. Then do not mess with the glue and wait until all the walls are dry.
But, regardless of whether you will paste the future toy box with self-adhesive or paper wallpaper, the principle of operation is the same:
- Cut a piece of wallpaper so that along the length it can wrap around the box around the perimeter.
- If necessary, coat the walls with PVA glue.
- Glue the wallpaper around the perimeter of the drawer.
- Make cuts at the top and bottom on the protruding parts of the wallpaper.
- Wrap protruding pieces inward and to the bottom.
The box is ready!
We use a tree
A wooden toy box with your own hands is quite complicated. But such an item turns out to be very reliable and will last much longer than a cardboard box.
Also, it can not only be used in the interior as a decorative element. Such a box can become a functional part of the room.
For example, if you put a box under the wall, put a blanket and sofa cushions on top, an additional seat will appear.
How to make a box?
For convenience, we give a guide on how to make a wooden box for storing toys with your own hands.

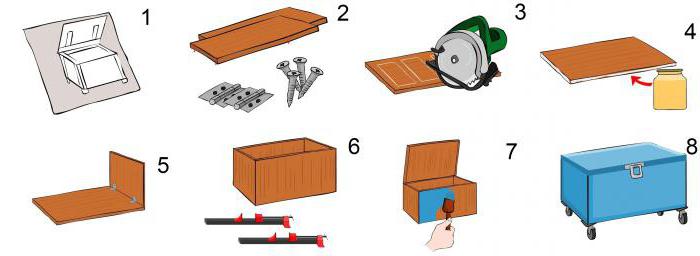
- Create a sketch of the future box (picture 1). Think about its dimensions, what will be the height, depth and width. Will he stand on his feet or stand upside down on the floor? Will there be pens and where should they be located?
- Prepare all the necessary materials and tools (picture 2). First you need plywood or MDF board. They are sold at a hardware store. But if you have old furniture (for example, a table, chest of drawers, wardrobe), then you can disassemble it and get the necessary materials. You will also need screws and corners, hinges, PVA glue or carpentry. Of the tools you need a simple saw or circular.
- If you buy materials in a store, you can ask that there you sawed boards to the desired size. If this is not possible or you use improvised material, then do it yourself (picture 3). To do this, draw the board into pieces and saw it. As a result, you should get the following number of parts: four walls (all the same or two different), bottom and cover.
- Start assembling the box. For this place of the joints of the walls, coat with glue (picture 4).
- Then connect the two parts with the corners (picture 5).
- Attach the lid to the drawer using the hinges (picture 6).
- Wipe off any excess glue with a cloth and leave the box to dry.
- Decorate the drawer. For example, sand it and paint it (picture 7).
- Attach the handle and legs as desired (picture 8).
The storage box is ready!
A box of boards
A wooden toy box can be made from planks. There are two collection methods.
- Take the plywood for the bottom and in the corners beat four blocks. Then beat them with thin cloves on the plank. You can make gaps between the tree, so ventilation will be better.
- Nail the plywood to the bottom of the box. And beat the planks to it. Thus, the sides of the box will be solid, and the sides with slots.
Advice
- If you make a toy box with your own hands out of the box, then check the cardboard walls and the bottom. If they are soft, then such a place for storage will not last long. Most likely, the box will fall apart after a couple of times of use.
- In the wooden crates, make slots or handles in the walls so that there is ventilation and the toys are ventilated. Do not cover cardboard boxes for toys for the same purpose.
- Decorating a handmade box for children's toys, do not forget to make a bright decor. For example, paint the box with plain paint, and with the help of stencils make vivid drawings.
- A stylish box can be made in the style of patchwork. To do this, shed all the walls or just the lid of the box. Cut multi-colored square pieces of paper and glue them in a chaotic manner on the outlined places. You can also use paint.
- Buy wooden decorative items (such as animal figures, letters, and so on) and stick them to the walls or lid of the box.
- If there is no space for the box, then make a low drawer so that it can easily fit under the bed. In this case, be sure to attach long handles.