For anyone, the bathroom is one of their favorite places. After all, where else can you lie in warm water relaxing, forgetting about the problems and fuss ... However, the coating of the bath itself eventually wears out and becomes yellow, forming spots. Now the restoration of bathtubs is widely used, the reviews of people about this process are the most enthusiastic. After all, there are many materials that update the old coating. The appearance of any bathtub becomes as if it had just been bought and installed.
Ways to restore bathroom coverage
Today, there are three ways to update an old bathroom cover:
- use a brush to paint over damaged areas;
- make an acrylic liner;
- bulk bath method.
Restoring the coating of a bath using a brush and enamel
So, let's start with the first method, it can be called "restoration of the bath with enamel", so it will be more accurate. For the whole procedure we will need:
- a brush, preferably wide and with which hairs do not fall out;
- waterproof sandpaper on a fabric basis;
- some kind of cleaning powder;
- respiratory mask.
Armed with all this, you can get to work. In the hardware store you need to purchase a bath repair kit. It includes an epoxy resin-based paint composition, as well as a thickener or hardener in a separate container. You need to carefully read the instructions, which says in what proportions to mix the two components. When the necessary composition is ready, you can begin the operation "restoration of the bath with your own hands."
Preparing a bath for surface restoration
The bath is washed with a cleaning powder to eliminate contaminants and bacteria that may not allow the new enamel to fully grasp.
Then it follows, without washing off the powder, to clean the places to be restored with sandpaper. Chips need to be cleaned to metal so that the surface becomes smooth and without tubercles.
Then it is washed from particles of wasted enamel and powder.
After that, the bath is filled with hot water, and then ten minutes later it is lowered. This is necessary so that the surface warms up well, for the quickest drying of moisture.
You need to put on bags on the faucet and shower to prevent accidental ingress of water on the still not frozen enamel, because the restoration of the bath with your own hands does not tolerate a mistake.
If there are large chips, then an automotive polyester putty is used to eliminate them. When it dries, it must be cleaned with sandpaper, and then eliminate the dust formed with a vacuum cleaner and a rag.
New enamel coating of prepared areas
It is necessary to mix the contents of the two containers, pouring a thickener into the enamel. Everything needs to be done quickly, because an hour after mixing the composition, it will be unsuitable. Next, using a brush, enamel is applied to the finished surface. Everything needs to be carefully aligned. Then, without waiting for drying, you can then cover with a second layer. These actions need to be done in 50 minutes. If you are not sure that the restoration of the bath with enamel will take place during this time, then it is better not to mix everything at once, but to divide it into two.
Safety precautions
All ingredients must be mixed in a respiratory mask, because these substances are toxic. Protective gloves must be worn on hands.
Bath restoration method using an acrylic liner
Using sealant, you need to glue an acrylic liner to the inner surface of the bath. This method of restoration of coverage is not suitable for most home craftsmen. This is because it is almost impossible to find these same inserts in ordinary stores. They are sold mainly in bulk to large enterprises or craftsmen who are engaged in plumbing.
The method of the bulk bath and what people say about it
Now we will describe how acrylic bathtub restoration is performed. Testimonials about this method say that it is ideal for restoring coverage yourself. Many people, having read about all the intricacies of this technique on the forums, decided to do everything on their own. Other restoration materials are often toxic, so it is inconvenient to use them at home. And the method with installing an acrylic liner is also not suitable for the reasons described above. It remains to apply liquid acrylic fill . In this way, it is really easiest to carry out the restoration, so it is used by both professionals and home craftsmen who do this for the first time in their lives. This method is ideal when restoring acrylic bathtubs, cast iron or steel.
Tools
To implement the whole process, we need:
- liquid acrylic, its other name is bulk;
- spatula is soft, elastic;
- drill and grinding wheels;
- acetone to degrease the surface;
- a respirator to protect the lungs from dust;
- stick to stir enamel, thickener, knife, rubber gloves, rags, scotch tape and newspapers.
Preparing a bath
We disassemble the holes for drain and overflow. This must be done for convenient operation. If you are doing the restoration of a cast-iron bathtub with your own hands, especially when it is old-style, removing the drain can be problematic because the thread could rust. Then the kit will have to be dismantled.
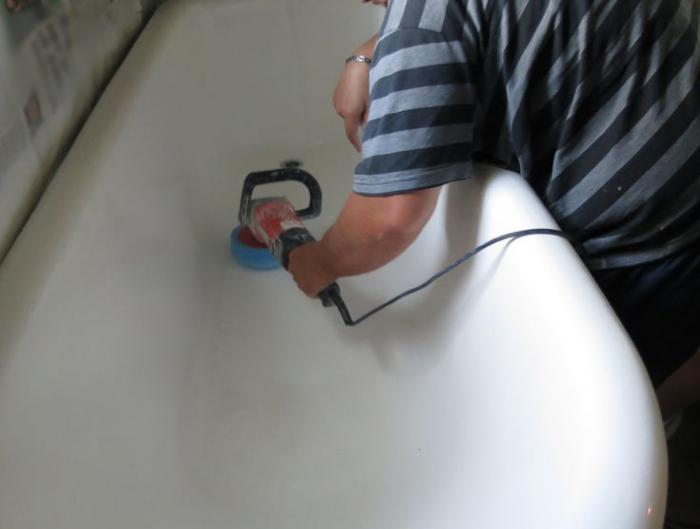
When the drain and overflow have been removed from the hole, you can proceed to grinding the surface. They do this with a special machine, a drill with nozzles, or if there are no such units, you can use sandpaper. Often people underestimate this part of the work, neglecting it, but it is worth taking sanding seriously, because it depends on how liquid acrylic sticks together with the coating. And the better everything grasps, the longer the appearance of the bath will remain sparkling and snow-white. When grinding, it is necessary to wear a respirator, it will protect against the ingress of small particles and dust into the lungs.
Do-it-yourself cast-iron bath restoration is ongoing. Now you need to remove all dust from grinding. This is done with a lint-free rag, you can also use a vacuum cleaner without a nozzle. After that, the surface is degreased with acetone. They moisten a piece of cloth with it and wipe the bath. It is necessary to ensure that there are no fragments of the old coating or fibers on the surface. Any remaining even the smallest garbage can subsequently lead to marriage. Instead of acetone, you can use any cleaning powder.
Preparing liquid acrylic for use
Restoration of bathtubs with glass (so called liquid acrylic) is carried out carefully so that dirt or anything else could not get into its snow-white color. Open the jar with a clean screwdriver or knife. Stir liquid acrylic according to the instructions with a wooden stick in slow circular movements. Do not use a drill with a nozzle for this. This may cause air bubbles to form in the mixture. So that the acrylic is homogeneous, you need to mix it slowly, adding a little hardener. And so you need to continue for 10-12 minutes, until everything becomes homogeneous.
It is very important that the restoration of the bath with liquid acrylic be carried out from the beginning of mixing the future coating to the full completion of work in an hour and a half. After all, only during this time the composition will be suitable for use. If you linger longer, it will begin to freeze and become unsuitable for further manipulations. So it’s worth immediately thinking everything over for more accurate and quick action.
We prepare containers for coating the bathroom with liquid acrylic
To evenly cover the entire surface, you need a convenient plastic can, you can make it from a bottle in which there was a hardener. It is necessary to trim its top, however, so that one corner is higher than the others. It will be like a spout on a teapot.
Protection of the floor and other undesirable parts for painting
You need to take newspapers or a large piece of polyethylene and close the floor. Using adhesive tape, glue all other surfaces where the mixture should not get. After all, restoring a bath with liquid acrylic may not be a very clean task, so it’s worth it to be safe. In addition, bags should be put on the mixers to be safe from water on acrylic when pouring the bath. You also need to put a bowl under the drain hole into which the mixture will drain.
The process of pouring liquid acrylic
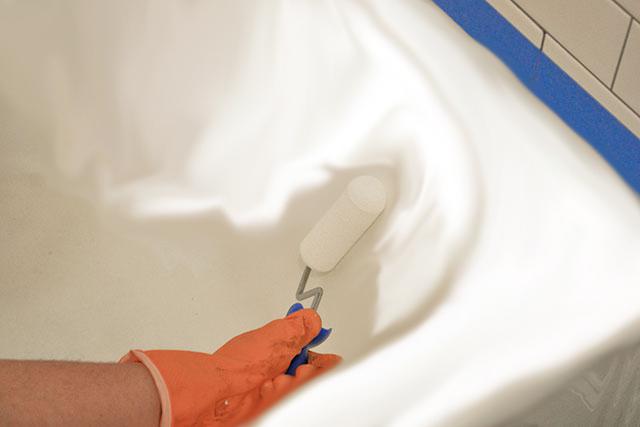
So, the plastic jar is ready, you need to prepare a flexible spatula for even distribution over the entire surface of liquid acrylic. When everything is at hand, the restoration of the bath with your own hands comes to its main part - pouring. Pour acrylic into the jar from the thickener and start pouring onto the top of the bath so that the material flows down. This must be done carefully, trying to capture the largest possible surface in width. This is done until connected to the beginning of the fill. Then, the restoration of the bath with your own hands goes into the phase of a uniform distribution of acrylic on the surface.
After this, you need to smudge and add a fill in parts of the surface where it is not there yet. Everything is done from the same place where you started, just a little lower. At the same time, the streams are aligned with a spatula so that they cover the entire surface horizontally. Now the material will begin to accumulate at the bottom of the bath, this is normal. When all the walls and top are evenly coated, take a rubber spatula or roller. They are used to align the bottom and walls. This is how acrylic bathtubs are restored, this is a universal way.
After the entire surface is covered with a uniform layer, it is worth checking it all the same. To do this, use a flashlight, its directional light, and if there are flaws, they will immediately be visible. In basic lighting, you may not notice, because it is more scattered. The method described here with liquid acrylic is the best option for home use, because such a restoration of bathtubs received approval from both professionals and home masters. Therefore, it is worth choosing from all of the listed ones.