The patterns on the nails, which are the same size and the correct shape, seem something unattainable. But now such drawings can be made not only at salon masters, but also at home. And all thanks to the fact that stamping with gel nail polish was invented .
What is stamping?
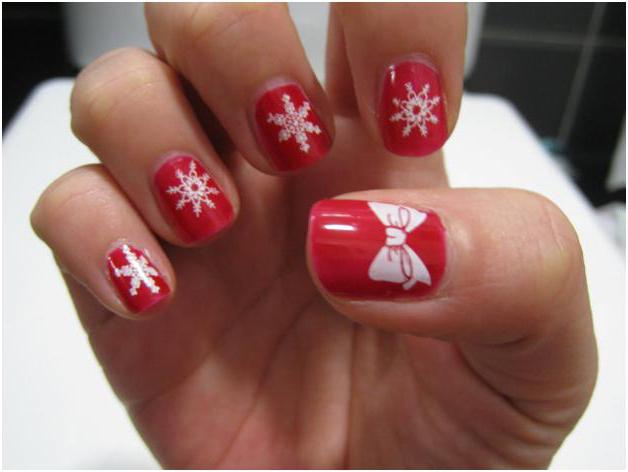
Speaking in the language of professionals, this is the usual stamping of patterns. Such a picture, although it looks like a work of art, but doing it is a pleasure. Moreover, the technique of its implementation is quite primitive. Even a child can handle it.
Some ask if stamping is gel polish? Of course! To begin with, you should decide on the choice of varnish. Do not forget that the shades of the coating for stamping should be chosen in accordance with the style of clothing and its color. Using stamping for nails with gel polish and your imagination, you can achieve unprecedented results. A manicure will turn out no worse than a salon!
List of necessary tools and tools
Stamping materials and tools can be purchased at any cosmetics store. For this technique you will need:
- A metal plate with mini-engravings of patterns carved on it. Usually, one disk contains several different prints or patterns at once. You can choose any, it all depends on your own preferences.
- Special coating base.
- Varnishes, with the help of which the base and images will be applied (several bottles).
- Fixing agent of transparent color.
- Liquid for removal of varnish (there should not be oil in the composition).
Each tool from the list can be purchased both individually and in a set.
How to do it right
Some tips to help stamping with gel polish:
- Before starting all procedures, wash your hands in warm water. Be sure to dry each hand with a paper towel and wipe with a clean towel. The surface of the nails should be degreased with acetone.
- The next step will be the application of the base layer. After this action is completed, you need to make sure that it is completely dry. Otherwise, the patterns may be fuzzy. In addition, the unfinished base layer is easily folded, and this is fraught with the appearance of wrinkles on the nail surface.
- It's time for a stamping disc. If it was recently purchased and has not been used yet, you need to remove the protective film.
What you need for good stamping
The next step will be the application of varnish on the disk. It is necessary to cover the entire surface of the stamping stencil.
The surplus that has appeared must be removed using a special scraper, which the nail masters call a scraper. This is done by quick movement. A little trick is that the scraper needs to be held so that the angle is 45 degrees. Care must be taken to ensure that the scraper is not too pressed into the surface of the disk. The varnish should remain in the recesses.
After that, you need to press the stamp to the disk, slightly rolling on its surface. This should be done quickly enough, otherwise the varnish will not have time to dry and the picture will not print well.
At the next stage, you need to press the stamp with the pattern to the nail plate. It needs to be rolled across the surface from edge to edge. If the picture is not completely obtained, it means that the varnish is already dry or the nail is not enough fat-free.
Follow these rules, and your manicure will turn out beautiful and accurate.
It should be known
How to use stamping for nails (gel polish requires compliance with all the nuances), the following tips will prompt:
- The varnish printed on the surface of the skin can be easily removed with a cotton swab or brush.
- Created images are taken with a liquid that does not contain acetone. Otherwise, you can easily damage the gel polish layer.
- If the stamp does not produce a clear enough image, or if it is not completely printed, you need to erase it and perform all the steps again. Better to achieve the perfect result. If you are unable to transfer the picture and the gel polish dries quickly, this is easy to fix. Just wipe the plate with acetone. This will allow the varnish to dry more slowly due to the fact that small droplets of liquid remain on the disk.
- You can try to move the cuticle around the nail plate. Thus, a stamp with a pattern can capture most of the surface.
- When choosing a liquid for removing gel polish from nails, you should choose the one in which there is no oil. Otherwise, the pattern will be fuzzy, blurry or not printed at all.
Top secrets to using stamping
A few tricks that will allow you to learn how to make stamping on gel polish is not worse than salon masters.
- Before starting a manicure, you should practice drawing a foundation. Of course, the first attempts can be unsuccessful and stamping with gel polish will turn out to be not quite ideal. But soon all the moments will be mastered.
- Do not choose varnishes with glitter or mother of pearl as the main coating. Images made with it do not look as contrasting and clear as we would like.
- After the paint has been used on the scraper, it is immediately cleaned with a paper towel. It is not necessary to wait until it dries.
- No need to use gel polish to create images. Such a product will not be able to print on the surface.
- The coating on the plate dries in an instant. And on the surface of the nails it hardens much more slowly. Therefore, you should stamp the pattern as quickly as possible. It should be borne in mind that the increased temperature in the room, working air conditioning or an open window contribute to even more drying of the varnish. Therefore, before stamping, you should remove everything that can affect the solidification of the coating.
Application Rules
To learn how to stamp on gel polish, pay attention to the following tricks:
Paint needs to be applied to patterns quickly and confidently throughout the disc. No need to apply gel polish to the edge of the picture, and then use a scraper to distribute it on the necessary part of the plate. In this case, not all recesses will fill evenly.
Before stamping, you should think about what angle the image on the nails will be at. It is necessary to determine this in order not to twist the stamp with the printed pattern for a very long time, otherwise it may begin to dry out.
Do not use hand cream before applying gel polish. As mentioned earlier, a low-fat surface is poorly stamped.
After all the necessary procedures have been performed, it is recommended to wipe the skin with a cotton swab, which was previously dipped in liquid to remove varnish. You can use a special corrector.
Some nail masters use small strips of adhesive tape for this purpose. They apply its sticky side to the skin. Scotch will attract all the small particles of gel polish. Stamps can be cleaned in the same way.
Application Methods
Stamping with gel polish can be done in two ways. First, the varnish layer is covered with a fixing agent, and then decorated with a pattern. And in the second case, the image is stamped. After that, fixative for gel polish is applied to it.
The advantage of stamping is that you can change the patterns on the nails as often as you want. Just erase the pattern and apply a new one that you like. The stamp and disc must be cleaned of paint particles remaining on it. In this case, the base layer remains in place. A new nail design will not take much time, which is undoubtedly very convenient.
The applied drawing is fixed with a transparent color gel. It will not take long to wait for the pattern to dry. Image fixing is fast enough. Apply the gel to the pattern with a single swab, with a quick movement.
No need to press hard on the surface of the nail with a brush. One drop is enough, which should be distributed according to the picture. Before embarking on stamping, you should think about in advance how the pattern will eventually look and color to match.
With the help of such a simple technique, you can make a chic manicure with your own hands. It is enough to work out several times and stamping will turn into an amazing process, the result of which you will really like. The reviews of those who have already tested the equipment are mostly positive. There are women who could not immediately master it. But a little training, and they found a great way to make their nails attractive without the help of professionals.