Today, shelves in the interior have become much more popular than bulky cabinets or other furniture for storing things. They do not take up much space, their design can be very diverse. In addition, you can use a variety of materials for the manufacture of such shelves. In addition, they can be assembled on their own, unlike large furniture that you can only buy.
Varieties of models
Despite the fact that the shelves in the interior look pretty pretty, it’s worthwhile to figure out which type is suitable for a particular room in order to achieve the maximum effect.
The first and most common form is the wall shelf. Most often, it is located near the desktop, sofa, bed, etc. These types of shelves can be divided into three small categories.
- Classic designs. This type is the most common, as it is simple in design, as well as in terms of assembly and installation. The shape of the product can be either square or asymmetric.
- The second type is more narrowly targeted - it's floor. They are located, as the name implies, closer to the floor. These shelves are fastened in the hallways, corridors. The shelf is used to store shoes of various sizes.
- Types of shelves in the room can also be open and closed. If we are talking about wood as the main material, then they are most often performed with decorative carvings, serve as decoration of the room. They can be made with or without sliding glass.
One of the categories of shelves is a suspended structure. It differs significantly from others in that it is attached not to the wall, but with the help of cables, straps, chains and other things.
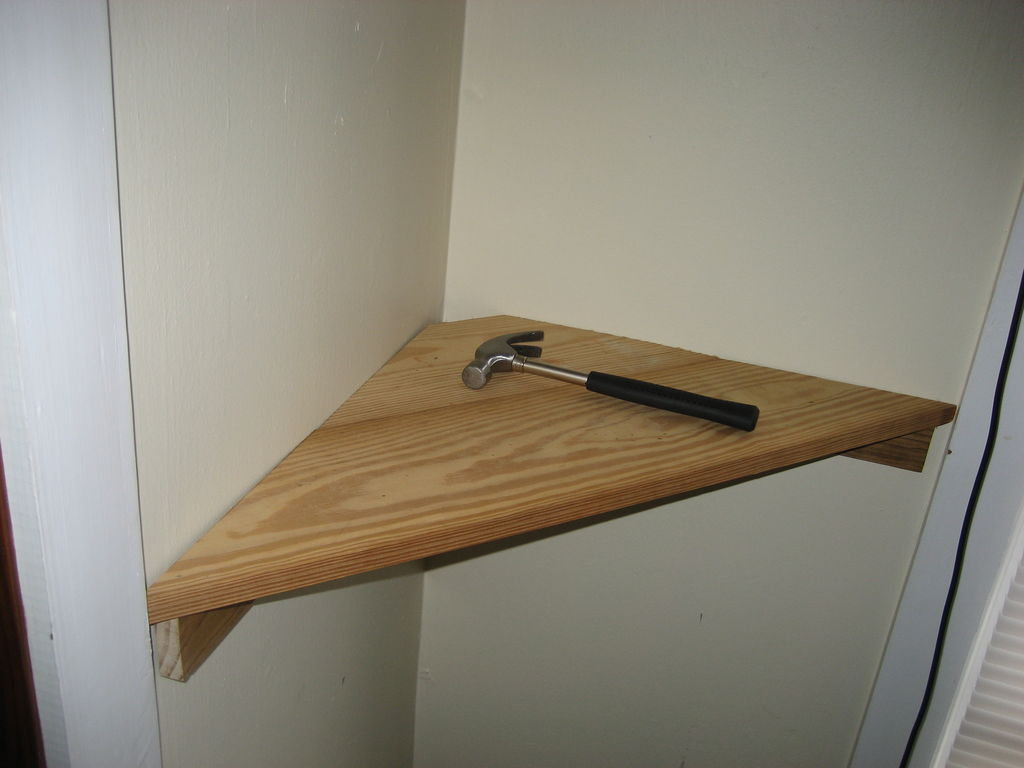
The last large group of such designs is angular. As the name implies, the place of installation of such products is the corners of the room. They differ in that they can be mounted not only to the wall, but also to the ceiling.
Making an object from wood
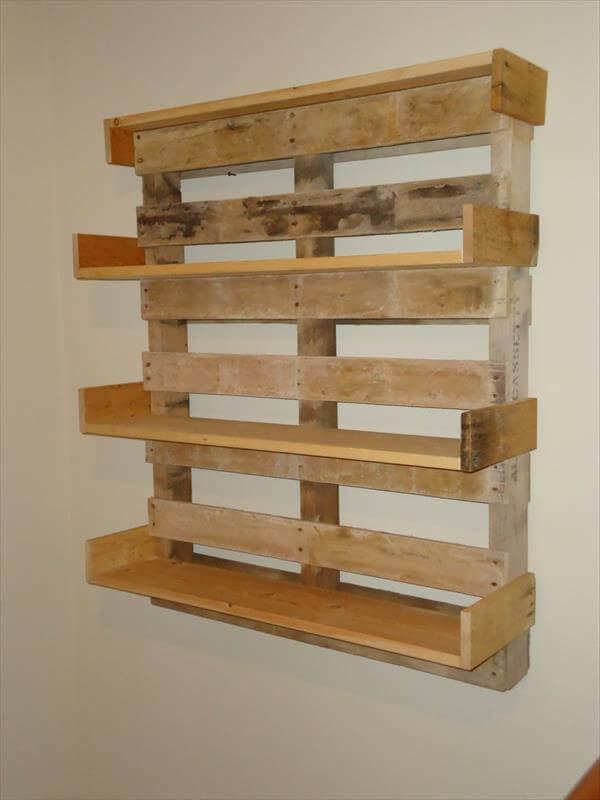
Self-made wooden shelves are the most widespread option. For successful work you will need the following tools and materials:
- wood with a thickness of 2.5-3 cm;
- timber with a section of 2 x 3 m;
- for mounting to the wall, one metal bracket is used;
- pencil for marking;
- building level;
- electric drill and self-tapping screws for fixing.
After that, you can begin to make a shelf of wood with your own hands.
- Using a pencil, markup is made where exactly it is necessary to install the shelf. Also, if there are several, then the distance between them in height should be at least 30 cm.
- It is best to draw horizontal lines using the building level. In this case, you can not worry that the shelf will turn out to be a curve.
- After the marking has been carried out, you can proceed to the fastening of the segments cut from the bar. It is worth noting that the minimum side length is 30 cm. In this case, the depth of the resulting design will allow you to easily place 3-liter cans, for example, or boxes.
- When the bars are attached, it is best to use self-tapping screws under the hexagon. Three locking elements are enough for a long length and two for a short one.
- It is best to work only with treated wood, and therefore, before proceeding to fasteners, it is best to sand the material with sandpaper. You can also use a grinder with a special nozzle.
- You can start attaching boards to the bars already fixed to the wall. For fixing, ordinary screws with a length of 3.5-4 cm are used.
- Next, you have to buy a special pipe for furniture. It will be needed in order to strengthen the structure.
- The product is cut to a size that will correspond to the height between the floor and the first shelf.
- The material is inserted and fastened with flanges.
- Following the same principle, they strengthen all other regiments among themselves, if there are several of them.
Shelves for flowers
Experts recommend making a shelf designed for setting flowers, also from wood. This material is the cheapest, practical, and also goes well with herbs.
In order to successfully carry out all the work, the following tools and materials will be required:
- Two wide boards 700 mm long and three pieces 280 mm long.
- It will also require three pieces, but already narrow boards with a length of 280 mm.
- Drill, sandpaper, paint or wood varnish.
- Hammer, nails, twine of decorative type.
After that, you can begin to make shelves for flowers.
- The first thing to do is to process the wood in the same way as in the first embodiment, when assembling a conventional structure.
- You need to take two long boards and lay them on the edge. After that, three wide bars of 280 mm length are attached to these two specimens. The result should be a shelf with two long boards on the sides and three short stands.
- Next, the narrow short boards are attached to the wide horizontal so that they form a limiter. It is important that flower pots do not fall from the shelf.
- After that, you need to proceed to fixing the shelf with your own hands to the wall. To do this, at the top, in two long bars that serve as walls for the product, one hole is made.
- After this, the wood should be treated with stain and varnish. All uneven corners are again carefully processed with sandpaper and the final coating is carried out.
- Decorative twine is threaded into the finished holes. To fix the structure, it is necessary to tie strong knots at the ends of the twine so that the shelf does not fall.
That's all, and the structure can be hung in the right place. A shelf in the hallway with flowers will look pretty pretty.
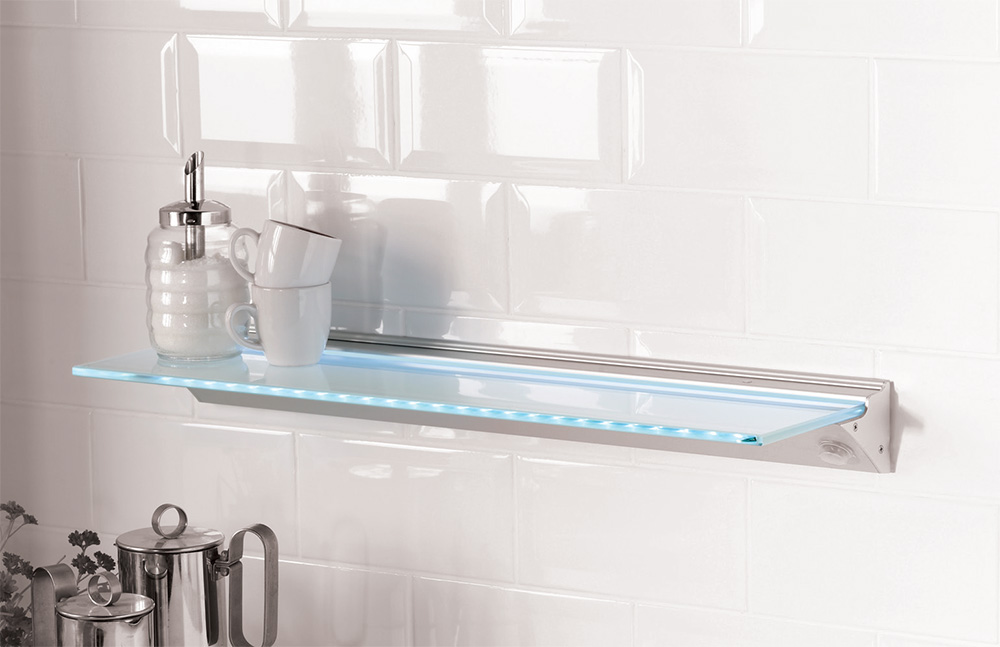
Advantages of glass structures
Such products can be made not only from wood. Successfully used here is such a material as glass. Of the advantages of such structures, the following can be distinguished:
- The first and quite important is moisture resistance. Therefore, the place of their installation may well be the bathroom. Wood products cannot boast of such.
- Glass is characterized by high resistance to any chemical composition. Therefore, to clean the shelves in the kitchen, for example, glass, you can use any cleaning agent.
- The washing process itself takes quite a little time and is easy.
- The life of such products is almost eternal. Such a structure made of glass will serve until it is broken.
Assembly assembly
To begin with, it is worth saying that for the successful completion of all work, certain equipment will be required. Firstly, you need a good glass cutter. Secondly, it will be mandatory to have a grinding machine with 120 grit abrasive sandpaper. It is recommended to rent these tools in case you need to make a structure in your home. If it will be necessary to produce many such products, then it is better to buy them, of course.
How to make a bookshelf? This issue is not in vain considered precisely here, since shelves made of this material are excellent for print media. The only thing worth noting is that depending on the number of books that will be on the shelf, you need to increase the thickness of the glass itself.
When the desired instance has been found, you can start cutting the blanks of the desired size. This is done as follows. A straight line is drawn with a ruler and marker. After that, the marker changes to a glass cutter, the ruler remains, as it will serve as an emphasis for the working tool. The glass cutting process must be carried out confidently and with smooth pressure. In addition, this work can only be done on a perfectly flat surface, which is also covered with rags. It is worth noting that this instruction is suitable only for ordinary, albeit thick glass. If the workpiece is a hardened type of product, then you will need a special automatic machine, which is only in the workshops.
How to make a bookshelf with round edges? After the workpiece has been cut, its edges will be sharp, it is clearly not worth hanging such a product, since you can get injured. It is here that you will need a grinding machine. If it is not, then, of course, you can carry out all the work manually, but it will take much more time. Edges need to be worked up until they become round or at least blunt so as not to cut the residents.
Product fasteners
In order to fix the glass shelf with your own hands, you can use two methods. The first is the use of an aluminum profile, the second is the use of special holders. It is worth adding that they do not differ in their functionality and both are quite reliable, the only difference is in the installation process.
If we talk about the holders, they are universal and fit a shelf with any thickness of material. The aluminum profile will have to be chosen clearly by the thickness of the glass.
Mounting the glass shelf holders is quite simple. They consist of two separate parts connected together. The first part is the base, which is attached to the wall, the second part is a decorative decoration. To carry out the installation of fasteners, you need to pull the main part out of the decorative stop. Marked places on the wall, screw the dowels. The base will be fixed on them.
Here you need to pay attention to the fact that to securely fix the shelf you need to use at least two holders. If a shelf in the kitchen, for example, and a large number of items will be stored on it, then it is worth using more holders. Another important point is that not too strong dowels can go in the kit. In this case, they will have to be replaced with stronger mounts.
Plywood constructions
You can assemble a shelf with your own hands from plywood even if the owner has never worked with furniture. This is possible due to the fact that practically no special knowledge or skills are required here, and if you select a specific mount, the process is simplified even more.
To fix such shelves, you can use the pelican mounts, decorative brackets or hidden anchor bolts. After the mount has been selected, it must be mounted on the wall at the required level. If you have chosen the option with a "pelican", then all that remains is to cut the structure of plywood of the right size, cover it with varnish or paint and simply insert it into the clamps. Shelf made by hand. However, it should be noted that the carrying capacity of such a design is very small.
Brackets and anchors are thought to be better than pelicans. And the anchors are also notable for the fact that they are not visible. Carrying out fasteners is also quite simple. In the wall, you need to drill a hole for the size of the anchor. The same thing is done in a plywood shelf. After that, the shelf is mounted on the finished mount. It is important to note here that the raw materials for the construction should be much thicker than the bolt. Suppose an anchor bolt has a diameter of 10 mm, which means that the thickness of the material must be at least 30 mm.
Plywood shelf
This kind of shelf, made with your own hands, can be an excellent decoration for any room. In addition, it can either occupy a small space or be located along the height of the entire wall to accommodate the maximum number of objects. In order to successfully assemble the structure, the following tools will be required:
- electric jigsaw;
- wood drill and drill;
- hammer drill;
- hammer;
- pins, glue;
- rectangular pieces of plywood.
It is important to note here that all rectangular elements must be identical in size, for example, 20 x 30 cm. It is worth noting that for convenience you can create a drawing of the shelf on the wall so as not to get confused during the assembly process. All parts that will be used for construction must be well sanded. Installation of the first module is as follows. The first segment is laid on the floor along the wall. After that, you need to attach two side parts to it. The left side should be mounted perpendicular to the wall to form a sidewall for the shelf. The right part is mounted in parallel with the wall. The next module is installed in the same way, but adjusted for the fact that now the left part will be parallel and the right one is perpendicular. All parts are attached using wooden pins. For each fastener, you need to drill a hole in the plywood. The size must be such that the pin enters the hole with great difficulty, then the shelf will be reliable enough.
If we are talking about a horizontal surface, then the hole is made in the plane, but if it is a vertical one, then at the end of the plywood.
The original idea may be to install several whatnots next to each other, but each subsequent one should be lower than the previous one by one module. In addition, it is desirable to interconnect all the shelves of this type.
"Suspension"
Another rather original variant of the shelf consists of plywood and a rope. To do this, cut several blanks from a large sheet of plywood. A small hole is made in the corners of each section so that the rope can pass. Pins are attached under the threaded rope. It is necessary to attach the anchor to the ceiling complete with hooks or rings. Naturally, the edges of the rope are attached to them.
Similarly, you can use a chain instead of a rope. Then it is best to use hooks, since it will be possible to hook chain cells to them. Some may find the hooks too unreliable. In this case, the chain can be locked in a different way. Holes are drilled in the corners of the room, a chain is passed through them, and a stop is screwed into the desired link. It could be a bolt, for example.
How to make a shelf from chipboard?
It is recommended to start assembling this kind of shelf with the preparation of drawings. It is best to draw two options, one will show the shelf in finished form, the second will show the shelf in detail. An excellent option would be to make an angular structure. To successfully assemble the product, you will need several of the following materials:
- two radius shelves 19 x 19 cm;
- two radius shelves 19 x 10 cm;
- two racks 60 x 26.5 cm;
- two racks 44 x 26.5 cm.
Corners for fastening the shelf may be needed. In order to successfully prepare the side segments, it is necessary to make markings on the workpieces. To do this, you need a compass and a pencil. It is important to know that the shelf should start from an even angle, and only then go to the bend. If you immediately start with radius segments, then it will be rather difficult to glue them together, and the shelf itself will turn out to be inaccurate.
In order to get two identical blanks without problems, you need to take two chipboards, glue and connect them together. For such a fastening, a clamp can be used successfully. The inner sections of the shelf should not protrude beyond the outer wall, and therefore they should be slightly smaller in size. In addition, it is best to use a jigsaw for cutting workpieces, since in this case the risk of formation of sloppy ends is reduced. If they nevertheless arose, then in order to get rid of them, it is necessary to use a grinding machine. As a nozzle for it, sandpaper with fine grain is used.
Further it is worth noting that an edge tape is required. When all the structural elements are cut and ground, you will need a hot iron. With this device, the tape will stick to the edge of the shelf. Also here you need to know a few nuances:
- Temperature selection. It is important to choose the average value for the iron, which is between the first and second level of heating. If the temperature is made too high, the tape will melt and damage the edge, and a too low indicator will not give the desired effect, and the tape will not stick as it should.
- In order to avoid deformation of the edge during operation, a fabric lining must be laid between it and the iron. On the surfaces of the bends, it is necessary to press the tape to the edge only with the iron nose. Pressure from the entire iron immediately is likely to damage the shelf. Shelves in the kitchen made of such materials can also be installed.