Swing ... This word caused such delight in childhood! And adults sometimes want to refresh that amazing feeling of flying to heaven. Have you ever thought that you can make your own swing in a garden or summer cottage? And it is not as difficult and troublesome as it seems at first glance. We will tell you how to make a swing, safe and comfortable! And first of all, we will consider all their diversity, from which you can choose something of your own.
Types of country swing
The most common materials for construction are metal and wood. But we will tell you about the use and improvised utensils. However, in the beginning you need to choose the category of construction that you will need:
- Portable. Mobile swings that can be moved, carried around the site.
- Family This is something monolithic and massive with seat-chairs and even sofas. The supports here are quite heavy; thick chains lead to them. It can be arranged as a gazebo with a canopy.
- Baby. They are attached both to their own support, and to a tree, any strong beam. Seating can be the most unexpected thing - from the pelvis to the old snowboard.
Also, home-made designs are divided into single, hammock, hanging, deck chairs and so on.
Pallet Seat
If you are thinking about how to make a swing with your own hands, then this option is for you. Wooden pallets (pallets) may well be on your site after the delivery of building materials or other cargo. From the pallet you get a great "seat"!
In addition to the pallet, you will need a strong rope and, in fact, a support to which we will hang the structure. The pallet can be cut out, calculating a place for a child or an adult "passenger". And it’s nice to combine several palletics into one, so that in the end you get a wide hanging sofa. Agree, great! Another option is to build a structure with a back from two pallets.
How to make a swing from pallets? First of all, we clean the surface of the tree from dirt, be sure to sand it (to avoid splintering). To get a long-lasting swing, paint the pallets with paint or stain, cover with waterproof varnish.
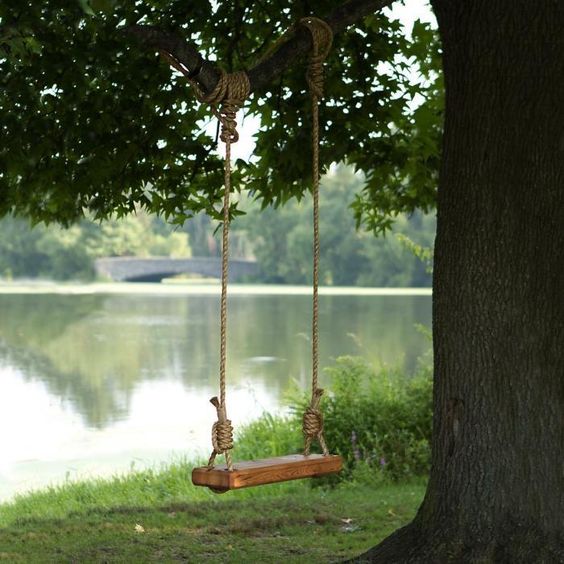
Board seat
How to make a children's swing? Another easy way is to use a suitably sized board. Like the pallet, it also needs to be sanded, coated with paint or protective varnish.
The second stage is to drill along the narrow edges for two holes for the ropes. To ensure that the rocker is stable, on the lower side underneath these holes we fasten two narrow props. In each of them, it is also worth drilling 2 holes for the rope in the right place. This will not only help the mount stay better, but also reduce its friction against the tree.
Snowboard seat
How to make a swing yourself (yourself)? Use an old waste skiing board. Thin and elegant, it only at first glance seems unreliable. The snowboard has a strong metal base, which is only lined with plastic on the outside.
A little difficulty here is to drill rope holes in a dense material. In addition, since the surface of the snowboard is rather slippery, it is worth making handles for holding on ropes. Or stick a rubber mat on the seat.
Seat made of logs
Let's look at how to make a swing for a summer residence here. We will need two rounded bars. If they are not polished, then sand them yourself with sandpaper so that the "passenger" of the swing does not plant a splinter.
It is best to fix the logs with each other with a dense rope - a sea knot. And from this attachment, stretch the rope to the support from both sides.
Hoop and rope seat
Surely you saw such structures in parks and recreation areas - a circle with a seat from interwoven ropes. And how to make a swing in the country with your own hands in a similar way?
We need a regular gymnastic hoop, which is wrapped in foam rubber, artificial leather or other soft material. Then we take a tight rope for sitting (ordinary linen is also suitable) and begin to weave a web inside it. The point is that we make loops (tying both ends of the rope to the hoop). And the task is to link these loops in the middle between each other, thereby pulling them and making a comfortable seat. At the end, a circular braid with a fastening knot on each loop is carried out along them (loops).
To sit on the web was soft, you can sew a round foam pad. By the way, to make a swing (photos of some models are presented in the article), it is not necessary to bother with weaving the ropes - ready-made designs of this type are on sale.
Pelvis seat
How to make a swing for dolls? Do you have an old unnecessary (and possibly even full of holes) large metal basin? If there are strong supports, then such a seat is suitable for children.
Four holes are drilled in the walls of the pelvis for fastening the ropes, and a soft pillow is placed inside. That's all a simple invention, which remains only to hang.
Canvas seat
If you are looking for an idea how to make a swing from metal, then you will like this option. We will need chains for attaching to the support and two iron frame triangles (an adapter between the chains and the seat). Everything is in place?
And from what are we going to make the seat itself? This is a tight tarp that stretches between triangles. Having swept it through the side-beam of this metal structure, it is advisable to flash the material in several rows with strong nylon threads - for better reliability. However, even in this case, such a seat is more suitable for young children than for adult "passengers".
Chair seat
One easy way to make a swing from a tree is to craft seats from old chairs. The first thing we ruthlessly saw off the legs. Then you can paint the chair with paint of a cheerful color. Or just varnish - after all, the chair-seat will have to be on the street.
But there are several options for attaching ropes:
- We need two strong metal rods that do not go beyond the size of the "seat". Then we drill four holes in the corners of the chair seat. We skip a rope into each of them. Under the chair we fasten them tightly to the rods. To each - two knots of rope.
- We pin boards to the bottom of the chair from the bottom so that their edges protrude. Done? Now in each of the 4 protrusions we drill a hole into which we insert the ropes, fixing them on the bottom side with a fixing unit.
- We make a small shield from the boards, we attach it to the bottom of the chair. As in the previous case, its edges should protrude beyond the seat. On the right and left sides of the shield we drill two holes. Also, a groove is made on these two sides of the seat. It will take two ropes - on the right and left side. The rope hangs into the first groove of the shield, passes under it, emerges from the second groove, then goes along the bottom of the seat and goes up through the hole in it.
Swing with a longitudinal roll
In other words, it is a seat with a vector of movement in the longitudinal direction. Rope mounts are drilled on both sides of the wide part. Why do we need such a swing? Of course, for riding a large (naturally, children's) company.
How to make a swing of this type? From polished beams, boards, connecting them from the underside with sockets-adapters.
Fastening to a support bar
So, we have chosen the option of a suitable seat. In continuation of the topic of how to make a swing, the next step is the fastening of the “seat” to the support beam. You can choose one of the following methods:
- A carabiner with a girth of a bar. You can either order such models in the Internet market or find them in the household goods store. Mounting carabiners are found both round - on a rounded bar, and square - on a regular one. Their sizes (to cover the beam) are adjustable.
- Through fastening with a carbine. Here you have to drill through the seat and pass through it an anchor device for the rope or chain of our swing. Fixing must be fixed with nuts!
- Suspension for 4 points. Most of all, this is typical for a swing bench or a swing bench. Two points here on the back, two - on the seat itself. Here you can reduce all the ropes (chains) into one ring (connecting common carbine), from which each lead to its own carbine. There is a second option. This is the installation of a fastening system with four carabiners, each of which is responsible for its own rope, coming from the back or from the seat.
- Hooks. An original solution is a fastening system fixed on 4 hooks driven into the side walls of the support posts.
- Iron eyelets (metal rings). In the wooden crossbeam, holes are drilled into which similar rings are inserted. A rope passes through them. The seat itself bends around the front and rear.
- Reiki How to make a do-it-yourself swing original? You can not use ropes and chains, but make holders strong rails mounted on a transverse beam. How will the seat swing? The beam can be mounted on the pin, which will rotate with it. Or the rails are mounted on a metal frame that rotates, slides back and forth along the beam.

Where to hang a swing?
How to make a garden swing? We figured out the seat, the mount. But what about the support? It must be reliable, aesthetic and safe. For the summer cottage, the following is well suited:
- Metal pergola. This is an arched construction made of bent pipe. Ready-made options are sold - you do not need to cut yourself, cook. Just mount securely into the ground. What is the best option for giving - you can plant nearby climbing plants that beautifully "hug" such a design.
- Wooden pergola. This option is done by you yourself from the bars. You can arrange a pergola in the form of a gazebo or a children's town with ladders. Here the swing can be removed, turning the pergola into a recreation area (just cover it with an awning) or a playground.
- Strong tree branch. The classic version for attaching a children's swing.
We build a support
We will also provide tips for those who want to build a swing support on the site, and not a universal design. There will also be several options:
- In the shape of the letter "X". We will need 4 logs of the same size. The beams are placed to each other on each side in the manner of the letter "X". It is important to cross them as high as possible - this is where we will install the cross beam for the swing. The logs in the place of the joint are fastened with a strong long nut with a wide iron gasket - for greater reliability. The transverse beam is fastened to each of the tops of the letter "X" in the same way. Already in its lower part we screw in two fasteners with rings, in each of which we will extend the rope holding the seat. The base of the letter "X" is dug into the ground - into a hole with pre-flooded cement.
- In the shape of the letter "A". Another convenient and simple design. Support pillars dig into the ground to each other at an angle. Here they resemble the letter "L". Closer to the bottom they get off the crossbar. Here it turns out already "A". A horizontal horizontal beam is placed and securely fixed to the tops of two "ash" from logs. For greater reliability, it is fixed on supports with inclined short boards on both sides.
- With metal pipe. Another good option. Just for those who are interested in how to make a do-it-yourself swing from metal. In principle, it is better to use wooden poles - they break into the ground and tilt each other in the manner of the letter "L". The metal nozzle nozzle is made under three diameters. Two - under the tops of "L", one - under the horizontal beam. By the way, instead of the pipe, you can use a metal triangle. It connects the tops of the supports, taking on the main mounting load.
- In the shape of the letter "L". The tops of the support beams here should have an oblique cut, since they will not adjoin each other - a longitudinal beam will be immediately fixed between them. Supports also dig into the ground and cement. At the top, a “sandwich” of three beams (supports and transverse) should be fixed with a strong bolt with metal gaskets, because the load on the structure is high.
Step-by-step instruction
We have considered with you many options for seats, fixtures and supporting structures. Let's take a closer look at one embodiment of the idea - the assembly of a swing made of metal.
Here is what specifically will be needed:
- file;
- sandpaper;
- welding machine;
- electrodes
- components for mixing cement: suitable containers, water, cement, crushed stone, sand;
- metal pipes;
- fasteners (bolts and nuts);
- a grinder and a set of metal disks for it;
- spanners;
- shovel.
Instruction:
Step number 1. We need to cut the necessary elements from the pipes:
- Side racks: 2 pieces of 2 meters.
- Crossbeam: 1 piece 1.5-2 meters long.
- Slanting elements for fixing the beam to the support: 4 pieces (2 on each side), the length is at your discretion.
Step number 2. If "barbs" form on the pipes after cutting, remove them with sandpaper or a file.
Step number 3. Now you need to weld the elements to each other. The crossbar is fixed on the supports perpendicularly, at a right angle, the oblique elements of the base, giving additional rigidity, under the oblique - 45 °.
Step number 4. Further, for the construction, trenches are excavated with a depth of at least 0.8 m. Their length should be equal to the distance between the "legs" of the letter "L" of each support, and the distance between the trenches themselves should be equal to the width of the horizontal crossbar.
Step number 5. At the bottom, a "pillow" is made of sand 10-20 cm thick, which must be carefully tamped. We prepare a concrete solution: sand, crushed stone and cement are mixed in a ratio of 2: 1: 1. Then add liquid and “knead” a homogeneous mass. It should not be too thin!
Step number 6. Install supports on the sand cushion. Then slowly fill each of the trenches with concrete. It will freeze for about a week. All this time it is better not to touch the construction at all. Then weld metal rings or chain hooks to the crossbeam. Choose one of the seat types described by us. Secure it with special carabiners or other adapters (we also disassembled them). You can simply make holes in the seat and thread the rope through them, fixing it with fixing knots.
Step number 7. To protect the swing from corrosion, cover them with paint suitable for outdoor use at the end of work.
A country swing is a huge field for a flight of fantasy. A teenager will cope with some designs, for some options the work of a whole team will be required. Choose what you like!