Those who like to spend time outside the city, but rarely go hiking, know how difficult it is to keep matches dry, quickly make a fire or make a hot breakfast. However, experienced travelers are able to make home-made DIY trekking without much effort. Each of these devices at a minimum cost will greatly facilitate the life of beginners and experienced tourists.
Camping Jet Oven
Perhaps this is the most expensive tourist home-made for the trip, which will be discussed. The fact is that for its manufacture you will need to purchase two small mugs of stainless steel in advance. Such a stove will make it easy to heat water for tea or fry fried eggs. Of course, the gas stove in this regard is much more convenient. But the gas can end, and this small device works on wood, which can be found in abundance in any landing.
For work you will need:
- inexpensive mugs with a diameter of 10 and 12 cm made of stainless steel;
- masking tape or strip of paper;
- stainless steel strip 25 cm long and 3-4 cm wide.
In addition, you need to prepare the tools:
- a grinder or hacksaw for metal;
- roulette wheel;
- hammer;
- drill and drill;
- marker;
- pliers;
- core;
- scissors for metal.
What do we have to do
In order to make such a homemade product for a trip, it is important to act very carefully and in accordance with the following instructions:
- We start by processing smaller circles. First of all, cut the handle - it will not be needed.
- Now we carefully grind the points of its attachment with a grinder using a cutting disc. If necessary, help ourselves with pliers. The result should be a kind of stainless steel glass.
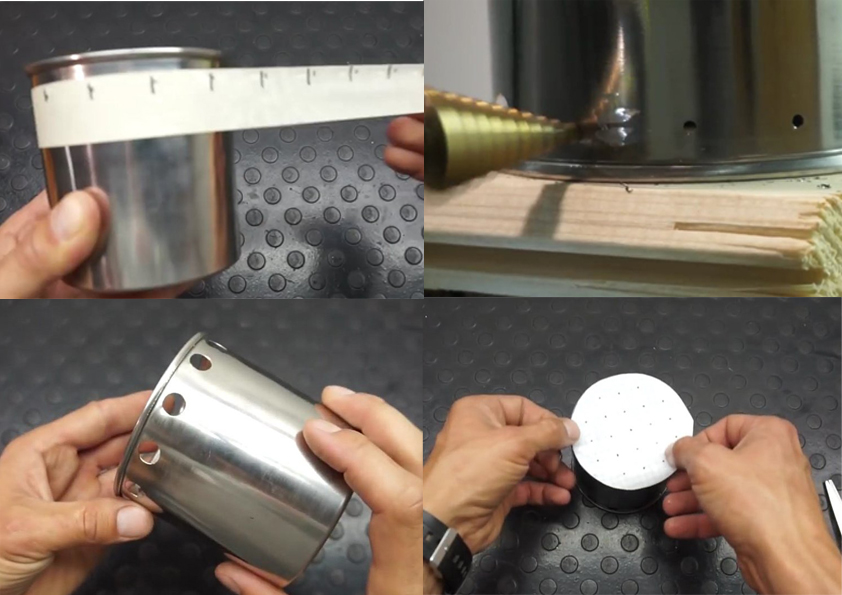
- Retreating from the edge of the workpiece about one centimeter, glue masking tape around the circumference. Peel it off again and mark out a strip of 12 divisions. This is necessary in order to drill 12 holes at the same distance from each other around the workpiece circumference. If there is no scotch tape, you can use a regular strip of paper, slightly moistened with water.
- We transfer the markup back to the mug, paint over the necessary places with a marker and use the drill and drill to make small holes.
- We remove the tape and drill the resulting holes to a diameter of 10 mm.
- We pass to the bottom of the workpiece. There you need to mark 21 holes. To get it beautiful and neat, you can outline the contour of the bottom on the sheet in the box and to begin to mark the holes there.
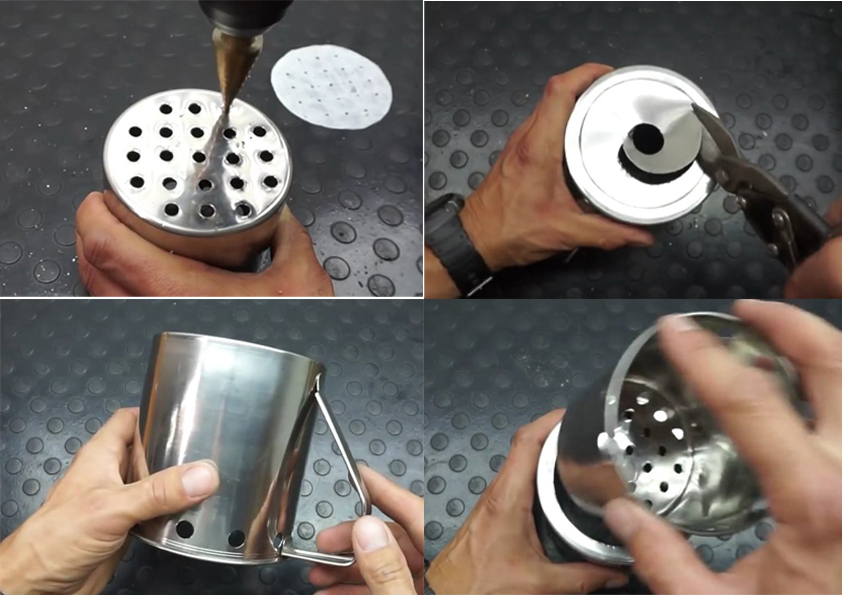
- Having slightly wetted the paper with water, glue the blank on the bottom and core the places of future holes. We mark them with a thin drill, and then increase the diameter of each to 7-8 mm.
- Now let's get to work with the second, larger circle. We turn it over and mark a circle with a diameter of 10 cm on the bottom in the center.
- In the center of the cup, we drill a convenient hole and cut out a circle with metal scissors.
- In the upper part of the circle, also stepping back a little from the edge, we drill several holes with a diameter of 10-12 mm, evenly distributing them around the circumference.
- We collect the stove. To do this, turn the large mug upside down and insert into the resulting hole a metal glass with holes made of a smaller mug (in the normal position, with the bottom down). The workpiece will enter tightly, so you can place a small board on top and gently tap on it with a hammer.
- It remains to make a cross. For this, you will need a steel strip. We cut it in half, then cut each half in the middle so that the parts can be inserted one into the other.

The stove is ready. If you install it on a flat platform and melt, the fuel supply is enough even to boil the kettle. At the same time, the handle will remain cold, so that the device can be safely extinguished or moved to the right place.
Bonfires for a bonfire
Considering homemade products for hiking and tourism, it is impossible not to pay attention to lighting a fire. Those who often do this in nature, especially after rain, know that doing this is not easy. To make the fire always flare up quickly and simply, it is better to stock up with special paraffin "bombs" before going out. Making them is very simple. You will need:
- cardboard packaging from eggs;
- cotton fiber, for example cotton wool;
- wax candles (2-3 pieces).
Everything is done very simply. Put a cotton ball in the cells of the cardboard stencil - it is better to tear it and tamp a little. In an unnecessary tin can in a water bath, melt the candles, having previously cut them into pieces.
Pour cotton wool cells with molten wax, wait until everything hardens. Using an office knife, cut the stencil into pieces and wrap each “bomb” in cling film. Each workpiece ignited by a match or a lighter will burn stably for at least twenty minutes. This is enough to dry a little brushwood and light a fire.
Bottle filter
And here is another useful homemade product for a hike. With its help, you will not be left without tea, even if the entire supply of drinking water is used up. The main thing is that there should be a small river or stakes nearby.
To make a simple filter, you need to prepare:
- plastic bottle;
- a small ball of cotton wool or 3-4 cotton pads;
- plastic bag;
- a piece of cloth, for example a clean handkerchief;
- a pack of activated carbon - if it’s not there, some charcoal from yesterday’s bonfire will do.
Operating procedure
The scheme for creating a homemade filter is very simple:
- We cut the bottom off the bottle, and make several holes in the cork. We wind the cork and turn the bottle upside down.
- We plug the neck with a ball of cotton wool or place 2-3 discs there.
- The next layer is crumbled tablets of activated carbon. The more of them, the better. If you use charcoal, then the pieces should be smashed a little so that they lie as densely as possible to each other.
- Coal again covered with cotton pads or cotton.
- To prevent the filter from clogging, we put a clean handkerchief on top.
- We cut off a corner of a plastic bag or make holes in it. Put cellophane in a bottle.
- Now pour a layer of clean river sand. If there is small pebble on the shore, it can also be used by placing the topmost layer.
Note! The layers should be such that there is room for water on top.
The filter from improvised materials is ready. The water obtained in this way must be boiled (at least ten minutes) in order to finally get rid of various microorganisms and pathogenic bacteria.
Hot gun without electricity
It happens that on a trip you need to urgently fix something. How to do it? It is best to grab a few hot gun rods from home. But how to use them? Find out now.
To make a marching hot pistol, you will need:
- lighter;
- knife;
- can;
- insulating tape.
It is very easy to make such a useful and necessary homemade product for a trip:
- with the help of a knife, we cut off the bottom and top of the jar, and cut it along so that a thin sheet of sheet is obtained;
- we turn a small fist out of it, fasten it with electrical tape;
- cut off the tip so that glue passes into the hole;
- with the help of electrical tape we fasten the bottom of the lighter like a pistol trigger;
- insert the glue stick into the hole.
The fixture is ready! Now it will be very simple for you to stick up a torn boot or to make minor equipment repairs.