Even if the apartment or house has an ideal repair made taking into account all modern trends in interior design, and for some reason the ceiling remains crooked and unevenly painted or whitewashed, the whole aesthetics of the room is reduced to zero. If you make do-it -yourself stretch ceilings, you can get rid of the need to whiten or paint them. This is also a temporary insurance against flooding from above. It is believed that only professionals should install these ceilings. But this is not so. Everything can be done independently.
What you need to install
It’s worth starting with tools and fixtures, without which you can’t do without in the process. For work, you will definitely need: a hammer drill, a gas cylinder, a stepladder, and a heat gun. You also need a level. Better if it is laser. Additionally, you need to stock up on dowels. Still in the process you need a hammer, a screwdriver, a sharp knife.
When the tool is assembled, the necessary materials are bought. It is important that you carefully measure everything before making stretch ceilings with your own hands. The dimensions are needed as follows - the perimeter of the room and the ceiling area.
Materials
For installation you need: baguette, dowels, as well as canvas. The latter will be pulled over the frame from the profiles.
A baguette is a profile bar. It is made of aluminum or plastic. The aluminum profile is more reliable. But plastic products are more affordable in terms of price. When buying, it is important to know the size of the room. A profile is acquired around the room. It is better to purchase this material with a small margin.
Further, it is also worth saying about dowels and self-tapping screws. Ceiling installation experts recommend purchasing these products with a margin. If more dowels are used in the process of installing suspended ceilings with your own hands , the design will turn out to be more reliable and strong.
The canvas will be the basis of the ceiling, as already noted. The tension element may be fabric or film. What to choose? Depends on the taste and style of the room.
Guidelines for choosing the canvas
As already noted above, there are two types of paintings. These are fabric and film solutions. Each material has its own characteristics, disadvantages and advantages.
Polystyrene is the basis of fabric webs. This is an excellent option if the cam method is chosen as the DIY method of installing the stretch ceiling.
The film material is made of polyvinyl chloride. It can be installed using harpoon, glazing bead or wedge technology. Harpoon installation is more reliable, but there is also a minus of this method - this is its complexity. It is assumed that special fastenings in the form of hooks are welded to the fabric. Then the latter are mounted in profile and the canvas is stretched.
The modern construction market presents a huge variety of paintings for suspended ceilings. They vary in price, color, structure. It’s not worth saving here - it’s better not to buy the cheapest options. When choosing a canvas, it is worth making sure that there are no defects on it.
With the help of suspended ceilings, you can change the visual perception of the room with your own hands. So, if you need to make the ceiling higher, then choose products in bright colors. If you need to underestimate the ceilings, then dark shades are suitable. When everything is purchased, it's time to move on to the installation process. Installation consists of several stages.
Installation process
Most apartments have ceiling irregularities, as well as warped walls. Therefore, the very first thing to do is to take measurements and mark the future installation site. With the help of markup, it will be possible to fix profiles-baguettes as evenly as possible.
Markup
First of all, you need to measure the height of the walls in the room where the ceiling will be installed. It is important to take measurements in all four corners. Marks are applied to the measurement sites. The difference can reach even five centimeters - this is normal. It is important to take into account how far the stretch ceiling will be from the base. The minimum distance is three centimeters. But if fixtures are also to be installed, then more space is needed.
Using a laser level, a line is drawn around the perimeter along which the baguette will be attached. But here you need to work very carefully. The line should be straight.
Unfortunately, do-it-yourself stretch ceilings can not be done in a harpoon way. To implement this method in life you need to have certain skills. It is better to use other options - they are simpler, and the result will be the same quality.
Fix the baguette
When the marking is completed, go to the process of fixing the profile to the walls. Installation will be carried out using self-tapping screws and dowels. It is necessary that the distance between the fasteners was about seven to eight centimeters.
To make it easier and easier, first the profile is glued to the wall. It should be noted that the dowel should not be mounted on the edge of the baguette - it is better to step back a little. If you will mount flashlights that attach the baguette, it is recommended to take into account the width of the lamps, the type and their number. When the canvas is already installed, something will be too late to change.
Installation of a cloth
We continue to learn how to make a stretch ceiling with our own hands. Apparently, there is nothing complicated about this. Only precision and accuracy are needed.
In order to properly install and tension the stretch ceiling canvas, you must first raise the temperature in the room. This can be done using a heat gun. You can buy it - this is a useful thing even after the ceiling is installed. It can be used to warm a variety of rooms in the cold season.
But it’s cheaper to rent it or from friends. Experts recommend taking up work with the canvas only after the room temperature rises to at least 40 degrees.
Step-by-step instruction
So, it's time to read the step-by-step instructions. With their own hands, a stretch ceiling can be installed on it even by those who have never done this. Here is the instruction:
- At the first stage, you need to unpack the canvas. It is better to do this with clean hands so as not to leave marks or stains. Next, one corner of the canvas is attached to a baguette. The canvas is preheated with a heat gun.
- Then it is tightly fixed on the opposite side to the fixed corner. Fastening is carried out using special clamps with gasket. This is necessary to reduce the risk of damage.
- Then all other corners are attached. Along with this, the ceiling is heated to higher temperatures. Together with the tension elements there is always an instruction where it is indicated how to install the stretch ceiling with your own hands. It has useful information about the base angle on the canvas. It is better to get acquainted with it so as not to make mistakes.
- The canvas needs to be slightly warmed up. In the process of heating, the clamp is removed from one of the corners. Using a corner blade, which is located in the groove of the film sheath, the web is inserted into the profile. You need to do this slowly. Holding the previous part, fix the next.
- All other corners are fixed in the same way. It should be remembered that the process will become more complicated as the matter comes to an end. Will have to make significant efforts. It is better to invite in advance for an assistant.
- When all the corners are fixed, proceed to the installation of straight sections. For this, straight blades are used. The areas where the seams are located are attached to two or three locks. Then the distance is divided into two and again secured with several locks. When this task is completed, they proceed to the installation of other sections.
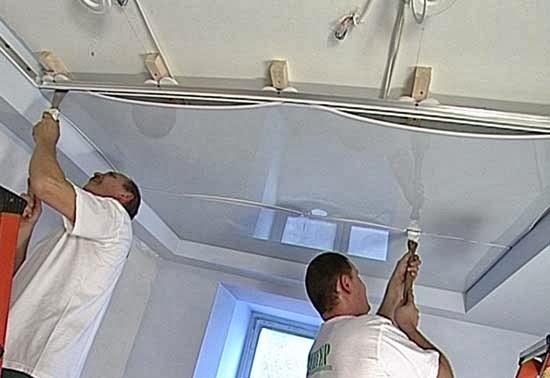
In the process, it is important to ensure that the panel is stretched as evenly as possible and without wrinkles. It must be securely connected to the bearing part. Folds are eliminated by heating the canvas and gently smoothing it. Carefully inspect the attachment points. If a defect is noticed, then it must be eliminated before the blade cools down.
Finally
This is how the stretch ceiling is installed with your own hands. Step-by-step instructions will help to do the job correctly and get a high-quality result.