The slope is a decorative trim of window openings that covers the inside of the window and the mounting seam between the window frame and the walls of the opening. When the main work on the installation of new plastic windows is carried out, then such an important question arises as the installation of slopes. Of course, many companies will offer their installation services. But the quality of the work done by their specialists often leaves much to be desired: the fastenings turn out to be unreliable, and over time the decorative elements begin to fall off, the slopes are often blown, and the design itself can be uneven. In addition, even the cheapest material for slopes will cost much more than market prices, to which you will have to add the cost of contractor services.
But if you want to independently understand the procedure for installing window slopes, you can get an excellent result at the lowest price, independently acquiring the best material for a beautiful and reliable cladding.
Types of slopes
Today there are slopes in this design:
- Plastering.
- From plastic panels.
- Plasterboard.
- From MDF panels.
- From a wooden lining.
In the article we will consider all these types in detail.
Preparatory work
To bring window openings in accordance with GOST rules, there are general instructions and recommendations for installing slopes:
- The surface of the openings must be smooth and clean of plaster, glue, dirt, old paint and any other peeling materials.
- If necessary, a crate for mounting slopes can be installed.
- Between the panel and the window opening must be present thermal insulation material.
- End profiles should be worn on the ends.
Installation of slopes in standard openings usually occurs without difficulty. But if you want to install arched or other forms of slopes, then it is better to entrust these professionals with quality work. A person without the skills of such work will certainly not be able to observe all the nuances that are required to obtain a good appearance of the structure, and to provide thermal insulation performance at the proper level.
Description of plaster slopes
Both types of slope installation work and materials have their advantages and disadvantages.
Plaster slopes are the most budget option. It will require the preparation of a plaster mixture and the desired skills with it. Such slopes are made like plastering walls, which is accompanied by humidity in the room and significant pollution. To perform such slopes, you need to carefully familiarize yourself with the priming of the concrete surface, plastering and puttying. Accordingly, such slopes are susceptible to atmospheric influences and may crack over time. Significant disadvantages of stucco slopes also include the formation of fungus and mold on them due to increased humidity. Work on installing slopes made of plaster on the windows will require the greatest time, since they are carried out in several stages, each of which involves the preparation of the corresponding material and its complete drying.
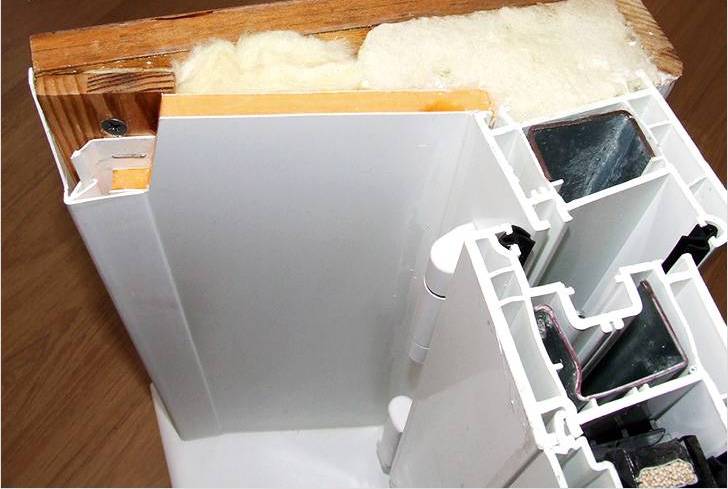
Plastic slopes
Such panels are considered the most durable, since plastic is resistant to fading, is less susceptible to weathering and belongs to the most moisture-resistant type of slopes. The possibility of manufacturing not only in white, but also under the imitation of wood will harmoniously equip them in any interior. Such slopes after installing plastic windows look like their continuation and are perceived as a logical completion of the window. The porous material also has additional sound insulation. Among other things, plastic is almost maintenance free, and any dirt is easily washed with ordinary water. But the main feature of sandwich panels is their heat-insulating properties, since there is polystyrene foam inside the panel, which is a heater. This means that heat will not leave the room, and cold will not penetrate into it.
So that the slopes do not lose their appearance over time, it is important to choose high-quality material and not to save. Moreover, the installation will be carried out independently, and this will allow finding additional funds for good material, without which it is simply impossible to get beautiful and durable slopes. The life of high-quality plastic corresponds to the life of the window.
Installing plastic slopes with your own hands does not require much effort and with a competent approach it takes much less time than performing plastering.
Plasterboard slopes
After its appearance, drywall immediately established itself as a fairly cheap, practical and easy-to-use material. Therefore, it is widely used for arranging window openings. Having a perfectly flat surface, it is an excellent basis for further decoration of slopes, based on the requirements of the interior. At the same time, installation of drywall is not difficult, and all the shortcomings of the work can be easily masked with putty.
Slopes from MDF panels
This type of finish of the slopes is one of the most durable and attractive, especially when installing these slopes on a wooden window or door. And if you precisely select the color tone of the MDF panels and the window frame, the result will be almost perfect. The advantage will be the relatively small time spent on installing such panels compared to plastering, puttying and further facing work. It is also worth noting the good soundproofing properties of MDF panels. But the obvious disadvantage of such slopes will be their high price and jewelry accuracy when fitting. It should be borne in mind that in case of improper measurements, the entire expensive panel will have to be replaced, since it will not work to increase the missing panel sizes. Therefore, it is recommended to carry out such work as a master or a person who has experience working with wood material. And not every owner has a number of necessary tools.
Sheathing of slopes with wooden lining
Like panels from MDF, here, during operation, you need precision measurements. But the errors in the calculations will not be so critical, since it is much easier to replace a damaged panel lining than an MDF panel. The differences between these materials are the manufacture of lining made of natural wood, rather than pressed sawdust and the need for its further processing and coating with protective layers. However, the tree has the ability to expand and dry out depending on the humidity and temperature conditions in the room. Seasonality also affects the "behavior" of the tree, while MDF panels are practically not affected by temperature changes. One way or another, installing do-it-yourself slopes from wood materials requires a separate study and acquired skills in order to start manufacturing complex wooden structures, where there are various sizes, tilt angles and high precision work is necessary to ensure that there are no gaps in the corners and joints of the panels.
Installation of slopes from a sandwich panels
The installation of plastic slopes should begin with measurements of all window openings where installation will take place. After you need to purchase the necessary material in any construction market or store. Usually the price there is much lower than the proposals of construction companies. It is recommended to take the material a little with a margin. Excess can always be sawed off.
The next step in the installation of PVC slopes will be punching 3-4 holes in each opening for dowels. They are set strictly on the level of self-tapping screws, since it is on the latter that the future slopes will be based. The distance from the screw head to the surface of the opening should be at least 1 cm. This gap will make it possible to densely fill the entire distance between the panels and window openings with foam, preventing the penetration of drafts and cold.
Also, do not forget to clean all installation sites from dirt, dust and exfoliating materials, which will ensure the reliability of fastening slopes.
After that, the end of the panel winds up about 1 cm behind the window frame. Now, using the mounting gun, a gap is filled with foam over its entire length of about 3 cm, the panel is clamped completely against the screws and glued with masking tape to the wall.
As it dries, the mounting foam expands and presses the panel perfectly against the window frame; there is no need to use sealant. If, after drying and expansion of the foam, the seam remains incompletely filled, the procedure for filling with foam should be repeated until there are no hollow spots at all. After drying, the foam is cut and installed on the end of the F-profile, completing the installation of the slope.
Procedure for installing slopes from drywall
There are two ways to fix such slopes: on glue or on the frame. In the case of work with glue, the entire surface of the window openings under the drywall must be cleaned with a stiff brush. As a result of cleaning, the openings should not have chipping off spots, flaking old paint, etc. The cleaned surface is richly primed. The next step will be the measurement of all window openings where the installation of slopes is required, and the cutting of the necessary parts of the structure from drywall. Next, special glue is applied to the back of the material. Following the recommendations of specialists, glue must be applied pointwise at small intervals. If you hold the glue in a continuous layer, drywall will begin to "float" on the opening. It will be extremely difficult to fix it, since the continuous layer dries for a long time. A maximum of half an hour is allotted for all work after glue preparation, so first you need to prepare all the elements of the slope parts for installation. Among the nuances of this work, the following should be noted:
- If the gap between the window frame and the opening reaches 3 cm or more, first plasterboard strips are glued close to the gap, on which the slope is subsequently glued.
- The horizontal slope on the upper opening is glued using vertical struts. So that in the future such a slope does not fall off, it is better to start the installation of the entire structure with it. After the vertical slopes will hold him with their upper ends.
To install the slopes on the windows using the frame, first U-shaped plastic profiles are screwed on the outer perimeter of the window. At the edges of the window openings, wooden or metal strips are attached, to which drywall will be screwed. All openings can be covered with glass wool, or you can fill the gaps between the slope and the opening with foam during installation. Naturally, the slats are set according to the level, and their thickness is adjusted so that all the slopes lie flat.
The fastening process is simple: the drywall is inserted into the plastic profile and tightened with screws on the extreme levels. If glass wool was not laid, then before attaching the slopes, all openings are filled with foam and clamped with drywall. The final installation will be the filling of the gaps between the slats and window openings.
Installation of panels from MDF
If you are confident in the measurements taken for the installation of MDF slopes, you can order their manufacture or cut in specialized construction companies that provide such services. Of course, this will slightly increase the cost, but ideally suitable panels with a factory appearance will be obtained. Such panels can be installed using liquid nails or a frame, according to the example of fastening drywall slopes. Just keep in mind that, unlike drywall, the MDF panel is a facing material. Therefore, it must be attached to the frame carefully, using thin cloves with a small hat. Begin fastening slopes should be exclusively from the top panel. At the end of the work, it is recommended to install platbands.
After installing the windows, the slopes remain the last but very important step in replacing the window. It is the quality of their installation that will determine the preservation of heat in the room, the durability and presentability of the appearance of the window. In order not to return to hastily done work by hired employees of construction organizations, using the above recommendations, you can cope with the installation of slopes on the windows with your own hands, saving money on quality materials. And if there is no doubt in your work, then the result will be the best.
In the event that preference was given to hired workers, one should not forget that in addition to the quality of work done, their duties include the removal of all construction waste received as a result of the installation. Upon completion of work, contractors are required to carry out express cleaning to remove concrete dirt and dust, to take away the remnants of all packaging and finishing materials, which will save time on hours of cleaning.