To build a fence in the country with your own hands made of wood is a fairly simple solution. However, it was this type of fence that became the most common and is considered traditional. It is easy to work with wood, good processing greatly increases the service life, and there is also the possibility of decorative carving, for example. It is thanks to such qualities that wooden fences are still in demand.
General information about the wooden fence
Despite the fact that wood can be treated with protective agents, it is still much stronger than other materials exposed. For example, a wooden fence built in a summer house with its own hands can crack quite quickly if there are constant changes in humidity and temperature. It may happen that after the autumn rains the tree is very saturated with water, after which frosts can come and the moisture inside will expand, which again will cause cracking. Because of all these shortcomings, you have to constantly look after such a fence.
In addition to the fact that there is a risk of cracking, rotting of the material or deterioration of its performance is possible due to the fact that bark beetles or other pests settle inside it.
As for the indisputable advantages of a fence in the country, made with your own hands of wood, this is the possibility of repair. Wood is easy to repair or replace in small areas. Other fences cannot boast the same quality. In addition, the installation of the fence from this raw material is also quite simple, which allows you to erect the structure yourself without any problems, even if there are no special construction skills, and also there are no tools such as a welding machine, without which it will not be possible to install fence from corrugated board.
Where to begin?
In order to successfully install a fence in the country with your own hands from any material, not just wood, you need to take care of the presence of high-quality support. There are several options. In the first case, recesses are excavated along the perimeter of the fence, into which the posts are installed. After that, several transverse crossbars (veins, lags) are fixed between them, and the fence is already attached directly to them. In another case, between the posts are installed pre-prepared wooden boards. However, as you can see, in any case, a strong and reliable support is needed. It is with her preparation that the work must begin.
As a raw material, that is, wood for pillars, most often either pine or spruce is selected. These types of wood are less likely to rot. You can use such types of wood as chestnut, oak or larch, but in this case you can forget about a cheap fence for a summer house. After the material has been selected, the practical part can begin. Here you should know that the distance between the supports should be the same and range from 1.8 to 2.5 meters. This distance is considered optimal and provides the necessary reliability. If there is a desire to save on poles by increasing the distance between them, then it is worth remembering that with a strong wind, such a fence is likely to simply fall.
A wooden structure in itself is a cheap fence for a summer residence. With your own hands to build it is quite simple. You do not need to save even more, as this will harm the entire structure. Once you have decided on the distance, you can start digging holes using a garden drill or a shovel.
Work with support columns
Before installing supports in pits, care must be taken to protect the bottom of the column from soil moisture. There are many options here. You can coat the material with hot bitumen or use used engine oil, which car owners have in abundance. You can use the rather old method and burn the bottom of the column, and then cover it with resin. Some advise this method: to wrap the bottom of the pillar so that it protrudes slightly beyond the pit, and then nail it firmly to the pillar. However, this method protects the structure poorly from the moisture that will fall from above, from rain. If you consider the photo of the fences in the country, built with your own hands, you can see that this method is not widely used.
Another way to protect wood from rapid decay is to install peaks on top of posts to protect it from snow and rain. If it fails, then you can simply trim the top so that moisture and snow immediately roll off the end and do not linger on it. It is also recommended to paint the material.
The height of the recess is usually equal to one fourth of the length of the support itself. However, depending on the soil, this indicator can be increased, however, it is still not recommended to deepen the columns more than 1/3 of the total length. When installing the supports, it is necessary to ensure that the poles are installed strictly vertically. In the photo of the fences in the country house, installed with your own hands, you can see that all the supports are perfectly smooth.
Installation of supports
After all of the above has been done, you can begin to work with the pits. Crushed stone is usually filled at the bottom of the pit, or it is completely concrete. However, here you need to build on the ground. If the soil is characterized by high heaving, concreting is not recommended. It is better to just cover the pit with rubble, which will play the role of a drainage layer, and at the same time eliminate this defect. Also, several boards can be nailed to the lower end of the column perpendicular to its axis. They will create an extra spacer.
It is worth adding here that no treatment will be able to extend the service life of wood immersed in the ground for a long time. Therefore, most often a base made of such a material is mounted using metal anchors or in a concrete sleeve. To make a fence at the cottage with your own hands, as was said, with a sleeve, is much more effective than completely concrete the support. This becomes most noticeable when you have to change the post. In this case, it is much easier to remove it from the sleeve than to dismantle the concrete base into which it is inserted.
To create a sleeve, you must first dig a hole about 1 m deep. After that, a pipe of asbestos cement is inserted inside, which should be the same length and have the same cross section as the diameter of the column. Further, if the soil is sufficiently stable and dry, you can simply tamp the filling, and it will be reliable. However, most often you have to insert a pipe using wedges, and fill up an empty place with broken brick, gravel, stones. After that, all this is carefully compacted, sprinkled with sand and poured with water so that the sand cushion settles and fills the pit.
In the event that the area is characterized by a strong heaving of soil in the winter, it is necessary to slightly expand the pit down. The pipe, lowered to the bottom of such a pit, must be poured with concrete with a ratio of 2: 2: 3 cement - sand - gravel, respectively. After this, the pipe rises slightly so that the solution flows out and forms a “sole”. The level of concrete mortar inside the pipe should not exceed 1 / 4-1 / 3 of its total length. After that, the pipe is poured with the mixture and outside.
Ranch: fence
How to make a fence in the country with your own hands? One of the simplest options is a ranch-style fence. It is immediately worth noting that such a fence performs poorly the protection function. It is intended to indicate the boundaries of the site. This type of design is very common in the United States, but exists on other continents.
As a material for the fence, you can use planed boards. In this case, the fence will be more accurate and will have a more pleasant appearance. You can use unprocessed wide boards or poles, if a large garden grows behind the fence. In this case, the whole picture will have a more natural look. A distinctive feature of such fences is that usually 2-3 crossbars are used in each span, but there may be more.
The optimal distance between the posts for such a fence is 2 m. Next, you need to install the pegs in place of future posts, and between them pull the cord so as not to be mistaken in the future. Then you can start digging holes and installing the base, as described above. Do-it-yourself wooden fences installed in the ranch style are most often distinguished by the fact that they have a rather small height, only 1.2 m. The height of the support posts is the same and the cross section is 75 x 75 mm. You can use poles 125 x 100 mm, but in this case they should be slightly higher. It can be added that a combination of higher or lower supports can significantly change the appearance of the fence and make it more attractive.
Ranch Style Fencing
As for the cladding with your own hands of an inexpensive fence for a summer residence, then usually crossbars made of soft coniferous wood are used here. Sizes of a crossbeam 120 x 20 mm. When installing the upper cross member, approximately 100 mm should be retreated from the top. The distance from the lower end may be slightly larger. In order to nail the slats, galvanized nails are usually used with a length of 35 mm. For reliable fixation, two nails are nailed from each edge indented 25 mm from the edge of the cross member itself. You can also do an intermediate fixation on an additional column. But if at the edges the nails are beaten one under the other, then on the intermediate fastener they are better fixed diagonally with a slight shift inward, in relation to each other. How to put a fence in the country with your own hands more reliably? To do this, you can use the mount with screws, but its implementation will take longer.
In order to further increase the structural strength, the cross members can be installed in pre-prepared grooves. You can also use various mounting metal parts, such as brackets, elbows. However, it is worth noting that such a fastener will spoil the appearance of the wood fence.
An excellent solution would be the installation of a ranch-style double fence. In this case, the strips must be nailed on both sides of the column. In addition, they are beaten in such a way as to block the gaps from the already filled strips. This makes it possible not only to get rid of the gaps, but also to increase the functionality of the fence, making it a complete fence to protect the territory.
Fence for cottages
Wooden fences for giving with your own hands from a picket fence - this is exactly what almost everything is installed, up to a certain time. This type of fence is assembled from planed boards with a section of 20 x 25 - 70 x 90 mm. They are located with a small gap between each subsequent board, if it is necessary to leave a gap. However, you can make it solid by removing this distance. But then a shadow forms under the fence, and nothing will grow there, which is unacceptable for giving in most cases.
As for the technical characteristics, everything is pretty simple here. The height of the fence is from 0.9 to 1.5 m. Wood is also used as pillars. Between supports, 2-3 veins are nailed to which vertical boards are nailed. The main advantage of the picket fence is that the upper cut of the planks can be the most diverse, giving a more attractive appearance. The usual cut is horizontal. The most common decorative cut is considered a "house", since it is easiest to arrange it. In general, there are a lot of decisions on how to design such a fence. In addition, its advantage is that it can be successfully combined with other materials. This can significantly extend the service life, increase its reliability, improve appearance and more. When making the upper cut, you need to remember that the end part is highly susceptible to moisture, and therefore the decor should not be such that moisture is retained on the surface.
An ordinary rectangular cut is considered the most unsuccessful in terms of protection against moisture, and therefore it is best to nail an additional facing strip on top of it, which will have a slight slope. In any case, you will also have to treat each shtaketin with antiseptic compounds and cover with paints and varnishes.
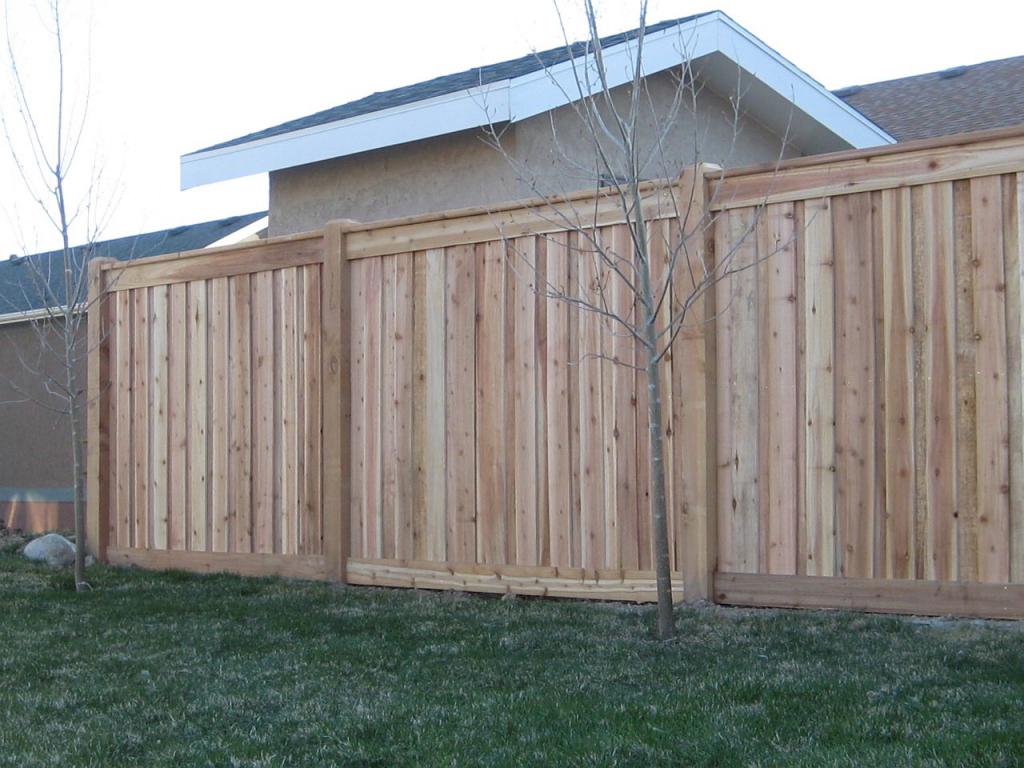
Deaf fence option
It is possible to make a fence at the cottage inexpensively, with your own hands, so that it is reliable, if you erect a blank fence. Such structures protect the site well from the wind and prying eyes, and are also more aimed at protecting the territory from penetration.
The simplest version of a blind fence can be built on the same principle as an ordinary picket fence. In this case, it is necessary to use columns with a cross section of 100 x 100 mm, to attach veins from a beam of 30-40 x 70-100 mm to them. However, there is a slight difference. Most often, such a fence has a greater height (1.8-2 m) than a conventional fence fence. For this reason, the number of veins must be at least three. In addition, if the height of the fence, for example, is 1.8 m, then the distance between the posts must also be reduced to 1.8 m, and in corner places to 1.2 m.
How to build a fence in the country with your own hands of this type? As for the installation of the casing for this type of fence, the racks can be installed vertically, horizontally or even diagonally. An important detail is that the boards are mounted end-to-end. It is important to remember that depending on the time of the year, the tree will either swell or dry out, which will lead to cracking of the entire skin if the boards are nailed too tightly.
It is worth making sure that the spans do not rot in the first couple of years of operation. To do this, make sure that they do not touch the soil below. In order to avoid rotting from below, it is necessary that the distance from the ground to the first fence board is 100 mm. However, then a gap forms through which water can flow, snow accumulate or an outside animal climb. In order to prevent this, a special board is installed - a dent. The horizontal board, which should be in contact with the ground. Replacing it is quite simple.
Fence for giving with your own hands from corrugated board
Despite the ease of working with wood, many still prefer more reliable and durable materials, which however require a more thorough approach to their installation. The process itself is also quite simple, but its implementation is more complicated. This happens if only because metal spans are heavier, and therefore it will be much more difficult to mount them. Most likely, you need an assistant who will hold a sheet of metal.
The simplest fence at the cottage with their own hands made of metal is installed as follows. Supports are installed, in which round or square pipes are used. It is worth noting that working with squares will naturally be easier. The installation of poles is not much different from the installation of wooden poles. You do not have to just process the lower part, but it is still worth concreting, for greater reliability. Here it is worth adding that they will have to be brewed from above or covered with something, so that moisture, snow, debris and so on do not get into the pipes.
Instead of wooden veins, metal logs are used here. The method of fastening them differs only in that you have to use either a welding machine or a bolted connection, and not nails. You need to understand that assembly using welding will be much more reliable than with bolts that unwind over time. Sheets of corrugated board are packed on these cross-beams. For their fixation, metal screws are used. The fastening step is 20 cm. After setting the fastening place, it is worth painting to avoid rust.
DIY fence from pallets
Quite a budget and at the same time a good option is to install a fence of pallets. The thing here is that these items are manufactured according to GOST, which requires that the wood be of good quality, without any defects and other flaws. It follows that a fence built of pallets will differ in that its durability, as well as reliability, is much higher than that of a conventional wood fence.
Despite this, there are some requirements that must be observed when pallets are selected for the construction of a wooden fence in the country with their own hands. Photos of such objects can be easily found.
A fairly important selection criterion is a checker (a cube on a pallet to which boards are attached). It should not have any cracks or defects at all. , . , , . , . , .
, , . , , , . , . , , , .