If you decide to equip the territory of a suburban area, then you must allocate a place to place one or more cars, which will depend on your wishes. If you build a carport, you can complement the stationary building and eliminate the need to drive the car into the garage. However, initially it is important to determine the features of the structure so that it does not clutter up the space too much, but is convenient to use.
Design selection
Wooden carports that you can build yourself can have different design features, sometimes they are fixed, sometimes attached to the main building. In order for the structure to create, together with other buildings on the site, a single architectural ensemble, the same finishing materials can be used in the construction. If you want to make the structure as stable as possible, then the columns must be concreted, as an alternative solution, they are installed on a prepared concrete site in advance.
When planning design features, you should calculate the number of cars that can simultaneously be on the site. It is important to take into account the moment that friends may come to visit you. If it is planned to build a canopy for several parking spaces, then the posts should be located around the perimeter of the site, and the distance between them should be made at 1 or 1.5 meters.
Size selection
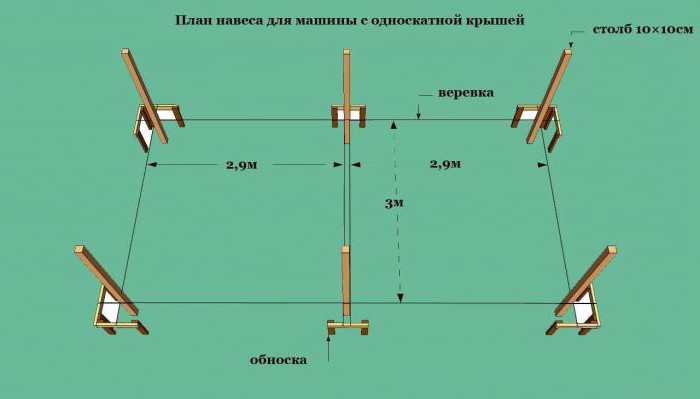
The master begins to build wooden awnings only after they manage to determine what dimensions the building should have. If your car is 4 meters long, then the canopy will have dimensions equal to 5x2.5 meters. If you have to park larger cars like jeeps or minivans, then the dimensions of the canopy should be increased to 6.5x3.5 meters. The height should be calculated taking into account the height of the cars, as well as the possible load on the trunk. But it is not recommended to make the pillars too high, since in this case the roof can become loose with strong gusts of wind and snow loads. In addition, such wooden awnings will not save the car from oblique precipitation. If you still plan to build a structure whose height should be more than 3 meters, then it is important to provide for the presence of powerful transverse beams that will cover the entire canopy around the perimeter. This will increase the strength characteristics of the structure, and it is recommended that the roof be double-skinned, since this option is considered more reliable.
Stages of construction: laying the foundation
Wooden canopies begin to build from the foundation tab, for this you have to choose a place to place the structure. It is best to prefer the area near the garage, along the vegetable garden or garden, and also in front of the gate. This will allow you to use the canopy not only to place the car, but also if necessary to store crops, garden equipment or firewood.
Specialist advice
If you decide to make a wooden canopy with your own hands, it is best to choose a place for it on a certain elevation, this will eliminate the accumulation of wastewater during natural rainfall. For this, along the perimeter, it is necessary to prepare drainage ditches, which are covered with gratings after completing all the manipulations.
Methodology
To equip a lightweight structure, a pile-screw or columnar foundation should be used, however, technology that involves the installation of foundation blocks or the deepening of support pillars can be used. To lay such a foundation, the number of supports must be calculated in advance in order to prepare a pit a meter or more deep for each of them. After the supports are installed, it is possible to increase the strength of the structure, for this, transverse cutting boards are fixed to the bottom of the posts, after which the entire system is concreted.
For reference
When you build a wooden canopy with your own hands, it is important not to forget about some of the nuances, for example, about protecting elements from rotting. To do this, the wooden components are treated with an antiseptic composition.
Work on the frame
At the next stage, you can proceed with the installation of uprights. In order to ensure uniform inclination of the supports along the entire length, longitudinal beams should be installed, the position of which is checked on the first two elements. Then install supports that are located opposite each other. The angle of inclination of the longitudinal components, which are laid in the grooves of the upper ends of the supports, should not be more than 3%. Whatever kind of roof you choose, you have to lay the rafter system, it is installed on the supports, and then fixed on the longitudinal beams. Between these components you need to maintain a distance of 70 centimeters. At the edges of the rafters are placed on the beam with a deviation from the edge of 10 centimeters. This will leave space for the installation of the gutter. It is recommended to connect the wooden elements of the frame system by cutting down the ends of the beams of the castle joints in the half-tree.
Roof installation
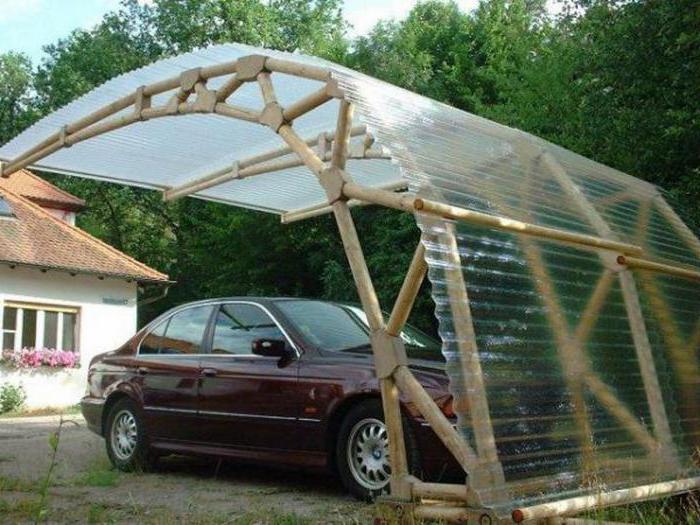
Wooden canopies, the photos of which are presented in the article, will allow you to understand what design features should have a building, the construction of which you will be engaged in. The next step will be the laying of the roofing, which is installed on the lattice frame. Among the most common covering materials, corrugated board, wood and polycarbonate should be highlighted. The main advantages of the latter are low cost, excellent performance and ease of installation. When installing cellular polycarbonate, it is important to monitor the perpendicular arrangement of the sheet channels with respect to the surface of the earth. This will allow free evaporation of moisture. If you want to make the roof of wooden boards, then initially you need to protect them with a water-repellent composition that will extend the life of the system.
Some nuances of work
The design of the wooden canopy may have individual parameters, which are recommended to be chosen by the master independently. The purchased material for the roof sheathing is laid after you manage to measure the length taking into account an overhang of 20 centimeters. If you decide to choose a profiled flooring, then its fastening is carried out by galvanized self-tapping screws, which are equipped with soft washers. About 1 square meter will take about 8 pieces. The same technology should be followed when attaching a slate, on one sheet of which 11 roofing nails will go. When a wooden canopy for a car is done with one’s hands without using other materials, it is possible to use an edging board as a covering material that fits as tightly as possible, it should be well adapted to the frame system. Do not forget about the design of the floor, for this you can use a concrete screed, sandstone or gravel, as well as an edged board, which is installed on fairly strong logs.
Conclusion
Drawings of a wooden canopy can be done by you yourself, after that you can start choosing the type of wood. It is best to use pine, which is characterized by durability and natural beauty. Her weight is small, so working with her will be very simple. For construction, you can use just planed boards, the main thing is that there is no bark on them. The recommended cross-section is 75x75 millimeters, part of the timber can be installed on the ground, pre-treated with bitumen mastic. If you decide to make a wooden canopy yourself, then you can prepare the wells for the supports with a shovel or a hand drill, but it is important to arrange the future elements in exactly one line, for this you should use pegs and a cord.