Interested in how to make a model of a submarine with your own hands? In our article you will find instructions that describe each construction phase in great detail. In addition, a list of necessary materials and tools that may be needed for work will be given here. This information will be useful to anyone who decided to do modeling or just wants to find out more information about the structure of submarines.
Buy a model in the store or do it yourself?
Decided to make a do-it-yourself submarine model on the radio? Such a lesson will take a lot of time, and also require a huge reserve of patience from the master. Perhaps it is easier to buy a finished toy in a special store? In them, and a guarantee for the goods is provided. For a person who does not like to do something on his own and is not used to counting money, such a decision will seem quite justified. However, not everyone has the opportunity to spend several thousand on a model, the cost of which is a couple of hundred, because for modeling submarines one of the most budgetary materials is usually used - wood.

In addition, do not forget that during the manufacturing process you will experience a sea of unforgettable impressions, especially if you are doing this process for the first time. To create a work of art from rough material is the destiny of real masters who can cope with absolutely any task. Well, if you decide to make a model of a submarine with your own hands as a gift to another person, you can be sure that the birthday person will remember this day for a long time and will keep your present with special care. Perhaps he will even become a family heirloom and will be passed down from generation to generation.
If your childhood was in the nineties of the last century, then you probably remember that there were quite a few toys in the post-Soviet space. For any child, a radio-controlled car seemed like a real treasure, since it was possible to find such goods on sale only in large cities. But practically everywhere do-it-yourself “Do-it-yourself” nuggets were sold, with the help of which it was possible to craft models of aircraft, cars, motorcycles, ships and so on. Just according to the instructions from one such set, we offer our readers to make a model of a submarine.
List of required materials
Making a model of a submarine with your own hands is a rather long and painstaking process that will require a huge reserve of patience and skill in handling classical instruments from the master. In addition, you will also need to stock up on some of the building materials that will make up the future model:
- plywood sheet with a thickness of 3 millimeters and dimensions of 210x55 millimeters;
- a rubber tourniquet of at least 400 millimeters in length (available at the pharmacy);
- 5 gram lead or a common weight for a fishing rod;
- tin from a can or other metal object;
- waterproof paint (acrylic, oil or nitro enamel).
If you want to add some element to your model that is not taken into account by our instructions, you should include a few additional items in the list of materials in order not to be distracted in the process. By the way, all the necessary components that can not be found at home, it is best to purchase at a construction base (paint, plywood sheet, sheet metal), because the prices for products there are much lower than in a regular hardware store.
What tools will be needed to work?
To make a model of a submarine or ship with your own hands, you will have to use some tools without which it will not be possible to process the material correctly. By the way, it is strongly discouraged to use alternative options for those tools that cannot be found on the farm, as the quality of the future model may be affected. It’s best to lend the missing items to friends or buy them at the store. Here is a short list of the basic tools that may be needed in the process:
- manual or electric jigsaw - for working with wood and plywood;
- any waterproof glue - necessary for gluing wood;
- pliers - for extension of the can;
- brushes - indispensable for painting.
Of course, this list can be significantly expanded depending on the materials that you decide to use for the manufacture of submarines. For example, if you decide to attach a small radio-controlled engine to the model, you will need to use many connecting wires and insulation. Well, in the event that the master decides to make a 3D model of the submarine, then this will require even more different tools that will allow you to plan the base from a full piece of wood.
Creating drawings for a submarine
Despite the fact that the Akula submarine model, the instructions for creating which you will find in the following sections, does not differ in complex details, it is worthwhile to leave drawings on a piece of paper in advance so that you always have an image of the future model in front of your eyes. Remember that even the slightest error in the calculation can lead to the fact that the parts, in the end, do not fit together, and time will be wasted. The same applies to those cases if you decide to make a 3D model of a German submarine or any other submarine. A competent drawing is already half of the successful work.
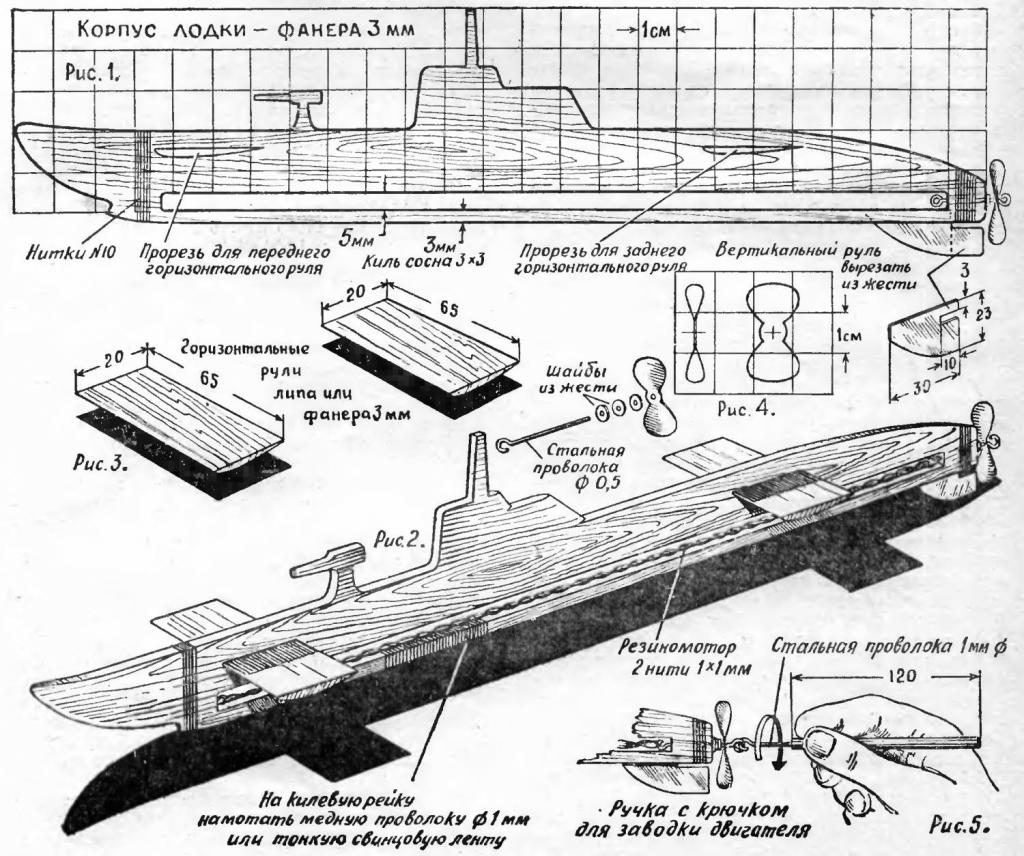
By the way, it is recommended for a beginner to start precisely with 2D models, since for their manufacture you do not need to have serious skills. It will be enough to transfer the drawing to a plywood sheet, and then carefully cut the workpiece with a jigsaw. If you have a printer, you can use the picture above. Just print the drawing on a piece of paper, and then carefully cut the base of the submarine with scissors and attach the resulting pattern to the plywood in order to circle it with a pencil. In this case, the bulk of the work will be practically completed.
Workpiece processing and work with small parts
We begin to make a model of a submarine with our own hands from wood. As soon as the workpiece is cut according to the technology described in the previous section, it is necessary to carefully process the places of cuts, since they can be easily injured in case of careless handling. This can be done using medium-sized sandpaper. It is especially good to smooth out all edges, as well as remove burrs.
If you pay attention to the drawing, you can notice several cuts in the model of the submarine. They are made so that the master can then insert the steering blades into them, which are also sawn from a sheet of plywood and well processed with sandpaper. The steering wheel should be rubbed with extreme care to form a part with a rounded front. Thus, the submarine will look even more realistic.
Gluing the steering wheel is necessary using ordinary water-repellent glue. Be sure to follow the instructions on the packaging during this process! Remember that squeezing force is important in joining two parts, not duration. It will be enough to properly fix the parts in one place and push them well together. After that, the glue will do the rest of the work.
What to make a propeller shaft from?
Any submarine must have propellers that allow it to move across the sea. Even if you make another model of a submarine - "Stars", for example - then this element must be present on the submarine without fail. You can make it from an ordinary pharmacy tourniquet, and attach it with a pin, which has a needle in the form of a ring at the end. A thread is passed through this little ring for the future rubber motor, and a propeller is attached to the opposite end. The easiest way to do this is with glue.
As for the hole for the shaft, you can make it with the help of red-hot iron. For example, you can heat the same pin so that the hole is ideally sized for the motor. However, do not rush, because any sailor knows that the boat's running ability depends on the correct location of the propellers. Alternatively, a conventional screwdriver or drill with a thin drill can be used for fastening.
It may happen that after burning or drilling the stern of the submarine will become less durable than its nose. To prevent breakage, it is recommended to additionally wrap the structure with strong threads dipped in water-repellent glue. Do not worry that this will give the submarine an unnatural look, as the model will be covered with several layers of paint.
Paint work
We decided to make the Pike, a model of a radio-controlled submarine, with our own hands? Such a design will look pretty solid, but you are unlikely to be able to convey its aesthetic appearance if you do not paint the tree with the right paint. It is preferable to use acrylic paints for this purpose, since they dry quickly enough and repel water well. Although, if we are talking about a 2D model, and you have a few tubes full of oil paints, you can use them as well. The advantage of high-quality compounds is that they are quite durable, so you do not have to re-paint the submarine every year.
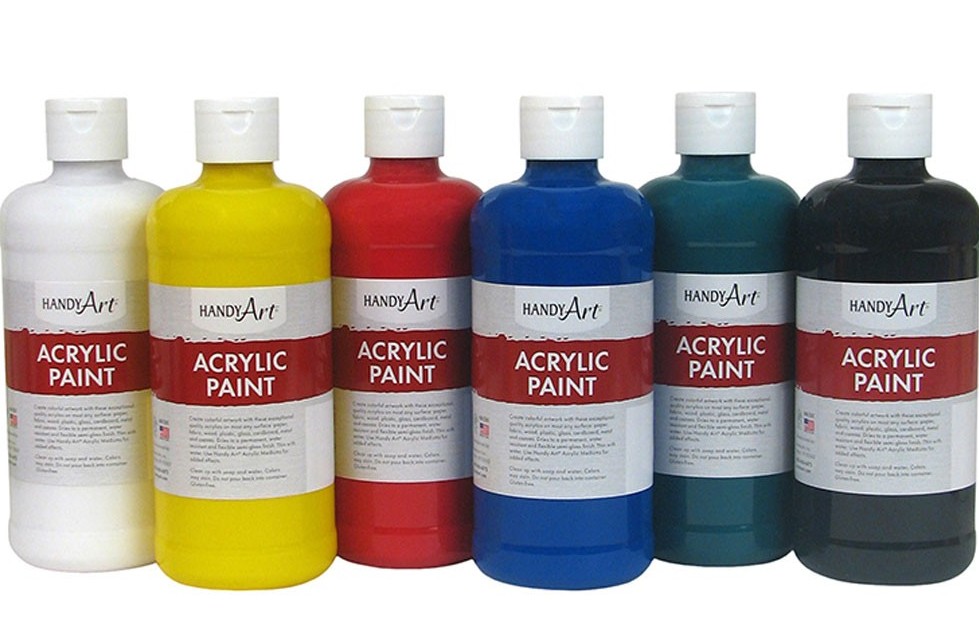
As for the color of the paint, its choice is strictly individual. If you decide to make a model that simply flaunts on a shelf with books, it will be enough to paint the boat in classic black so that it is as close as possible to its natural appearance. However, if you want to make a model that will float on water, it is best to paint it in some bright color so that the submarine is always in front of your eyes. It will also be very useful to impregnate the structure before painting with hot drying oil to give it durability.
When using acrylic paints, it is necessary to treat them with the entire surface, without leaving areas without paint. After polymerization, this composition becomes water-resistant, so you can feel free to lower your model into water. You can not be afraid that the plywood will get wet and swell, especially if you have worked the corner parts with sandpaper well before painting.
Making screws for the engine
For the manufacture of a do-it-yourself radio-controlled model of a submarine, you will need to use high-quality material for the propellers, since the running characteristics of your submarine will depend on this. The material is suitable for ordinary tin, attached to the main part with three small washers, in front of which you can additionally put a small glass bead, which will act as a bearing. Thus, you can not only reduce friction, but also greatly facilitate the rotation of the shaft.
If you are making a model of a submarine for some important competitions or simply do not want to bother with making a screw, you can purchase a ready-made engine in a specialized store. However, it is best to do this in advance so that then there are no problems with fixing the purchased item to the finished structure. Such engines differ among themselves not only in power, but also in appearance. But you should not pay attention to the number of screws, since the driving characteristics depend mostly on their rotation speed.
Also, the submarine's driving performance is affected by the angle at which the engine screws are bent. A model with a well-folded gesture will immerse in water in a matter of seconds, and also quickly develop maximum speed. Therefore, special attention must be paid to the manufacture of screws. But you should not bend the blades at too great an angle (40 ° will be more than enough). To find the optimal location of the screws, it is recommended to conduct several test launches and see in which case the boat plunges to the depth faster. You can use a stopwatch for this.
Ballast installation
The last step in the manufacture of a do-it-yourself radio-controlled model of a submarine is the installation of ballast. If you plan to place the submarine as an item for decorating your home, then this item can be skipped, because the cargo is needed only to make the model quickly submerge under water. It is necessary to install the ballast on a special keel beam, which can be found on the drawing that we left earlier. As for lead, it is best to use it in the form of a plate measuring 12x22 millimeters, but the thickness should not exceed 1 millimeter, otherwise the mass of the submarine will be too large for it to stay afloat.
The strip must be bent in the form of a bracket to form an even letter "P", after which it remains only to fix the ballast to the keel rail, which is located approximately under the gun of the submarine. Moving the weight, you can easily adjust the center of gravity of the submarine, forcing the stern or bow of the submarine to rise to the top. In order not to make a mistake with the location, it is recommended to conduct several test dives, fixing the ballast with ordinary tape. Only after a successfully selected position can you use glue to fasten the lead tightly to the boat.
Built-in radio sensor
If you want a wooden submarine model to be controlled by you from a long distance, then you will need to build in it a special radio transmitter that can be removed from any old toy or purchased in a specialized store. The latter option is best for those. who do not really understand the electronics device or do not want to delve into the wires. It will be enough just to attach the sensor to the left and right engine, and then test the progress of the submarine on the water.

You can adjust the trajectory of the submarine using the intensity of rotation of the right and left engine. As a rule, there are two levers on the radio remote control, each of which is responsible for its own engine. If you slow down the right engine and accelerate the left, the submarine will turn right. Therefore, for convenience, you should swap the contacts on the control panel so as not to get confused in the process. If you used a joystick from an old typewriter, you will first have to figure it out a bit to adjust the intensity of pressing a certain button according to the rotation power of a particular engine.
Installation of decorative elements
We turn to the decorative stage of making a model of a submarine with our own hands from wood. If you want your submarine to look as realistic as possible, then you will have to attach various small elements to it, which can be made independently or purchased in a toy store. In the first case, it is best to use ordinary wood as the material, since it has a relatively light weight and lends itself well to processing. However, be extremely careful during operation, since the smaller the part, the more difficult it is to make it. As for toys, they are usually made of plastic and are more durable than wood. However, buy only those items that really fit your model in appearance and size.
So what can be attached to a submarine to give it a beautiful appearance? If you decide to make a model of a nuclear submarine, then you can purchase several stickers that will talk about the radioactive element on board the submarine. Also on the submarine, you can attach several torpedoes on the sides, which indicate the readiness of the submarine for battle. Well, if your model also has a deck for fighters, then you can buy some beautiful toy airplanes, and put them at the very top. Of course, all of the above can be made with your own hands. , , .
, , , , , . , , . -, , , . -, , , , .
Video and conclusion
As you can see, making a model of a submarine with your own hands is not such a difficult task as it seems at first glance. You should be patient and carefully study all possible options for the execution of one or another element, after which it will not be difficult to make your dream a reality. If you still have any questions about the progress of work or the information from our article seemed to you a little, we strongly recommend that you watch a short video in which the author shows in detail how to make the simplest model of a radio-controlled submarine from ordinary plastic bottles. For some masters, such an action will seem ridiculous, but this guy has a lot to learn. For example, you can use the same engine system, but already on a wooden submarine.

And what do you think about what else you can make a model of a radio-controlled submarine with your own hands? Perhaps you have any thoughts on this subject that you would like to express? Share them with readers. You may even be able to help some of the novice inventors make their own submarine based on your idea. Is it not nice to realize that you helped some stranger who is several thousand kilometers away from you?
We hope our article will help you make a model of a submarine with your own hands. For bonding, it is best to use a good water-repellent glue, since conventional formulations can lose their strength over time. However, if you do not plan to submerge the submarine under water, then everything is much simpler. Let your imagination run wild and don't be afraid to experiment. Of course, for the first time it is unlikely to make the perfect sample, but do not give up. Over time, you will become a true master of your craft and will produce submarines that have no equal.