The article will talk about how to make a radio with your own hands. Simple radio receivers cannot catch stations in the FM band. And in order to make a radio receiver that allows you to receive signals in the FM range, you need to use a large number of transistors or a microcircuit. But the simplest radios that allow you to receive signals from distant stations operate in the AM band. In the article we will talk about the latter.
Radio Basics
This design is very simple, even a first grader can repeat it. The principle of operation of the device is quite simple, on any diagram all the elements that are found in the design are shown. When making such a radio with your own hands, you need to remember how the signal of the radio station is formed.
There are two types of signals that any radio station emits when operating in the AM range:
- Carrier - a specific frequency is set by the generator. This creates a kind of background.
- Modulation is a signal that is created by music, voice, any sounds.
These two signals overlap each other. And as a result, the listener, when tuned to the station frequency, can perceive the information that is transmitted without unnecessary interference.
Antenna and Ground
For the detector to function properly, you need a good antenna. A piece of wire or a telescopic construction will not work, you can not even try to connect, you will not achieve any effect. It will be required at a height of 3-5 meters above ground level to pull a wire of at least 5 meters in length. From it you make a tap to the installation site of the radio with a similar wire. The main condition is that this wire should not have electrical contact with the structural elements of the building, with trees, poles. If you need to fix it, use special insulators.
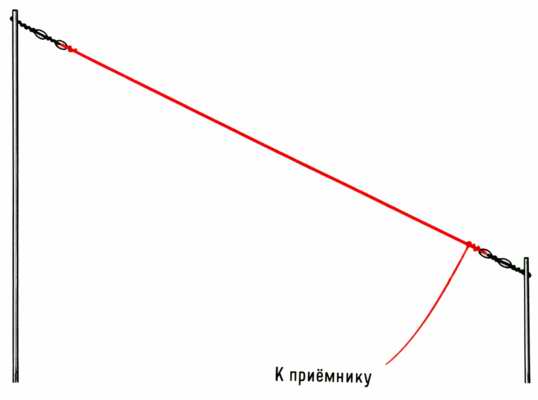
The antenna sheet must be isolated directly from the suspension points. You can mount the antenna on a house, outbuildings, trees or poles. It does not matter, the main thing - do not forget to isolate the canvas. Otherwise, the signal will simply begin to sink to the ground. As you can see, making a radio with your own hands at home is not difficult, but preparing everything to make it work is a lot of work. After all, you still need to make grounding. Of course, you do not need to do it according to all the rules of electrical work. It is enough to hammer a metal pin about 1 meter long into the ground. But if there are metal water pipes nearby, you can use them as grounding.
Headphones or headphones?
This design has earned popularity among beginner amateur radio enthusiasts for a reason. It contains a minimum number of elements, but allows you to receive signals from powerful stations. Unfortunately, only on high-impedance head phones. Headphones with a 3.5 mm plug, which are used for computer equipment or phones, are not suitable - you will not be able to listen to the signal. It is necessary to use headphones such as TON-2. They have a winding resistance of the order of 1600 Ohms.
But one feature should be noted - if computer speakers with an amplifier are available, they can be connected to the output of the receiver. Then you don’t have to look for TON-2 head phones that are already in short supply.
Receiver circuit
In the diagram you can see all the elements that are used in the design of the receiver:
- Inductor.
- Variable Capacitor.
- Semiconductor diode.
- Constant capacitor.
- Head phones.
The upper part of the circuit is connected to the antenna, the lower to ground. Instead of a variable capacitor, you can use a trimmer, it has slightly smaller dimensions. And the work, as practice shows, is not influenced by the choice of this element.
Inductor
To make such a radio craft with your own hands, you will have to wind an inductor. The procedure is simple, you will need such materials and tools:
- The frame is cylindrical in shape. Diameter 3-5 cm, height not less than 10 cm.
- Copper wire in varnish insulation - diameter 0.5-1 mm. The thicker it is, the better.
- Crocodile clips.
- Screwdriver and drill.
- Varnish for fixing the winding.
At the edges of the frame, you need to make holes in which you fix the ends of the winding. Then tightly, turn to coil, lay the wire on the frame. To increase the range of received signals, it is necessary to make taps from each 15th turn (not critical, you can make a tap from the 20th or 25th turn). In total, 100-150 turns will have to be wound in this way.
Fix the edge of the winding, clean all bends and solder. By the way, to facilitate switching, you can install a multi-contact switch. But you can use the clip "crocodile", which is connected to the top according to the circuit output of a variable capacitor. The coil is done, now you can start assembling the structure.
Start assembly
To make a simple radio with your own hands, it is enough to have basic skills. Soldering iron can not be used. But if you use it, then the installation of the structure will look better mounted. The biggest element is a variable capacitor. Moreover, it is necessary to use those in which air acts as a dielectric. Modern film capacitors are not suitable for use in the design of a detector receiver.
Find the right housing for your design. Due to the large size of the coil, the housing will be suitable. But you can reduce the size of the coil, for this you will have to increase its inductance. This can be done very simply - wind the wire not on a thick frame, but on a ferrite core. Then the whole structure can fit in a small case, on which it is necessary to install jacks for connecting headphones, grounding and antenna.
Connecting elements and starting
And now let's look at the design in more detail and detail. It is not difficult to make a radio with your own hands, the main thing is to strictly follow the circuit of connecting elements.
Consider how this is done:
- A semiconductor diode must be soldered to the top output of the variable capacitor. Instead, a transistor can be installed, but only the pn junction should work. Experienced experts recommend the use of silicon diodes type D9B or KD350.
- Solder a constant capacitor to the second terminal of the diode. It is necessary to choose non-polar and with a large capacitance (from 3300 pF). Be sure to pay attention to what material the element is made of. It is better if it is a paper capacitor.
- Solder the second output of the capacitor to the bottom of the contact of the alternator.
- Turn on the head phones in parallel with a constant capacitor.
- Connect the antenna to the top inductance coil circuit.
- Grounding connect to the lower terminal.
That's all, if no errors are made, the receiver works without adjustment. He does not require food.
Radio upgrade
As you can see, making such a radio with your own hands is not difficult, but it has a lot of disadvantages - low sensitivity, large dimensions, can take no more than two stations. One of the improvements discussed above - replaced the large coil with a more compact one with a ferrite core. But still, one problem remained - the sound reproduction. If desired, additional high and low frequency amplifiers can be manufactured for this receiver.
In this case, the selectivity and sensitivity of the device will improve significantly, and most importantly - you can listen to radio programs through the speaker. By the way, you can assemble the entire structure in a case from computer speakers. In this case, the need to manufacture an additional low-frequency amplifier will be completely eliminated. But on the other hand, why spoil such a device with a simple detector receiver?
Better assemble a high-quality receiver that works in the FM band. For this purpose, you can use literally one chip and no more than 5 elements. It is worth paying attention to the fact that the reception in this range is much better, and most importantly - a large number of stations work here.