Human life at all times has been associated with dolls. In the excavations of ancient Egypt and ancient Greece, archaeologists found figurines of dolls created from wood or clay. Subsequently, dolls began to be produced not only in wood and ceramic, but in the use of porcelain and textiles. French fashion designers using dolls demonstrated new models of clothing. They put on luxurious outfits on small copies of a man and sent them to their clients. In the modern world, material such as polymer clay is very popular among puppet masters.
How to create an image of a doll
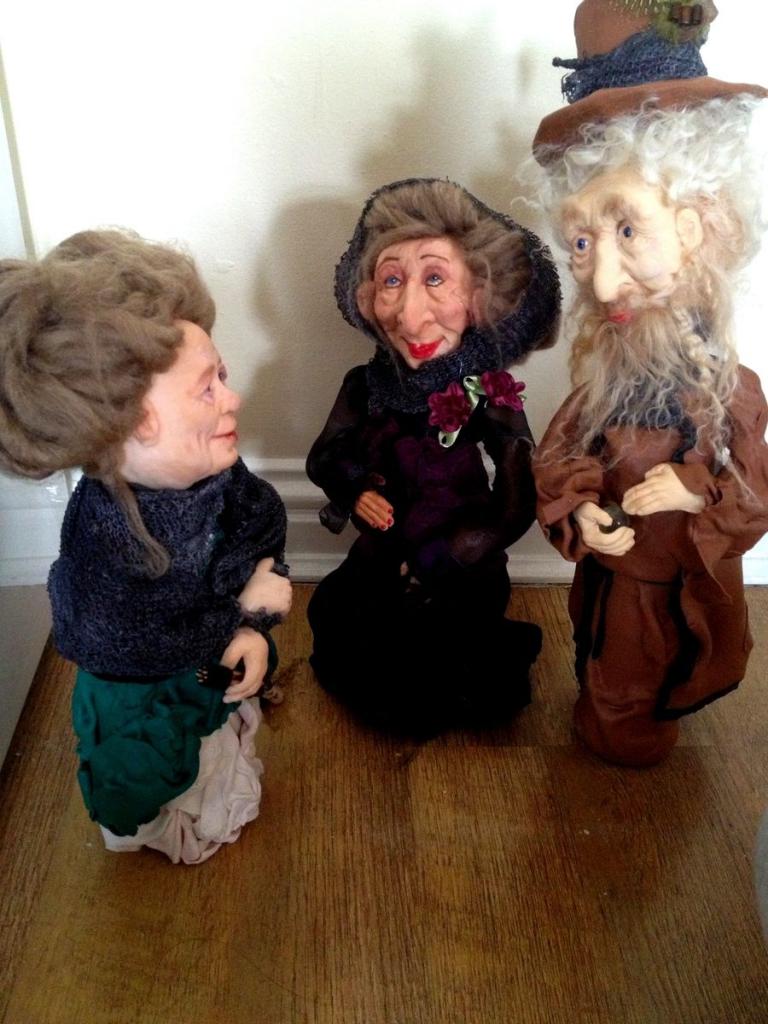
Any handmade polymer clay dolls will be unique. As a rule, no master can make an exact copy of the doll.
In order to come up with an image of a future masterpiece, you need to understand what kind of character it will be. Perhaps his prototype will be a hero from a cartoon or a book, or maybe it will be the embodiment of the master’s imagination. In any case, consider the following:
- age and gender of the character;
- the size;
- pose
- character;
- body proportions.
Necessary tools and materials
In shops for creativity, you can find a large selection of polymer clay. This material for modeling is of two types. The first hardens under the influence of air. The second option must be fired, and it is much more suitable for beginners than the first. Such polymer clay can be baked in a conventional oven. In the future, when there is experience in the manufacture of polymer clay dolls, it is better to use self-hardening material. Unlike baked plastics, it can be ground after hardening.
To create a polymer clay doll, you will need the following materials and tools:
- Needlework wire.
- Styrofoam balls for the head.
- Aluminium foil.
- Polymer clay.
- Emery paper of various grain size or manicure bar for polishing nails.
- Acrylic paints and pastel pencils.
- Acrylic varnish for creative work (matte and glossy).
- Paint brushes.
- A set of sculptural tools (it is very convenient to use a dental tool).
- Glue.
- Scissors.
- Fabrics for clothes and torso dolls.
- Materials for the wig (synthetic or natural tresses, yarn, sheep or goat hair, floss or tow).
Tips for sculpting polymer clay dolls
Before you start sculpting, you need to properly prepare the workplace. Lay out tools and prepare materials. Polymer clay should be thoroughly kneaded by hands, and if necessary, use water. During breaks in the work, it is better to remove the clay into the cling film and plastic bag to prevent it from drying out.
It is very important to monitor the cleanliness of the hands and wash off the remnants of dried material in time. The finished product must be properly dried. Drying time at room temperature depends on the thickness of the material and can last from several hours to several days.
Making doll head
To make a beautiful doll made of polymer clay, the master usually begins his work with making a head. First of all, you need to draw a sketch or choose a suitable picture. During the sculpting of this part, it should be examined from different angles, as well as periodically look at its mirror reflection in order to notice all the flaws in time. Be sure to remember the proportions. As a rule, the head has an ovoid shape. The occipital part should be rounded, not flat. On the front part should be: forehead, nose, cheeks, lips and chin.
On the prepared egg-shaped form, it is necessary to note a horizontal line at the level of the eyes, which will divide the face into two equal halves (top and bottom). For an even arrangement of the eyes, an axial, vertical line should be laid through the nose (left and right parts of the face). The nose is made in the form of a triangle, and the mouth should be located in the middle between the chin and nose.
Sculpting steps
Next, do the following:
- Wrap an ovoid or round foam shape with aluminum foil.
- Prepare polymer clay and evenly coat the blank on all sides. The thickness of the material should be approximately 0.5 cm.
- To sculpt the forehead, cheeks and chin, roll small balls of plastic and stick them to the previously marked places. Flatten joints and give them shape.
- To sculpt the nose, you need to take a cone-shaped piece of clay and attach it to the marked place. Form with your fingers, smooth the seams with a stack and give the nose the desired shape.
- From a piece of clay to make a flat element in the form of a rhombus for the formation of lips. Stick it on your face. Use the stack to shape the lips, and then make the nostrils. For these purposes, it is very convenient to use a dental tool with a ball at one end and a flat spatula at the other.
- Before you sculpt your eyes, you need to make a place for the eye sockets with your fingers over the cheeks. Fashion two flat circles of polymer clay and stick them on the eye sockets. Smooth joints and outline eyelids.
- Stick ears to the head. The location of the ears on the head is in the middle of the distance between the eyebrows and the tip of the nose. The shape of the ears can be made in the form of a spiral and shell.
- Carefully inspect the head, smooth out all the bumps, and if everything suits, put the head to dry. When the head dries, cracks may appear, they can easily be repaired with a solution of polymer clay and water.
How to make arms and legs
When making dolls on a wire frame, it is necessary to take into account the length of her arms and legs. And it can be especially difficult to sculpt brushes with fingers. This detail of a polymer clay doll for beginners will not work, experience is needed. Therefore, for the first craft, arms and legs with primitive palms and feet will go.
Manufacturing technology
It is important to ensure that when sculpting the right hand and left hand are obtained, they must be done simultaneously:
- Roll a cylinder out of clay, which will be slightly longer in length than the hand visible from under the clothes.
- To form a hand - it should have a narrowing to the wrist. From a circle of plastic, blind the palm and attach it to the hand.
- You can make a hand right away with a brush. To do this, you need a longer cylinder, at the end of which a palm is made. Using the stack, fingers are created.
- Insert the hand wire from the body frame into the workpiece so that after drying it is possible to put the clay handles in place.
- The legs are formed in the same way as the hands, while taking into account what kind of posture the doll will have.
When all the details of the polymer clay doll are ready and well dried, it is necessary to smooth out all the bumps with sandpaper and a manicure bar for polishing nails. Then you can start painting.
Assembling a polymer clay doll: master class
All materials are required for assembly. It is necessary to prepare a wire frame, choose fabrics and accessories for clothes, as well as details of the doll from plastic. After the details of the polymer clay dolls are ready, you can proceed to join them.
The body frame can be made immediately or assemble it from the parts of the head, arms and legs into which the wire is inserted. You can connect the parts of the frame to each other with the help of Chenille brushes. To give the body a shape, wrap the frame with a synthetic winterizer, stick the tips to the polymer parts.
It is not difficult to make a costume for a doll from polymer clay with your own hands. For this, there is not even a need to make a pattern. Details of clothes can be cut directly on the doll and sewn to the frame:
- Cut out the sleeves of the dress from rectangular flaps of fabric and sew to the hands, fixing with glue at the junction of clay and synthetic winterizer.
- Beautifully wrap the neck and shoulders of the doll with tape, closing the frame of the body.
- Put the craft on a piece of paper and outline the outline of her body, design a dress.
- Sew a dress to the doll’s body and decorate it with braid and bead decor.
- Make shoes out of braid by wrapping it in the feet and gluing it to the legs. Garnish with beads.
- On the head, make a wig from yarn and decorate with flowers.
That's all! Your doll is ready.