Well-groomed female hands, along with makeup on the face and dyed hair roots, always attract the attention of both men and women. After all, as Anton Pavlovich Chekhov correctly noted: "Everything should be fine in a person: face, clothing, soul, and thoughts ...". Today it is difficult to imagine a well-groomed and stylish woman with peeling nail polish. But what about those who simply do not have time for a weekly manicure? This question for many years has been a lively concern for young mothers who want to take care of themselves, and a businesswoman who is busy from morning to evening at work.
And a few years ago, girls and women all over the world had an incredible opportunity to do manicures only once a month! And the name of this miracle is shellac, or, as it is also called, gel polish. A novelty in the beauty world instantly scattered around the world and simply captured the beauty industry, turning upside down the usual understanding of manicure and pedicure. Women in orderly rows moved to beauty salons to try this innovation on themselves. Gel polish and after a few years has the same unprecedented popularity among women as in the first years.
And yet, even with the appearance of shellac, not everyone has the opportunity to visit the master of manicure once a month. Therefore, more and more girls and women are learning to make shellac at home on their own. Today, to help them, there are many courses where they clearly teach the process of applying gel polish. In today's article, we will tell you how to make shellac varnish at home on your own.
What is shellac?
Briefly described, shellac is nothing more than a resin extracted from tropical plants, which is widely used in production. If you look in terms of cosmetology, then shellac is a mixture of ordinary varnish and gel. Its properties are such that this coating does not fade for a long time, does not lose color, and generally lasts about 30 days. For all their stamina, manufacturers claim that shellac is completely hypoallergenic.
Where to begin? Preparation for shellac
In order to start using shellac at home, of course, you will have to spend a little money on the necessary equipment and the varnishes themselves. It is important to note right away that the final price of such a set can range from 5,000 to infinity, depending on the quality of the preferred product and your capabilities. It is important to remember that in order to independently make shellac at home, at least 2 hours of free time are needed, because this procedure is not as fast as a regular manicure.
So, here is what is included in the kit for applying shellac:
- drying lamp with UV rays or LED;
- manicure forceps;
- hard file;
- buff;
- lint-free napkins;
- pusher;
- degreaser for nails;
- gel varnishes: base and topcoat, primer, colored;
- adhesive remover;
- shellac remover;
- decorative elements.
To purchase all the necessary components, it is better to go to a trusted store in order to avoid buying low-quality goods and subsequent disappointment in the shellac procedure. What is definitely not worth saving on is gel varnishes themselves. They must be of the highest quality to create a persistent manicure.
Nail preparation
The preparation of the nail plate for shellac at home is not very different from the usual manicure procedure for all women.
The first thing to do is to soften the cuticle for its subsequent removal. To do this, make a nail bath for 15-20 minutes. If the cuticle has not grown very well, then just push it with a pusher (iron spatula) or an orange stick. If the cuticle is rather large, then after the bath it should be carefully removed with manicure forceps or special oil.
The second is creating the mold and preparing for the coating. A coarse file is used to create a specific shape of the nails. For polishing nail platinum - buff. So, the most suitable shape is determined by the length and thickness of the fingers, as well as depending on the nail itself. Today, the most fashionable are the forms of "ballerina" and "almonds". Both forms look great on medium and long nails.
The third step in the preparation will be grinding. For this you need a buff file. After this stage, brush off the nail dust from the surface with a special brush for manicure.
Gel Polish
Having prepared the nails, you can begin to apply the varnish. But first you need to degrease them. An important point: for a better result, you should walk especially well on the edges of the nail, and then do not touch them with your hands. This is one of the most important rules that those who decided to make shellac at home should remember. For beginners, it may seem that there are too many rules, but this is not so.
Next comes the primer, which serves to better adhesion of gel polish to the nail. There are 2 types of primers: acidic and acid-free. The former are used mainly on problem nails, prone to frequent detachments. The second is suitable for normal healthy nails.
After the primer, a base coat is applied. Apply it with a thin layer, as well as all subsequent layers of varnishes. Be sure to seal the ends of the nail, i.e. the end, for good durability of the gel polish. Dry in a UV lamp for 1.5 minutes, in LED for 30 seconds. After drying in the lamp, do not touch the nails.
Next, we determine the color. After choosing the right shade, you can start applying. In the same way as the base, apply it with a squeezed brush, sealing the ends. It is important to remember the rule of thin layers. Let there be several of them better than one fat one that does not dry out to the end. As a rule, 2 layers are applied - for the best tone. If the gel polish is translucent and not very pigmented, then 3 layers are acceptable. Now you need to dry each layer, as well as the base.
And the final stage is the top cover. Here it just needs to be applied with a slightly thicker layer than the previous ones. And again, seal all open edges and dry in the lamp the right amount of time.
Next, remove the sticky layer, if any, with a degreaser. And grease the cuticle with oil. If your gel polishes do not have a sticky layer, then the procedure for applying shellac at home for beginners can be considered complete. As you can see, everything is not as complicated as it seems at first glance. But here, as in any other business, skill and patience are needed.
How to remove gel polish yourself?
Of course, women are worried not only about how to do it, but also about how to remove shellac at home? First you need to prepare some necessary materials. You will need to have: cotton pads, foil, shellac remover, buff and pusher.
First you need to cut the foil into rectangles. Their size should be such that it is possible to wrap a finger on all sides. Then cut cotton pads into 4 parts. Wet generously with nail polish remover and apply to each nail. Wrap the foil on top of the finger so that the entire nail is closed and the product does not evaporate. Depending on the durability of the gel polish and the number of layers applied, keep cotton pads for 10-15 minutes.
Next, you need to remove the foil and, if the gel polish is not completely gone, use a pusher to clean the surface of the nails. To process a nail plate buff. And finally, apply a caring cream or nail oil.
Also, one of the modern methods for removing shellac at home is the purchase of special clamps. In fact, they replace the foil, and in themselves are more convenient to use.
Gel Polish Design
Having learned how to make a simple classic manicure with shellac, you will probably want to experiment with various designs and techniques. Especially when pictures from all over attract the most interesting nail design options. And the choice today is so great that deciding on something specific can be very difficult. The most popular decorative elements for nails are rhinestones, sparkles, broths, adhesive strips and water stickers. Consider how to make shellac at home with each of them.
Sequins and rhinestones on shellac
In order to stick rhinestones on top of the already applied coating, you need to carefully take the rhinestone with manicure tweezers and place it in the right place on the nail. For example, a stylish option is when one small rhinestone is located at the base of the nail, in the center. Gluing rhinestones relies on an unsweetened layer of top coating, crushing them a little on top, as if imprinting in the nail. If you already cover pasted rhinestones with another layer of top on top, then you need to be prepared for the fact that their luster will not be so strong.
Another trendy direction of nail design is the so-called. glitter coating, in other words, glitter. Usually one nail or some part of each of the nails is isolated in this way. Sequins are sold in dry or liquid form. In dry, they are a loose mixture in small jars. And if everything is clear with liquid glitters - they are applied as regular varnish, then how to make shellac with dry sparkles at home remains unclear.
So, for the decor of the nail with dry sequins, you need to prepare the nail and cover it with a base. Next, apply a mixture of sparkles mixed with a base coat from a jar with a brush. And fasten with a top top on top. Thus, you can cover the entire nail, make a jacket, or draw patterns.
Manicure with broths
Another very interesting option is a manicure using broths. Or, as it is called in another way, "caviar manicure." It got its bizarre name due to the fact that the broths are very much like little eggs. But their color is not only black or red, but completely different, suitable for any request. However, the same as the size. Designing a nail with broths is not difficult at all. To do this, choose the color of the varnish to match the color of the eggs. Apply the base in the usual way, 2 layers of gel polish and top. And after applying the top coat, apply it with another layer and gently sprinkle the nail with balls. At the same time, pressing them into the nail with a finger. And then on the sides of the nail, sprinkled with broths, it is barely noticeable to walk with the top, as if fixing the design.
“Eggs” you can not only decorate a solid nail, but also use it in the decor. It all depends on your abilities and imagination.
Striped manicure and water stickers.
A couple of years ago in all beauty salons a new trend appeared - shellac with self-adhesive stripes. This option looks very stylish, and the most interesting is that with their help you can create a large number of different designs. Such strips are sold in coils of different colors and sizes.
Making stripe manicures is easy. To do this, you need to glue a strip vertically or horizontally on an already stained nail, cutting off the ends with manicure scissors. It is important that the ends of the tape end just before the end of the nail. This technique is needed in order to keep the strips stronger. And after gluing, they should be fixed with a top coating.
Also, with the help of such ribbons, you can create various patterns. For example, in order to make a striped nail, you need to apply a white gel polish, and then glue the strips horizontally, leaving about a centimeter from each edge of the nail. On top of them, for example, paint with blue varnish. Then carefully remove all the tapes and cover with the top. Striped manicure is ready! In the same way, other manicure variations are made using decorative ribbons.
If none of the proposed decors you like, we recommend that you pay attention to the stickers for the nails. It is still simpler here. You just need to select your favorite images and carefully cut them. Then dip with tweezers in a glass of water and transfer to the nail. Secure with a top.
Fashionable manicure with ombre, or gradient.
Last year’s hit was a manicure using the ombre technique, or “gradient”. But no matter how you call such a design, it means one thing - a smooth overflow from one color to another. And here there are fantasies where to roam. Because there are so many gradient manicures. For example, an ombre can be two-tone - from dark to light, or maybe five-color with mostly bright colors. Whatever performance you like, his technique does not change from this. In order to make shellac ombre at home, at least 2 colored gel polish and a clean brush are needed.
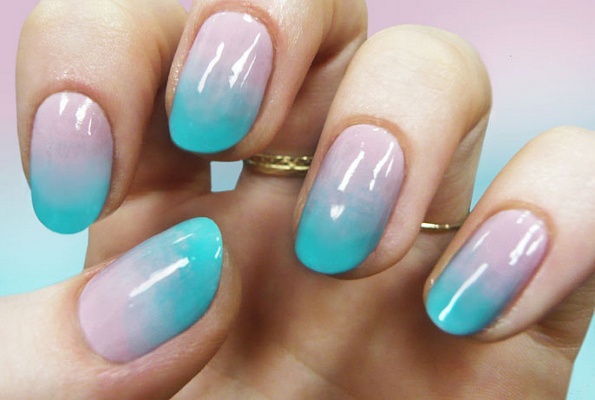
Here is an example of how to make the gradient shellac at home using a three-color transition. First you need to apply the lightest varnish throughout the nail and dry in a lamp. Next, apply a darker shade to the middle of the nail plate and blend the lower border. Dry again. And then apply the third shade of varnish to the remainder and gently blend the borders. In conclusion, cover with a top. Now you know how to quickly make shellac ombre at home.
Moon manicure
One of the latest fashion trends in the world of nail art has become a lunar manicure. In fact, as one of the laws of fashion says: everything new is well forgotten old. Lunar manicure returned to us from the distant 1920s. It was at that time that the first nail polishes appeared, and women began to study them and try to do manicures. Then it was believed that the varnish was not supposed to cover the entire surface of the nail as a whole, but only its middle part. Accordingly, bypassing the lunula (white crescent at the base of the nail) and the tip of the outer edge. The rationale for this was the erroneous opinion that varnish can harm the nail plate and interfere with its growth. In photographs of movie stars and models of that time, the same moon manicure is clearly visible.
Today, girls and women are no longer afraid to paint their nails, so the fashion for this type of nail coloring has slightly changed. And it has come to our time already with stained tips of nails, but with a highlighted lunula.
So, how to make moon shellac at home? To begin, perform all the necessary manipulations with the nails until the time of applying color gel polish. After all the steps are completed, you need to carefully paint the lunula with the carefully selected color. It’s not scary if it is not painted over perfectly. Dry this layer in the lamp. Then, with a thin brush, take the second color and draw the lunula along its contour from the outside, as if outlining. And then with a thick brush, paint over the remaining nail, bypassing the resulting crescent. The layer of the second colored varnish should completely cover all the imperfections when painting the lunula. The final step is the top cover. Everything, stylish retro manicure is ready!
Geometry and Minimalism
Well, perhaps the last of the most stylish nail designs for today can be called designs in minimalistic and geometric directions. But, unlike previous manicures, these can be made from completely different materials and different techniques.
The geometry on the nails is an image of clear lines, angles and shapes. To make shellac nails with a geometric pattern at home, you can use a self-adhesive ribbon. On a nail already coated with color gel polish, glue the tape in different directions, creating a pattern. You can also use a thin brush and draw triangles, squares or just single clear lines on the nails.
The option is very beautiful and elegant when the shiny triangle comes from the base of the nail to its middle. And the main color of the varnish is pastel.
As for the newfangled minimalism, he also touched on nail art. Today there are a million ideas on nail design on this subject. Such a manicure looks incomplete, but it is precisely this effect that those who are close to this direction achieve.
To create a nail minimalism you will need a very thin brush and a little imagination. For example, you can draw a small circle (3-5 mm) on each nail. This option is interesting, especially if the circles on all nails will be located in different places. The finest outline of the plants also looks great, but some skill is needed for this. If it is not there yet, you can use water stickers with images of minimalist figures.
The advantages of such a manicure include its conciseness and the fact that it is easy to combine with almost any outfit. At the same time, it is not at all boring, like a simple varnish coating, and allows you to diversify your image, adding to it a touch of sophistication.
Nails correction
One of the most frequently asked questions by beginners is the question of how to make shellac correction at home? This does not mean how to remove the old coating and apply a new one, we talked about this above. And what to do if a detachment of varnish has gone on one or several nails or the nails have simply grown back and the manicure looks stale.
In both cases, approximately the same action is taken. With any kind of cleavage of gel polish from the surface of the nail, you need to take a buff and carefully file the damaged area, minimally injuring the adjacent coating. Then brush off the dust with a special brush and coat the entire surface of the nail with a suitable varnish. Secure with topcoat. In the same way, you can extend the life of an overgrown manicure without resorting to removing it.
Another interesting way to mask the peeling varnish is to paint it with shiny gel polish or decorate with rhinestones. Thus, your manicure will last some more time.
In today's article, we looked at how to make shellac at home. The step-by-step process of applying gel polish is much easier than it may seem to the uninitiated. I want to believe that our review will help you comprehend this pleasant and such a feminine procedure.