If you decide to independently apply the liquid wallpaper with your own hands, then first you need to familiarize yourself with the technology of the work, which involves the preparatory stage. This material is a type of decorative plaster. In order for the wallpaper to gain an attractive appearance, fillers and dyes are added to them, these can be granules or sparkles. For fixing, KMS glue is used, it is usually used to work with rolled wallpaper. By the method of application, liquid wallpaper is close to decorative plaster mixes.
Work Tools
If you decide to apply the liquid wallpaper yourself, then you need a trowel or a spatula. This indicates that you can work with the composition by different methods. The main advantage of such a mixture is the possibility of applying it to the base of any arbitrarily complex shape. Wallpaper can be combined and form applications. The minus is their significant cost. When making an estimate, it is necessary to take into account the consumption of material: one package will be enough to cover about six square meters of the surface.
What the master needs to know
If you decide to apply liquid wallpaper yourself, you need to know that there is one more minus of such mixtures, which is expressed in the fact that after the mixture dries, all the wall errors will be noticeable.
Surface preparation before applying liquid wallpaper
The main requirement for the base is the uniformity and evenness of the surface, among other things, the wall should absorb water minimally. You should provide a white background color or shade that matches the color of the wallpaper itself. The surface should not have differences, potholes, and also recesses of more than three millimeters per meter on the surface. If you decide to apply liquid wallpaper with your own hands, making a master class presented below will allow you to master it.
Initially, it is necessary to rid the surface of the old coating such as painting or wallpaper, as well as plaster. This is necessary in order to exclude delamination. It is also necessary to get rid of screws, nails and self-tapping screws by removing plastic elements from the wall. If there are ends of reinforcement, pipes on the surface, then they must be well repaired. To do this, you can use putty, which is laid in a layer of two millimeters. If possible, it is recommended to cover with oil paint.
If there are external defects on the wall, the surface along the entire length is littered, then the use of textured plaster may not highlight this. It must be remembered that full leveling with plaster can be very expensive, so you should consider your capabilities. Applying liquid wallpaper with your own hands can be accompanied by a significant consumption of material, if you do not get rid of the protrusions and depressions. Experts recommend pre-coating the entire surface with putty or gypsum. This is true for partitions and drywall walls.
Padding
It will not be enough to get rid of just the joints between the canvases. After the surface is leveled, it should be well primed. To do this, apply a deep penetration composition, which is applied in three layers, between each of which a period of 3 hours is maintained. Only after this can we proceed to the application of a thicker putty, which acts as the basis for liquid wallpaper. You can use water-based paint or facade composition for this. Each of them should be white, adding colorings should be excluded.
Cooking composition
If you decide to apply liquid wallpaper with your own hands, the manufacture of the composition must be done before the start of work. Almost all types of liquid wallpaper are prepared at the stage of priming the walls. Depending on which mixture was purchased, its preparation may differ in technology. This can be a mixture packed in one package, or a composition that is distributed among the components into different packages. The dry mixture must be poured into a container or piece of polyethylene, the size of which is 1 x 1.5 meters, and then mix thoroughly.
Before you make a liquid wallpaper with your own hands, you need to consider that in a dry form the mixture should be well mixed, which will eliminate the formation of lumps. If you plan to use decorative additives such as sequins or granules, then it is better not to mix them dry with fibers, as well as glue. They are recommended to be poured into the water first, then mixed, and then proceed to add the base of the wallpaper. This will ensure uniform distribution of the composition.
Mixing Guidelines
If you decide to use liquid wallpaper, do-it-yourself manufacturing must be done using a certain technology. Firstly, the volume of water should not exceed that recommended by the manufacturer. Secondly, it is necessary to strictly comply with the sequence of actions: in the prepared container, pour water, and then add the dry mixture.
Mixing must be done in such a way that the entire package is used at a time. Only part of the bag should not be kneaded. It is recommended to mix the solution with your hands; no components that are corrosive to the skin are contained in the mixture. If you use a drill for this, then a similar approach can adversely affect liquid wallpaper. After the mass is saturated with water, it must be left for some time. Manufacturers advise that the composition remains intact from 6 to 12 hours. Only then can all the proportions be mixed. If applying to one wall from different batches, a transition may be noticeable.
Wizard tip
Before making a liquid wallpaper with your own hands, it is necessary to take into account the moment that, as a rule, the consumption of the composition in practice turns out to be larger compared to what is recommended by the manufacturer. Thus, the number of packages purchased is preferable to buy at the rate of one package per 4 square meters. It is recommended to purchase two more packages, as a result they can be used for repairs.
Features of applying the composition
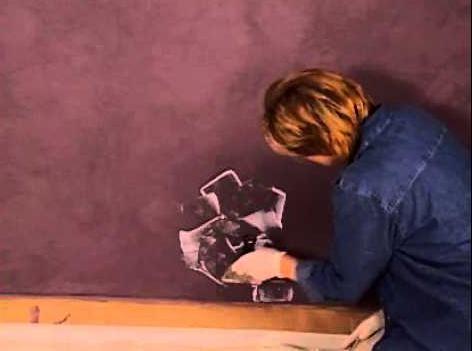
After the composition is ready, you can begin to apply liquid wallpaper. The walls after priming must be completely dried. If you will apply liquid wallpaper with your own hands, reviews of which are often quite positive, then it is permissible to use a grater, trowel or putty knife. The working surface of the latter can vary from 18 to 80 cm. The atomizer is also great for this. For this material graters are provided that have a narrowed canvas, quite often they are made of transparent plastic, which allows you to control the smoothing process. The latter helps in compiling all kinds of applications from different types of wallpapers.
The process, which involves applying liquid wallpaper with your own hands, is similar to the technology used in the application of putty. You can collect the solution with your hands or with a small spatula. After that, you should lay the serving on the wall, and then rub it. The master should get a layer whose thickness is 3 millimeters. Application should be done in small areas, adding new portions to the applied area. If the solution does not attach well to the wall or is too thick, you can add a certain amount of water, not exceeding one liter per serving.
When applying liquid wallpaper with your own hands (a master class will help you deal with the features of the work), the grater should not be flat in relation to the wall, it must be raised by 15 degrees relative to the surface. The force should be significant, so it will be quite simple to distribute the layer until the required thickness is obtained. After you manage to fill one square meter, with a grater that is previously wetted in water, you can even out the area to prevent the formation of grooves and lumps. Next, you can begin to fill the next section of the wall.
Finally
Before you make a liquid wallpaper with your own hands, you need to take care of the availability of all tools and materials. Next, you can proceed to the study of technology, which is presented in this article.