Do you know how many ways there are to decorate your manicure? Many? Very, very much! One of the best nail art materials that ever exist is color gel polish. Design made by this method attracts the eyes, durable and has many variations. The only prerequisite is the presence of an ultraviolet or LED lamp. Without it, gel polish will not harden. Its main property is UV polymerization.
Before you start creating any design, you need to prepare your nails. Colored gel polish is not applied to a natural nail plate. This is a taboo! First, the nails are filed, degreased and treated with an antiseptic. As the latter, you can use alcohol, for example, formic. He is in any pharmacy and costs ugly little. Then you need to choose a gel polish. Design is also better to think through right away so that you don’t rush about ideas later. Immediately determine for yourself what specific nails the drawing will be: on all or only on some. If you do the design yourself, then start with the hand that you have is strong. Right-handed people - on the right, left-handed people - on the left. This ensures that you complete the drawing. After all these steps are done, you can start applying the base under color gel polish. It should be the same brand as the main color and top (fixative). The base is dried using a lamp exactly as much as indicated in the instructions for the tool. This is usually written in a bubble, as well as information about the application technique. The sticky layer is not removed from the base.

Then the fun begins. Take your favorite gel polish. The design can be applied either with a brush from a bubble, or with additional devices. It all depends on the complexity of the selected drawing or pattern. Additional tools may include:
- the needle is thick or thin;
- dots (a special needle with a ball at the end; it can be of different thicknesses);
- toothpick;
- sponge;
- thin brush for design.
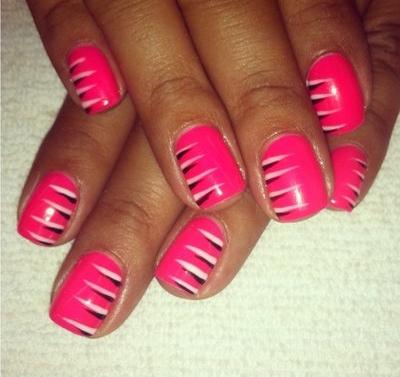
Gel nail polish design has many options. It can be stripes, dots, droplets, intricate patterns and even patterns. A good way is to transfer the picture to the nail from the sheet. What does he mean? Take a color gel polish. Design is not done on the nail, but on a thin sheet of plastic. Dry with a lamp. Then gently pick up and remove the dried pattern from the plastic. Glue it on the nail. How to glue? Precisely - not glue. The nail is already covered with a sticky layer of the base, and the picture is attached to it. The final stage is the same with any design - the nail is covered with a top. Fixer is applied in one layer. Not very thick, but even. Next, they remove the sticky layer, if any.
Professionals give advice: pre-select the option of how you will make the design of nails with gel polish. The photo should be in front of the eyes. On the other hand, you can improvise. Sometimes squiggles and hooks look like real lace. Also, immediately think about the color scheme. What will she be like? How many colors do you want to use? According to the rules of the color wheel, more than three colors are not recommended. One may be the basis, the other two for design. Or the base will be transparent, and the pattern will be three-color. Well, if you do not have enough skills, feel free to go to the salon. There you will create a masterpiece on the tip of the nails.