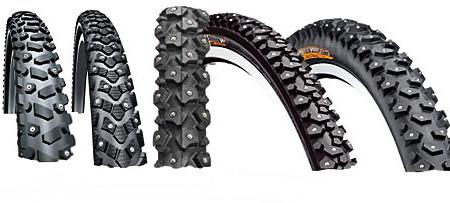
Cyclists who want to continue to ride comfortably during the cold season should consider changing the usual tires of their steel horse to studded tires. Special treads for winter are sold that are equipped with steel spikes. However, they cost a lot, about 1000–2500 rubles; do-it-yourself tire studding will be much cheaper. It is not as difficult as it might seem right away, and you will only need to buy screws, good glue. Naturally, ordinary tires will also be needed.
Spike selection
To upgrade tires, self-tapping screws are selected, which are designed to be twisted into metal holes. The optimum length is 14 mm, and their hat should be wide and with rounded edges. Such self-tapping screws are also good because they have a wide tip, so they will wear off more slowly.
The choice of tread for studding
To make studded tires for a bicycle with your own hands, it is better to choose tires with the thickest rubber, which is designed for snow and ice. This will allow you to convert the tire so that it is universal: for snow, ice and asphalt. Rubber should not be too hard to cling to the surface better. Do not equip the tread with self-tapping screws too thick, because they will not hold on smooth stones or tiles. And if you insert too few spikes, their tenacity will not be enough on the ice, so you should find a middle ground. It is necessary that the protrusions on the tread alternate: one with a metal spike, the other without it. Do-it-yourself tire studding should not be carried out only in the center of the tire, it is very important that there are self-tapping screws on the sides. After all, cornering is much more difficult to maintain. For this reason, the side parts need to be equipped with metal spikes thicker than the center. Such symmetry will allow you to ride comfortably on any surface. One tread needs about 140 screws to ensure good adhesion to any surface.
The method of installing screws on the tread
So, there is preparation for the winter, hissing rubber with our own hands. To begin with, the tread pattern is examined. It is necessary to determine in which protrusions it will be necessary to screw self-tapping screws so that their location is symmetrical. This is very important, because if you place somewhere more, and somewhere less spikes, the grip will be uneven, which will significantly impair movement.
After it is decided which protrusions should be equipped with spikes, they are marked so as not to make a mistake in the sequence, after that they are drilled. It is convenient to do this with an electric drill, and it is better to choose a drill twice thinner than self-tapping screws.
Tread drilling
The tire is drilled from the outside, laying it on a wooden board for convenience. When all the holes are made, the studding of the bicycle tires begins with your own hands. The spikes need to be screwed on the inside of the tread. Before this, we take pliers with which it will be convenient to take self-tapping screws. Then we dip them in glue to the hat, insert them into the hole and screw them in with a screwdriver. Many people use screwdrivers, but for a start it is better to use a conventional screwdriver until all the actions begin to work out automatically. As for the glue, then any rubber, for sticking the camera, or the usual “Moment” will do just fine.
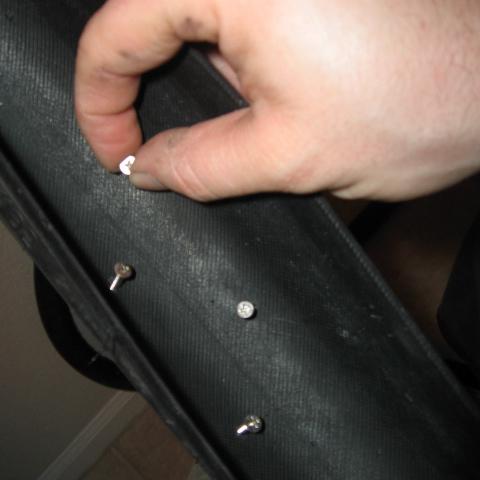
The self-tapping screw needs to be mounted carefully, although it is screwed into the guide hole, it can still come out not where it was expected. In this case, it is twisted and correctly installed. Indeed, the adhesion to the surface depends on the angles at which the spikes will be located in relation to the ground. Thus, along the entire circumference there is a studded tire, with your own hands, at home, without any special tools. The central spikes should protrude 2 mm above the rubber, this is the optimal size for a good grip on the surface. If some exceed this size, then they need to be shortened with nippers. Side spikes can protrude by 4 mm, because they do not touch when driving in direct sections of the surface, but are involved only in turns.
Camera puncture protection
After all the metal components are installed and tightened securely, you can proceed to protect the camera from the screws. To do this, you can apply a nylon tape or any other, the main thing is that it be as rigid as possible. Or cut the old camera into strips of the desired width. The main thing is that all the hats are closed, in order to avoid contact with the camera.
Bonding a protective gasket between the camera and the studded tire
In principle, some do not stick a protective tape, but for reliability it is better to do this so that the studding of the wheels with your own hands is obtained qualitatively, and during the ride the screws do not penetrate the camera. If the glue is quick-drying, it is better to cut the tape into pieces and stick them in turn. In a word, you need to seal the caps on the inside of the screws.
For better bonding of all parts, when they are connected, they lay the inside with polyethylene and insert the chamber, and then pump it up. Thus, everything fits snugly and leveled. In this form, the tread is allowed to dry, and polyethylene does not allow the camera to stick. The next day, when everything is dry, you can collect the wheel.
What changes occur when riding, after installing the studded bike tire with your own hands?
First of all, this is the weight of the tire. It can be calculated based on the fact that one self-tapping screw weighs in the region of 2 grams (plus glue). Weight becomes about 400-600 grams more, but again, everything is individual. For this reason, the speed drops by 2-3 km / h. A little more noise made by tires, but it rather depends on the surface that is under the wheels. And, of course, the appearance of the tread is more toothy and predatory.
However, all the drawbacks are nothing compared to the advantages that the do-it-yourself wheel studding provides. The first is the price, this option is much cheaper than branded rubber. The second is that the size of the metal spikes and their location can be clearly selected to fit your needs. And do not hope that the purchased tire will meet the necessary requirements.
Well, now about skating itself
Even when riding on open ice, the bicycle rolls as if on asphalt. No drifts occur, even on bends. You can easily drop into the slide, where the children made a skating rink for themselves, fill it with water, the clutch occurs, as in the summer. The snow is also excellent. As for the asphalt and slippery stones, it all depends on how the spikes are located. Many, knowing that they will ride in the winter mainly in the city, do not put screws on the middle row at all. But if nevertheless there is such a need, then they should not stick out from the rubber by more than 2 millimeters. In general, the studding of winter tires with your own hands is justified, and its advantages outweigh the cons.
Do I need to spike both wheels?
When winter is very changeable, and snowfalls are replaced by slush, only the front wheel can be hissed. It is responsible for handling, but the load on it is much less. Therefore, the spikes will not wear off very much if you go, for example, on bare asphalt. When the rear wheel is drifted on ice, it is not as dangerous as the front wheel. In general, do-it-yourself winter tire studding provides more options than a finished product. However, if there is money for branded protectors, and they meet all the requirements, then, of course, it is more convenient to purchase them.
Having covered the tire with metal spikes once, the cyclist will know exactly what to change in the following models. The whole difficulty of the first choice lies in the fact that there is no definite answer to the question about which spikes should be and how many to screw them in. It all depends on the specific ski area. However, as practice shows, if such wheels are not needed for a highly specialized sports discipline, then it is better to make universal ones.
So, the article describes how tire studding is done with your own hands, and what you should pay attention to. This method is the most universal, and is suitable for any coating. Having made the tread studding using this method, it will be possible to further clearly understand what to change for better adhesion in a particular skiing area. One thing can be said for sure: that the rubber in which the metal spikes are installed will always be better in frost than one that is not equipped with them.