In this article we will look at how to make a shower cabin with your own hands. Not everyone has plenty of time to take a bath. A shower is an outlet for those who are not used to basking in the bathroom for a long time. But sometimes it happens that the layout of the room does not allow you to install a full bathroom in it. But the shower is placed in it without problems. And you do not need to run to the store for a shower cabin - it is quite possible to make it yourself, and literally from improvised materials. That's what we’ll talk about in our article.
What is necessary for arranging a shower
A shower booth must be equipped, looking not only at practicality, but also at hygiene. In general, all designs are easy to maintain, they occupy a small area. And thanks to the variety of building materials on the market, you can create your own unique option. Nowadays, showers are mounted even in private houses, although there are no space limitations in them, unlike cramped apartments.
Please note that the cabin must not impede movement in the bathroom. Therefore, at the very initial stage, decide on where it will be installed. It should not impede access to communications that are available in the bathroom - a washing machine, washbasin, etc. Since the shower cabin is an area in which there is very high humidity, it is necessary to think through the ventilation system in advance.
Wiring in the shower
As for lighting, all wiring should be laid outside the “wet zone”. It is recommended to use LED lamps in which the degree of protection is IP65 or IP67. These indices mean that the devices are protected from direct exposure to water. It is recommended to use lamps that work from sources of 12 or 24 volts. This will protect people who take a shower from the possible effects of electric current. The constant voltage of 12-24 volts is completely safe. The maximum that a person can feel is light tingling. The power source itself must necessarily be grounded and protected using an emergency shutdown device (the so-called RCD).
Cabin manufacturing steps
In the event that you nevertheless, despite numerous difficulties, decided to make the installation of a shower cabin with your own hands, consider in more detail all the stages of this matter. Be sure to follow the sequence:
- Wall construction - if the room is already there, this step is omitted. If there is no finished structure, you need to distinguish the entire space of the bathroom. Only after this is the installation of a shower cabin. Do it yourself with your own hands, just follow the instructions.
- Making a hydraulic barrier for walls and installing a pallet. This is a rather responsible and difficult stage, it depends on it how safe and convenient it will be to use a shower.
- Production of a system for draining used liquid. The main thing is to place it correctly, so that later it can be serviced without any special difficulties.
- Acquisition of materials for decoration. It is advisable to buy only high-quality porcelain tiles, tiles or mosaics.
- Installation of communications in the walls.
- Wall cladding material.
- Installation of plumbing devices.
Adhering to this sequence, you can pretty quickly independently make a shower in the bathroom.
Pallet: which one can I buy?
On sale there is a huge number of ready-made pallets. They have different sizes, materials, too. Moreover, their cost is relatively low - this allows a good save on construction. Acrylic pallets are often purchased when making booths, as they are not only cheap, but also warm and light. But they also have a drawback - low strength. Therefore, you will need to build a small podium before starting installation. Making a shower cabin with your own hands in a private house with the help of such pallets is a trifle.

The second version of the pallet is enameled. Such designs are very reliable and easy to maintain. But the only trouble is that when they get wet, they have a very slippery surface. This, of course, can be solved. It’s enough to use a cheap rubber suction cup mat. But in the event that you have free means, and even want to distinguish yourself, you can buy a copper pallet, glass or ceramic. When making a shower cabin with their own hands in a private house, they will prove to be very useful. They cost a lot, but they look just amazing. The sizes of all pallets are standard - 80x80 cm, 90x90 cm, etc. Moreover, the larger the size, the higher the cost of the product. The pallets that are commercially available can take several forms:
- Corner
- Square.
- Semicircular.
- Rectangular
The choice of forms is small, but this is enough to make an attractive cabin on your own. You can build a shower cabin in the house with your own hands pretty quickly, having a ready-made tray available.
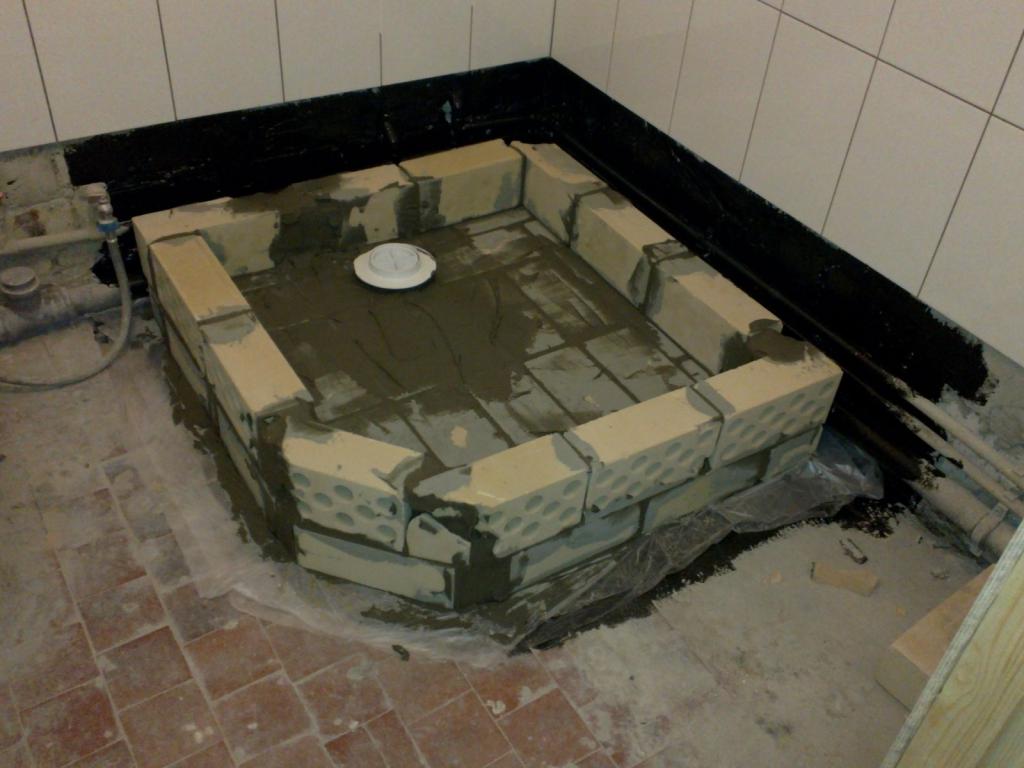
Self-made pallet
But if you have enough building material, or you are not a supporter of purchased products, try to make a pallet yourself. It can be made literally from improvised materials - from block, brick, concrete. This type of pallet is quite difficult to manufacture, since it is necessary to allocate sufficient space. But then you can make a booth of any size. First you need to make a frame, after which a waterproofing is arranged. The entire inner surface is laid out with mosaic, stone, tile.
Pay attention to the fact that a wooden shower cabin can be made with your own hands. Inside, the shower stall can be finished with these materials. But for this purpose it is necessary to use only special species, the main condition is that the wood is resistant to temperature extremes and moisture. And be sure to use impregnation and special equipment before installation. Experts do not recommend the use of wood for decoration, as it must be constantly looked after and processed.
Can it be without a pallet?
By the way, at the height of fashion - this is the manufacture of showers without a tray as such. Very attractive designs, quite comfortable and practical. In this design, the base is in the same plane as the bathroom floor. And visually not much different from it. Some may argue that such a system may cause the water to start to stagnate, the room will be constantly damp, and mold and mildew will spread faster on the walls and floor. But you can make a shower cabin without a tray yourself, but there will be no such consequences.
Mold and fungus will appear if technology violations occur during installation. But if everything is done correctly, to observe gaps up to a millimeter, then the platform on which water will fall will not be a problem zone. This platform will have a slightly noticeable slope, so the water will tend to the drain hole, decorated with a special grill. Everyone who has work experience and desire will be able to assemble a shower cabin with their own hands and beautifully decorate it.
This type of construction has a clear advantage - it is very easy to care for. Since the floor is in one plane, there are no joints, it can be washed without problems. But it is more suitable for commercial buildings or in the private sector - there is a need to raise the floor level in order to ensure a high-quality drain. In apartments, this is almost impossible to do.
How to make a drain?
There are various ways to divert and collect water. The easiest is the installation of the siphon. Be sure to take into account one point in the manufacture of the pallet - there must be easy access to the drainage system in order to serve it later. Passages to the installation site of the siphon can be decorated with hatches or gratings. Sometimes they install doors lined with the same material as the pallet. And now about how to make the right drain in the shower cabin with your own hands.
In order to clean the pipes with a blockage, they must be laid with a rotation angle of not more than 45 degrees. It is desirable, of course, that there are no turns at all. It is also worth remembering about the slope - about 2 degrees per meter. Only then can stagnation be avoided. The most reliable and wear-resistant system for draining spent water is considered a gangway. This design in height takes up slightly less space.
Modern materials make it possible to produce systems that can provide water drainage at a rate of up to 0.8 liters per second. And now a few words about how to make a ladder and a funnel in the shower cabin with your own hands. The funnel in the ladder comes complete with dirt traps - they are quite easy to remove and clean when clogged. And do not forget about the water trap - it will help to avoid the reverse flow of fluid from the sewer.
Another system that looks a bit like a gangway is called a drainage channel. In it, the tray is very similar to the one used in the previous design. But it has a slightly larger area for collecting water. Water is collected using a plastic or metal gutter. It allows for a discharge rate of a maximum of 1.2 liters per second. Channels can be mounted both in the walls and arranged in the middle of the shower. The installation scheme is quite complex, so it is rarely used in practice. In addition, you will have to make an additional niche in the wall.
How to equip a shower with a tray: the initial stage
Before starting the basic work on installing the cab, you need to make a base - the entire surface is cleaned of debris and dust, after which a primer is applied to it. If you are making a pallet of blocks or bricks, then first you need to make a rough (primary) screed. In this case, it will be possible to complete all the processes without additional alignment.
And if the sides of the pallet are poured with concrete mortar, it will be necessary to install the formwork strictly in size. After the base is ready, lay the drain, strictly observing the slope. The whole structure must be covered for the entire installation time, so that glue or concrete does not get inside. Thus, the manufacture of a shower cabin from tiles with their own hands is done .
To carry out additional insulation of floors, it is allowed to use expanded polystyrene. From above, it is necessary to pour a screed with reinforcement on it. Then, after screeding, waterproofing is applied. You can use both ordinary bitumen and a variety of mixtures that are used in the arrangement of pools. Remember that the reliability of the entire structure depends on the quality of the hydrobarrier. The number of layers is at least two. But before starting work, be sure to read the instructions.
Waterproofing and Finishing
At the junction between the floor and the wall, it is necessary to stick a waterproofing tape with a width of at least 10 cm. Due to this, moisture will not get into neighboring rooms. After waterproofing, you can do a screed. In its manufacture, beacons are used, but one moment must be taken into account - the bias is made towards the drain hole.
When arranging the screed, it is necessary to use only those solutions that contain various additives with water-repellent properties. It is recommended to add PVA glue or liquid glass to the mixture - these substances provide additional waterproofing. Please note that the installation of a shower cabin with your own hands should only be done after the entire room has been waterproofed.
After the concrete has set, the treatment is carried out with a waterproofing material. For this purpose, it is recommended to use a composition based on cement, since it is it that is able to perfectly adhere to any tile coating. To lay the tiles, it is imperative to use water-repellent solutions.
When making them, strictly follow the instructions. All joints after laying the tiles are filled with hydrophobic grout. On the seams and tiles can be applied varnish with water-repellent properties. It looks like making a shower cabin from a tile with your own hands.
Barrier-free space in showers without a shower tray
This work must be carried out when forming a room screed. Calculating the height in this case is much easier. First, the sewage system is arranged, all communications necessary in the bathroom are laid. A tray cut in advance is built into the floor or wall. It must be securely fixed to the surface. After the installation of the siphon, all components are joined together. Making a shower cabin with your own hands in a wooden house is not much different - waterproofing should be of the highest quality.
A box is being constructed around the entire perimeter of the zone in which the cab must be located. It will allow you to separate the area of the cabin from the rest of the floor of the room. With the help of such a simple action, you can bring the level of the main part of the floor to zero. Before starting to fill the screed, the floor is insulated - polystyrene mats are used for this. As soon as the screed is set, the base is made - be sure to observe a slope of no more than 2 degrees.
In the event that you plan to install a warm floor system, the screed is erected in two stages. First, the first layer is laid, it is reinforced, and after setting the mortar, pipes or mats for heating are mounted. Then you need to fill in the second layer and apply waterproofing material on top of it. When laying decorative coatings, use only materials with a thickness of 8-10 mm. With the help of tiles of this thickness, you can make a shower tray with your own hands, which will be reliable and durable.