Setting up Yandex mail in Outlook does not contain anything complicated, and if you do not know how to set the correct parameters, then we recommend that you read this article. If you are just a novice user on the network and generally can’t understand how to configure this program for Yandex settings, then at first you will definitely need instructions, but, after one installation (with the exception of reinstalling the operating system), you will no longer you will need to make any settings. For beginners, setting up Outlook 2010 for Yandex mail may take some time, but if you follow the information given, you can perform this task correctly and subsequently get the opportunity to work with incoming letters directly on the computer.
Analogies
Actually, setting up Yandex mail in an Outlook program is exactly the same as, for example, using the mail service mail or any other service that provides users with email accounts. All settings will occur directly in the program itself. Do not be afraid of complex functionality, you will need only part of the settings from it.
I would like to mention right away that each mail service contains pros and cons. In fact, this is not at all surprising, but, however, Yandex has recently begun to engage in global optimization, and many users even leave the famous mail and switch to a more high-tech service.
Instruction manual
Setting up Outlook Express for Yandex will require authorization in the first place. Let's put everything in order so that beginners do not get confused. First you need to open the MS Outlook program. Today we analyze MS, since this service is much more convenient when compared with the standard Outlook EX application. After you have entered the program itself, you need to go to the menu, for this, left-click on the "Service" button on the top panel, after which you will see a drop-down menu. Your task is to find “Accounts” in it - this button may be in older versions, or rather, if you use MS 2003, then you can definitely find it.
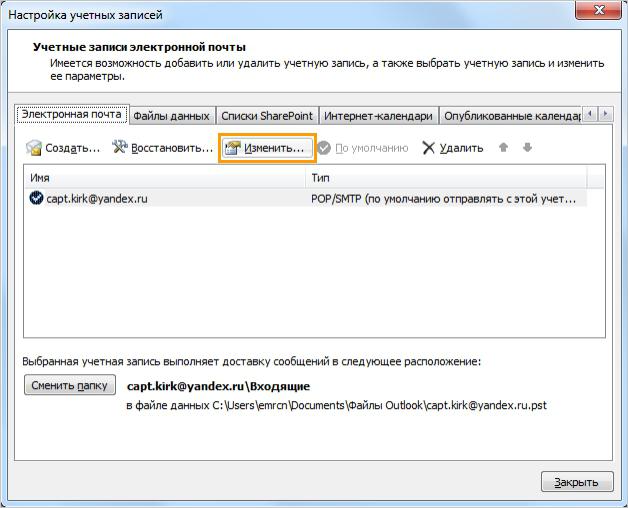
After you clicked on this button, you will need to find the “Accounts” item - it is in this section that you will create a new account, or rather, add your own. If you weren’t able to figure it out exactly, then we recommend that you simply go to the “Options” submenu, then “Mail Settings”, and there you will already find the “Accounts” column. In fact, finding this solution is quite simple even in new versions of the program.
Yandex
After going to the "Account" tab, you can see a whole group of teams. Your task is to check the box next to e-mail, since you should connect an e-mail box to the program in order to receive instant notifications without visiting the Yandex.Mail service. Your task is to create a new account, and it is very easy to do.
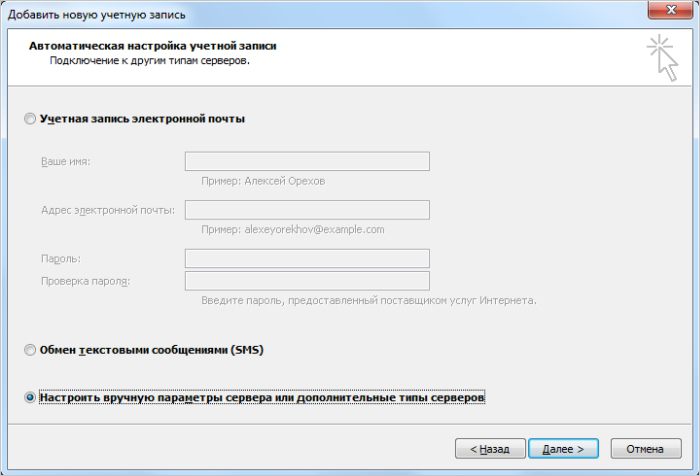
As you can already understand, setting up Yandex mail in Outlook takes place directly in the program itself, where you need to specify all your data, after which you can use the service right on your computer. When you start creating a new account, then a new window will open in front of you, which will be named "server type", you should specify a checkmark on item 2 - POP3, although in other versions it may be different. In any case, you should select the server type “POP3”. After ticking “POP3”, you should click the “Next” button at the bottom of the window. In the next window, you will need to make Internet email settings. Do not be afraid, setting up Outlook Yandex mail is very simple.
Final setting
In the "Server Type" window that opens, select the checkbox 2 - POP3 - and click "Next" again. You will be required to enter information about the user, there you need to specify your name, or rather, the login. Setting up Yandex mail in Outlook will be completed only if the mail program can synchronize with your mailbox, so you must first check all the specified data.
Note. Outlook Express is included with the Windows series operating system. The first platform that was equipped with this solution was Windows 95 OSR 2.5. Also, this application comes with Internet Explorer 4.0 and newer versions. We hope you find this information helpful.