Do-it-yourself drip-type furnaces are often made by craftsmen and home craftsmen. These units act as an excellent way of autonomous heating. If you want to use equipment that is one of the cheapest to operate, then it is worth making such a furnace. Used as fuel can be used oil, which can be motor or transmission.
Any master is capable of producing such a design, due to the simplicity of the work, during which there will be no need to use a special set of tools and materials.
Design features
Do-it-yourself drip-type furnaces are made on the basis of two combustion chambers, which involves the combustion of fuel twice during the operation of the structure. In the first chamber of an installation of this type, the process of burning used oil is carried out, which is accompanied by the release of a significant amount of combustible vapor. As soon as these vapors arise, they enter the second compartment, in which the mixing of oxygen and combustible gases takes place. The resulting mixture begins to burn in the second chamber, which is accompanied by the action of a significant temperature and the release of a large amount of heat.
In the manufacture of the furnace for the development of a drip type with your own hands, you must correctly select the place for its installation. Due to the fact that the construction is accompanied by fuel combustion at rather high temperatures, it is necessary to take care of safety rules that do not imply the installation of the structure in a place that is blown.
Ensuring normal operation
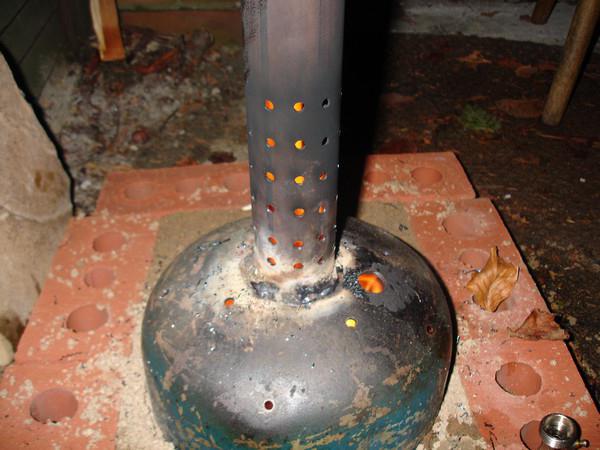
For the installation to work properly, it is necessary to ensure the supply of oxygen to both combustion compartments. Excess air should not enter the first compartment, and in order to regulate its supply, a damper should be mounted. The second chamber should receive a sufficient amount of oxygen. To do this, a lot of holes should be drilled in the pipe that mates the two compartments, the diameter of each of which should be approximately equal to 10 mm.
Additions to the furnace
When making a drip type furnace yourself, you must remember that it can be supplemented with some elements. This will allow using the design for heating several rooms at once. The stove will have such functionality if it is connected to the heating system. Initially, it is necessary to install a tank for heating water, which must be connected to the system, only after that the return line is connected. Thus, the installation will not only be able to heat the premises, but will also allow you to warm the water, as well as cook food. This type of construction has many advantages, one of which is expressed in its small dimensions, which make it possible to dismantle the furnace in a short time, and then install it in another place. It is imperative to supply home-made drip-type furnaces with your own hands to a chimney, the height of which should not be less than 4 m. Make sure that the chimney is devoid of horizontal sections. In order to be able to clean the pipe, which will have to be done once a week, it is necessary to equip the element with a system that will allow for dismantling.
Options for manufacturing drip furnaces
When making a do -it-yourself kiln, the drawings of which are presented later in the article, you must first think about what design it will have. Thus, the structure may be based on steel or a gas cylinder. Before manufacturing, it is worth evaluating that the drip feed is quite difficult to implement on your own. If the burner is insensitive to impurities that may be contained in the used oil, then the drip mechanism, by contrast, is extremely sensitive. In order to reduce sensitivity, a filter should be put on the hose, use the one that is used in cars.
The pump can also be borrowed from the car, you can use a high pressure gas pump. Due to the fact that it will supply significant pressure, it is necessary to make a return, so an excess amount of oil will return to the tank. In the role of a dropper, you can use a medical one. It has a clamp, this will allow you to adjust the feed rate.
Preparation before production
If you decide to do the manufacturing of the furnace yourself, the drawings should first be considered and prepared for the work to be done. To carry out the process, the master must first prepare some materials and tools:
- grinder;
- pump;
- gas bottle;
- a pipe;
- steel sheet;
- a dropper;
- welding machine;
- capacity for oil.
Furnace manufacturing process
The most suitable option for manufacturing is considered a gas cylinder, which has thick walls. But if you use sheet steel, firstly, you have to look for one that has a sufficient thickness, and secondly, it will be necessary to produce an impressive amount of welding work, which will make manufacturing more time-consuming. Do not forget that the first chamber will begin to work normally if it has a damper needed to regulate the oxygen supply - this is the only way that do-it-yourself furnaces are made. Drawings (it is easier to calculate the furnace from a gas cylinder) you should first prepare and choose the one that will be most convenient to perform work on.
Possibility of cleaning
It is worth remembering that the chamber where the oil is burned must be made such that during operation it is possible to disassemble it, only in this way can the cleaning be facilitated. Horizontal sections of the chimney are not needed, since draft can be deteriorated from them, in addition, there should be a minimum amount of inclined ones. It is preferable to make the pipe vertical.
Balloon manipulation
When making a do-it-yourself kiln, drawings (from a gas cylinder) will allow you to do the job correctly. So, initially the balloon has to be prepared, only after you can start cutting off the top and bottom from it. In order to install the oven and make it stable, it is necessary to weld the legs, which are prepared from the cut parts, to its lower part. Next, you can begin to manufacture the combustion chamber, which should turn out to be collapsible. In this compartment, a hole is made into which the tube is installed, and through it the fuel and oxygen supply will be regulated.
In the center, you need to weld a pipe with holes made in advance. This element will connect two compartments, in each of which combustion takes place. The second compartment can be made from the middle part of the product and a sheet of steel. After the chamber is ready, it will have to be strengthened by using the welding machine to the pipe from above. After the chimney is made and mounted.
After the manufacture of a do-it-yourself kiln, the photo of which is presented in the article, it must be checked for functionality. However, do not immediately fill the entire compartment with oil, as during the entire period of operation, this will eliminate the splashing of oil from the combustion chamber. Pour it only on 2/3 of the volume.
Recommendations for working with a cylinder
If you decide to do the manufacturing of a drip-type furnace yourself, the drawings will definitely come in handy. It is important to know how to work with the cylinder, otherwise you can’t avoid the explosion, because even if the product has not been used for a long time, it can contain gas that is dangerous. Initially, the valve should be removed from the cylinder by screwing, after the cylinder should be freed from gas residues. Then, water is poured into the hole, only after you can start working with the grinder, which will save the product from the upper part with a hemisphere. At the next stage, the master will have to separate the same area from the bottom of the product. Do not start cutting the cylinder if you have not completed all of the above steps.
When making a drip type furnace yourself, you should get two hemispheres from a gas cylinder, which should be welded by the formation of an annular seam, this will allow you to form the first compartment. In this case, the lower section with the stand should be left below. To the upper part, which also has the shape of a hemisphere, a pipe that has perforation should be welded above the hole. Through this channel, gases will rise into the second compartment, mixing in parallel with air. This indicates the need for a fairly dense perforation.
After the lower chamber is prepared and the adapter is mounted in the form of a pipe, you can start manufacturing the upper chamber. Its assembly is made from the middle part of the product, however, before this, the ends of the cylinder should be closed using sheet steel. In this case, the master must prepare an entrance for installing a perforated pipe in the lower “cover” , and an opening for installing a chimney pipe in the upper one.
Finally
Drip-type furnaces are very economical, and you don’t even have to buy fuel for them, especially if you are a motorist. That is why such equipment acts as the best for heating a garage or industrial premises.