Landscaping “in Russian” is a special type of space decoration. Everything is used: from plastic bottles to old car tires. You can see rubber swans and tracks assembled from car tires in summer cottages or in some city yards. Even old enameled pots in combination with the stumps left after a saw cut of dried trees turn into bright multi-colored mushrooms. Particularly skilled designers make figures of wood, logs and all kinds of stumps. Such materials make very cute giraffes or storks sitting on the remains of a sawn tree near the house.
The leader in the list of improvised art objects from improvised materials
In the list of exotic objects that can be found in the adjoining territories or summer cottages of Russians, the palm of plastic bottles is clearly the leader. In addition to the fact that this work of “bottle art” can even fit quite nicely into the landscape, it also allows you to give a second life to plastic bottles, rather than send them to a landfill, where they will pollute the environment. To make a palm from plastic bottles is possible for any person who does not even have outstanding skills in needlework. You can spend the evening creating such an art object with your children. Therefore, in this article we will look at how to make a palm tree out of plastic bottles.
What will be needed to make a palm tree
First of all, it is necessary to prepare materials. Obviously, in the manufacture of palm trees from plastic bottles, you can not do without a large amount of this container. If you do not drink soda in unlimited quantities, you may have to resort to the help of friends or relatives so that they donate “raw materials” for harvesting. Green and brown bottles are best suited for this. But to show imagination and connect some other shades is not forbidden. Also important is the size of the packaging used. Wide leaves of a palm tree will look most effective . Therefore, it is better to stock up on bottles with a volume of about two liters.
In addition to plastic bottles, for a palm tree you will need:
- Wreck. In this capacity, fittings, a plastic pipe, and a wooden beam of sufficient length can act.
- Materials for fastening the elements: glue, adhesive tape, wire, construction stapler, rope, metal cable, self-tapping screws.
- Stitching accessories: knife, scissors.
- Marker for marking.
We turn to the methods of making palm trees from plastic bottles step by step with their own hands.
A simple way to build a palm tree
If you have never had to build this kind of structure before, we recommend starting with the most uncomplicated version of a palm tree made of plastic bottles - for beginners. Step-by-step production of this art object can be divided into four stages:
- preparation of plastic elements;
- bond of leaves and formation of a crown;
- installation and design of the trunk;
- crown mount.
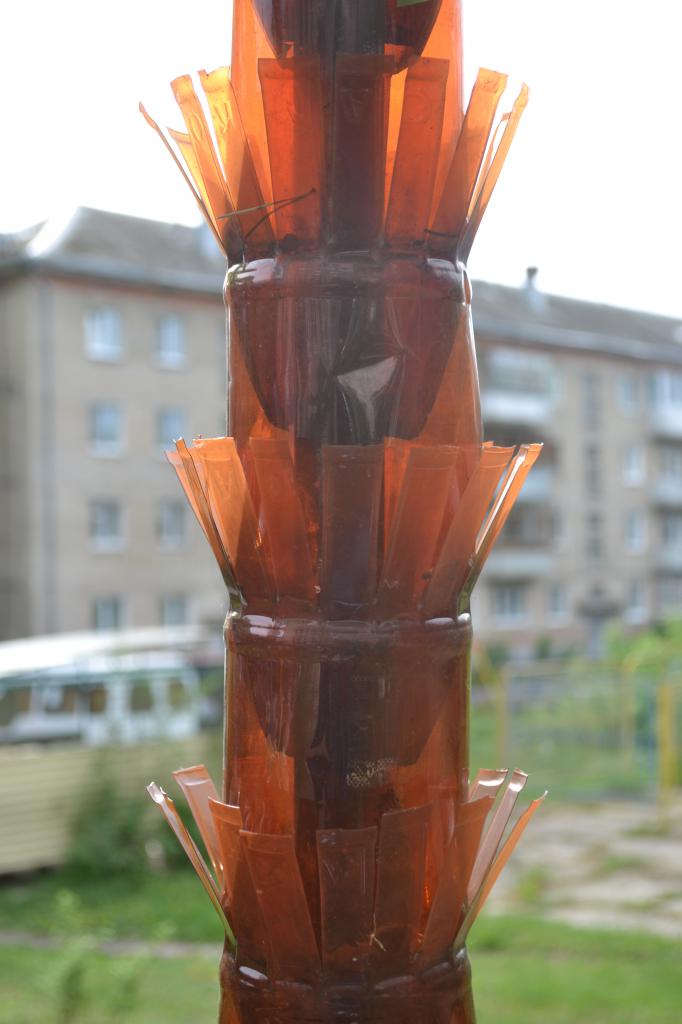
In the bottles from which the barrel will be made (it is best to take brown ones), cut off the bottom by about 3-4 centimeters.
We advise inexperienced designers to make leaves as follows: cut off the lower part by half for green bottles (or slightly less - at your discretion). It should make a long funnel. Further along the cut line, perpendicularly, you need to make fairly deep cuts at a short distance to get something that looks like a fringe.
On a sturdy cable that holds its shape well, you need to put on green blanks: sequentially, with the necks in one direction, trying to insert them into each other as tightly as possible. Depending on the desired size of the future tree, it may take 15 funnels to make one palm tree branch. In total, about six such branches will be needed. They need to be collected in a "bouquet" and fastened together with a rope or wire. The result of making a crown for a palm from plastic bottles is in the photo in the article.
To make the palm stand reliably, it is recommended to dig the skeleton into the ground. The part remaining at the top must be fully decorated with blanks from brown bottles, simply by inserting funnels into each other as tightly as possible.
When the trunk is ready, it needs to be crowned with a crown, which can be attached to the base with the help of the same rope or wire.
So, the palm of the plastic bottles for beginners is ready.
Advanced palm manufacturing
In this case, you need to make a palm tree out of plastic bottles, adhering to the four points described above. However, now it will become more complicated to cut parts from bottles for both the barrel and the crown. You can choose any of the options you like, or even combine several at once.
How can I cut bottles for the barrel
- If you slightly modernize the method described in paragraph "for beginners", you can get a more spectacular palm. For long brown funnel blanks, you need to cut the fringe, as in the leaves described in the same paragraph. When stringing the bottles on the skeleton, the fringe can be "protruded." This will give the barrel a roughness effect.
- Use for the manufacture of the lower part of the bottle with a height of about 10-12 centimeters. The slice of the bottle must be turned into a "fence", making the edge serrated. Bend the resulting teeth about two centimeters high outward. Holes must be drilled in the bottom so that the elements can be put on the skeleton. This should be done upside down.
- The teeth on the cuts of the bottle can be made not sharp, but rounded. Then the assembled trunk will look as if covered with scales.
- For the design of the barrel, you can use only the bottom of brown bottles. But for this, either a thick wooden beam or a plastic pipe of sufficient diameter should be taken as a skeleton. You can attach plastic elements to the barrel using self-tapping screws and a screwdriver, placing the bottoms of the convex part out and drilling them in the center. It is important to place them tightly to each other so that the skeleton does not shine through. To better fill the space, bottoms from bottles of different sizes are suitable.
What shape to give plastic elements for leaves
- Cut the bottom of the bottle. On the remaining long funnel, make four longitudinal incisions towards the neck, bend the resulting “petals”. Along the edges of each of them make serrated or fringed incisions. Assemble several of these items onto the cable. For this option, palm trees from plastic bottles can take a relatively small container. After assembling the required number of branches, fasten them together in the form of a bouquet.
- Cut green rectangles as large as possible from green bottles. To give them the shape of a sheet - cut the edge with cloves or fringe. Details should be quite flat. To make a branch out of them, you need to sew them together with a stapler or wire. Fasten the ends and tie them to the skeleton with a rope.
Recommendations for assembling palm trees from plastic bottles
The manufacturing options for the elements indicated in the previous two paragraphs can be combined in any way you like. The main thing is that the end result is pleasing to the eye. Particular attention in the manufacture of palm trees from plastic bottles with their own hands should be given to the assembly of the structure.
So that the crown does not fall apart, in the case of using bottle elements with necks, it is worth putting caps on the end blanks. Pull a cable or rope through them, on which fragments are strung, and tie good-quality knots. On the side that the branch will be attached to the crown, it is recommended to leave a sufficiently long end of the cable (rope).
What else can be made from plastic bottles
In addition to palm trees from plastic bottles, you can also make various fruits. For example, pineapples. In this case, take a large five-liter container as a basis, stick cups from plastic disposable spoons on it so that the bottle is covered with “scales”. Then the spoons are painted with brown paint. From green bottles, smaller leaves are made, as described in the paragraph "Palm for beginners." The resulting tops just need to be inserted into the neck of a large bottle.
Also, using the fringed method of cutting funnels from bottles, you can build swans. For the body you need to take a large five-liter, and for the neck - a container with a volume of not more than one and a half liters. You can give a curved shape to the neck if you string the bottles on a thick wire or cable.