The cost of an ordinary mobile cart is over 6,000 rubles. But you can make the construction with your own hand of metal, wood, profile. Self-assembly saves 80% of financial resources. And if you make a tool trolley with your own hands made of wood, then the elements for assembly can be easily found at hand. The only thing you need to get is the wheels.
Instruments
Equipment for work is probably available at any construction company. You will need the following:
- roulette;
- square;
- pencil;
- jigsaw;
- hacksaw for precise cutting of wood;
- self-tapping screws;
- screwdriver.
According to sketches, drawings and photos, it is easier to do a tool cart with your own hands, since the exact dimensions and appearance of the product will be indicated.
Materials
If the tree can be found at hand, then some important materials will have to be bought. You must list the following:
- iron corners for a strong connection of elements;
- plywood, MDF sheets - so that their thickness is at least 1 cm;
- wooden bars with a cross section of 5 cm;
- 4 wheels
- varnish or paint;
- antiseptic impregnation.
They buy the material with a margin of 10-15%, because marriage can happen, and the craftsman will have to go back to the store for wood - this is an extra waste of time.
Assembly of a wooden cart
Having prepared everything you need - tools, sketch, material - you need to start work. The product in appearance resembles a narrowed rectangle.
This design fits more details, the trolley is easier to move, and also it will freely pass into the doorways. Build progress:
- The preferred dimensions of the do-it-yourself tool trolley are: length - 120 cm, height - 90 cm, width - 60 cm. Therefore, the material is cut based on these sizes.
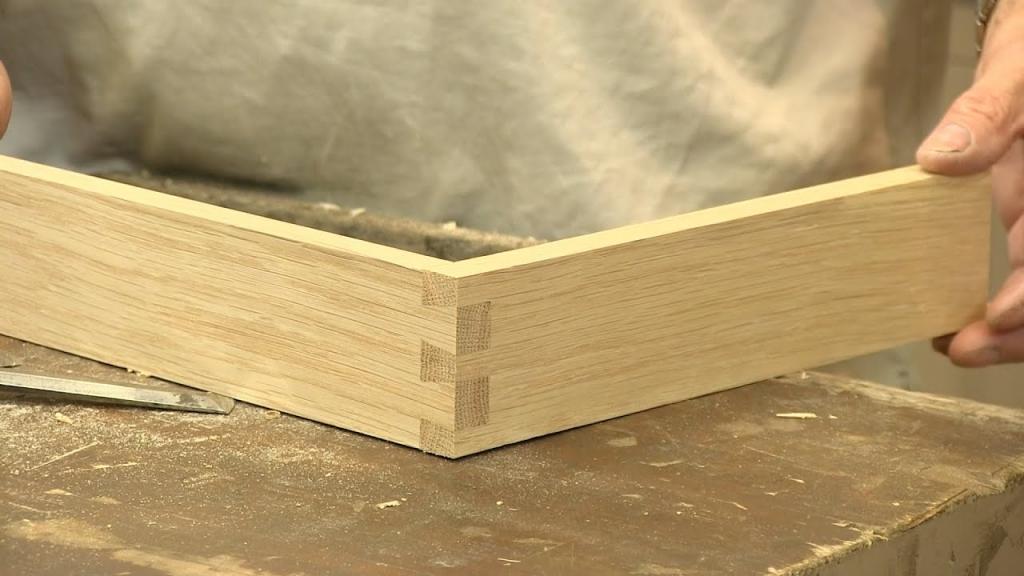
- Make the bottom of the frame. Lay blanks with a length of 60 cm and 120 cm beech "G". A lock is cut out at the jig with a hacksaw. If the width of the bar is 5 cm, then 2.5 cm in length are measured from the end, and 2.5 in width from the edge. Elements join and pull together. The remaining parts are made in the same way.
- Supports are attached to the constructed lower frame. In the course of work, locks are cut out and fastened with screws. They use a square so that the design is even.
- The upper frame is mounted in the same way as the lower one. Gather a rectangle from the bars, cut out the locks, turn the product over - it's easier to work with. And they screw the blanks with screws.
- If the height of the cart is 90 cm, then it is divided into 3-4 parts of 22.5 or 30 cm. The dashes are symmetrically drawn on the supports with a pencil. This will help roulette. On the inner side of the racks, cutouts for locks are cut. Apply a jumper and screw it on. So do on 4 sides. That is, they make the same frames as the upper and lower.
- On boards of the first level, 4 boards with a thickness of 2 cm and a length of 60 cm are attached, plywood or MDF is wound on top. So do on all tiers.
- At the bottom, bars are symmetrically and firmly screwed onto which 4 wheels are attached.
- In the upper part, 2 short bars are attached to make a distance of 7 cm from the frame, and a handle 30 cm long is attached.
- At the end, the product is treated with antiseptic agents, varnish or paint.
If possible, instead of open tiers, drawers can be made using plywood, thinner bars and furniture corners with rollers that will allow you to push the elements.
Equipment for metal mobile construction
Making iron carts will require basic welding skills. You must also purchase:
- welding machine;
- a mask with protective glass C-3 or C-4;
- electrodes with a diameter of 3 mm;
- canvas gloves;
- hammer;
- grinder;
- square;
- roulette wheel;
- a thread;
- scriber.
Do not cook metal without protective equipment, otherwise you can get burns that will heal for a long time.
Iron parts
Material for work will require a minimum. It is advisable to use non-rusty, rotten elements, otherwise the service life of the product will decrease. The list of necessary:
- corners or square pipes with a section of 4 cm;
- metal sheets 2 mm thick;
- armature for the handle;
- rubber hose;
- paint;
- 4 wheels.
In time, a do-it-yourself tool trolley made of wood is much longer than a metal one. In the second embodiment, it is not necessary to make locks for joining wood.
Manufacturing steps
For work, choose a flat area, for example, a concrete slab. Materials are cut to the desired size and taken for the job:
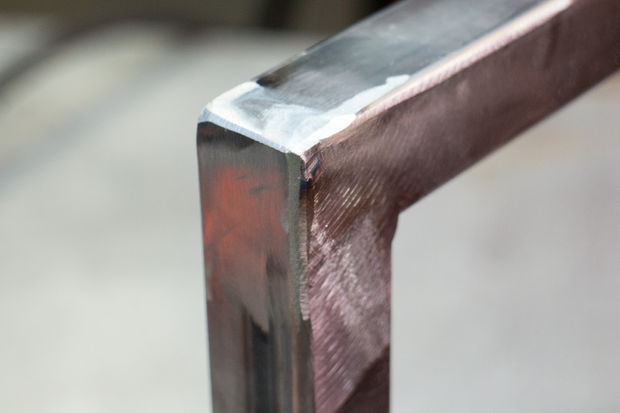
- From corners or square pipes, a 3-tier frame is assembled. 2 elements are laid with the letter "G", the connection is seized by welding.
- They install racks and also make point tacks. A square is checked for evenness, if the part is deviated from the norm, then it is knocked out with a hammer.
- The connecting parts of the frame are scalded. Shelves are made of sheet metal and welded.
- The box is turned over, iron elements are attached at the bottom, on which 4 wheels are attached. These 4 parts must be installed exactly one to another using a tape measure and thread.
- In the upper part from the end of the cart, 2 pieces of reinforcement are welded - the base for the handle. A rubber hose is put on the rod and welded to the rods. In appearance, the product looks like a football goal.
- The seams are tapped with a hammer and remove the slag. If there are left undigested places, then they are again scalded.
- Compounds are lightly scraped with a grinder. If the leg of the seam is greatly reduced, then the strength of the joints will decrease.
- The product is cleaned of possible rust and stained.
Attention! To make the connection of metal parts stronger, use bolts and nuts, but you need a drill, and more time will be spent on work.
A self-made tool trolley for car service is ideal, as well as for any other enterprise where you need to move heavy accessories.