Finishing the ceilings with fabric looks quite rich and stylish. There is a huge selection of colors and textures that are suitable for decoration. There are also a large number of finishing methods. It is about them that we will try to tell as detailed as possible in our article.
What are the fabric ceilings?
There are several ways to decorate the ceiling with fabric, the most popular:
- Draped canvas.
- Stretch fabric ceilings.
- Pasting the ceiling surface with silk material.
These are the main types, then we will consider them as detailed as possible. Everyone has both advantages and disadvantages. Moreover, sometimes the disadvantages are so serious that the choice of method is unacceptable in a particular case. And then we will talk about what types of structures exist, as well as how to install fabric stretch ceilings with your own hands. But first things first.
Tension ceilings
They are made from special paintings, based on which are synthetic material and polyurethane impregnation. Fastening is carried out on special baguettes using clips mounted around the entire perimeter of the room. Among the advantages can be identified such:
- No draft ceiling preparation is required.
- High strength and durability.
- High degree of resistance to fire.
- The surface is perfectly flat.
- With their help, a perfectly smooth and even ceiling is obtained.
But there are drawbacks, and to some they may seem too serious:
- Not a very large selection of colors - only basic and their shades. Therefore, in some cases it is difficult to choose the ideal option for a particular design.
- Drawing can be applied only after the final installation of the ceiling.
- You must have the skills to establish the design of the ceiling.
- If you decide to dismantle the ceiling, you will have to buy a new canvas - the old one will not work.
These types of ceilings are ideal for rooms decorated in a classic style. They unobtrusively and gently emphasize the decoration of walls, furniture. However, they will not distract attention to themselves. It can be used in cabinets, living rooms, even in bedrooms.
It’s just that it is impossible to install these types of ceilings in rooms with high humidity - condensation and dirt will collect on the material. In the kitchens, you should not use them either - all the smells will be absorbed by the material, and the fat and soot will remain on the surface. Please note that the manufacture of suspended ceilings from natural fabrics is allowed. But the main thing is to choose the right canvas. It should be so wide that it does not turn out extra seams. Typically, curtain types of fabrics are used. Next, we will talk about how to make a fabric ceiling with your own hands.
Draped fabric ceiling
This variety involves the use of any fabric - you can use organza, translucent chiffon, and even smooth silk. Due to the fact that different textures are used, it turns out to achieve the desired effect, to give the surface a certain shape. Two-layer designs are very popular, in this case, drapes are mounted on top of a stretched smooth ceiling made of dense types of fabric.
Usually a translucent shimmering material is used for it. If desired, you can decorate with the help of drapery both individual elements and the entire surface of the ceiling. Fasteners are made in this way:
- Using staples or small studs with wood guides.
- Using adhesive tape.
- On a wooden frame, which is subsequently fixed to the ceiling.
Before you stretch the fabric ceiling with your own hands, you need to determine the type of design. Among the advantages of a draped ceiling are the following:
- No expensive preparation of the rough foundation is necessary.
- Do-it-yourself installation is very simple.
- If necessary, you can dismantle the canvas to clean it or replace it.
- High resistance to various kinds of mechanical stress.
- Large selection of colors, patterns, textures. With this material you can create the perfect finish.
- The cost is not very high, but the material is high-quality and reliable.
Disadvantages of draped ceiling
But there are significant shortcomings, among which are the following:
- The ceiling level drops very much due to drapery. Therefore, you should not install such a ceiling if the height of the rooms is less than 2.7 m.
- The fabric belongs to fire hazardous materials, so special attention should be paid to the quality of the fixtures and wiring installation.
Drapery can be stretched in rooms in which it is necessary to create comfort and a homely atmosphere. For example, it can be a nursery or a bedroom, a dining room, a living room, an open veranda or a terrace. Moreover, you can install it in the summer, and remove it in the winter. Do-it-yourself stretch of the fabric ceiling will not take much time.
The ceilings fit very well in rooms decorated in Empire or Oriental style. In smooth fabrics, decorate country-style rooms and Provence. As for children's rooms, for them you can use fabrics with some magical motifs, the heroes of your favorite fairy tales. Any fabric is suitable for the manufacture of drapery, the main condition is that it must be resistant to sunlight. She also has to keep her shape for a long time.
Pasting ceilings with fabrics
In order to finish the ceiling in this way, satin or silk is usually used. Cloths are glued butt on a previously prepared surface. In fact, the procedure is very similar to wallpapering. The most important thing is to use special adhesive compounds that will not leave streaks or change the structure of the material. Pay attention to the fact that silk can be either plain or printed with a pattern. Through the use of light-colored fabrics, you can visually increase the height of the ceilings, expand the room, give it a soft glow.
Due to the bright colored fabrics, you can attract attention and achieve originality. When installing a fabric stretch ceiling with your own hands, you get the following advantages:
- Rich and stylish look.
- The material is clean, does not emit harmful substances and does not interfere with air exchange in the room.
- It does not fade during use.
- Do not lower the ceiling level in the room.
- Self-assembly is possible.
But there are disadvantages:
- Be sure to carefully level the rough ceiling, make the yoke perfectly smooth.
- After gluing, the fabric cannot be removed and washed.
- You must carefully select the material.
You can glue the ceiling with a cloth in any room - both in the office and in the bedroom. The main thing is to choose the right pattern and shade. Very often, designers finish silk niches in the ceiling. When choosing colored silk, it is necessary to take into account the general style of the room and its size. A bright large picture will visually expand the room. But small printed can give her comfort. If the ceilings in the room are low, it is best to use fabrics of light colors.
What tools and materials are needed
Textile ceilings can be ordered from specialized companies, and if you have the tool and certain skills, you can easily install them yourself. This work is not very complicated, you need to follow the technology and be careful. To install a fabric ceiling with your own hands, to buy a set of baguettes and fabric will not be enough. It is also necessary to prepare materials.
You will need:
- Canvas made of polyester or other fabric;
- guiding baguettes with clips;
- puncher, drill - depends on what material the walls are made of;
- tape measure, scissors and knife;
- level;
- a blade for dressing the canvas in a baguette;
- Paint tools for removing old finishes and surface preparation.
Stages of work
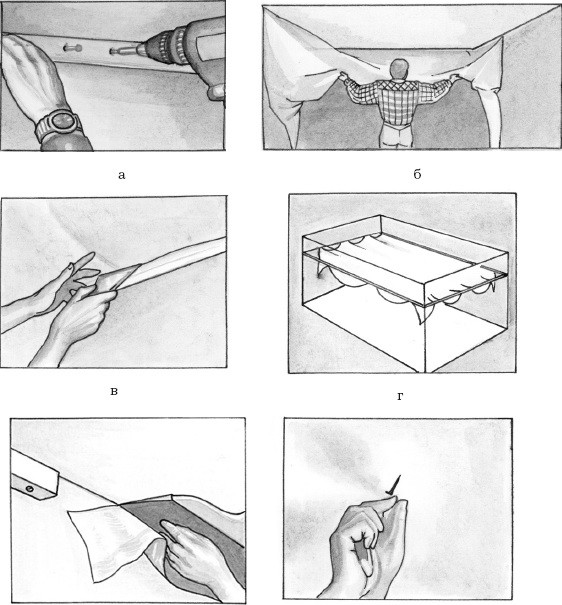
In order to independently make this type of stretch ceiling, you need to adhere to the following algorithm:
- Prepare the surface. Under fabric ceilings, you do not need to perfectly level the surface, just remove the old coating, which is peeling, or finish. Paint or whitewash is removed with a spatula or wash. Wallpaper must be removed and wash off the remnants of glue. Close up cracks, seams and cavities with putty. All suspended structures must be completely dismantled, from the fastening of the frame the holes must be sealed with putty. In the event that this is not done, the sound insulation will deteriorate significantly.
- Now proceed to marking the level of the location of the guide elements. In order for the ceiling to be flat and horizontal, it is necessary to carefully mark it by level. It is most convenient to use a laser, but if it is not, then you can do with a simple bubble. The markup needs to start from the lowest angle. Depart from the ceiling surface at least 5 cm, draw lines with a pencil or marker. Use the level on both adjacent walls. Draw the lines to the corners, put a mark in them. From these marks, draw lines in the same way to the last corner. Ideally, if they converge at one point. This means that the work is done correctly.
- Proceed to install the guide elements. As guides, it is best to use baguettes for a stretch ceiling made of aluminum or plastic. They have special clips, clips, under which the canvas is tucked with a spatula or spatula. Guides are fastened along pre-marked marking lines using dowels and screws. Holes in the wall are made with a drill or a perforator every 0.3-0.4 m.
- The next step is the installation of lighting platforms. In this case, strictly follow the instructions for the device that you have chosen.
- Cut the canvas. Fabric for the ceiling must be cut exactly to the size of the room, leaving allowances of at least 20 cm on each side. The fabric, when compared with a PVC cloth, is not very elastic, so it won’t stretch. It is important to correctly calculate the required width and make a cutting of the material. Cloths from specialized material are selected along the width of the room. While the length is rolled in place from a roll.
- The process is in full swing, now you need to fix the canvas. It is straightened and leveled so that the same allowances remain on all sides. Step back from an angle of at least 50 cm, temporarily fasten the canvas in a baguette, maintaining a step of 50-70 cm without strong tension around the perimeter of the room. Ceiling mounting should start from the middle of the shortest walls. Then fasten the long walls, and fill the corners in baguettes at the very least. The fabric is seasoned with a rounded spatula.
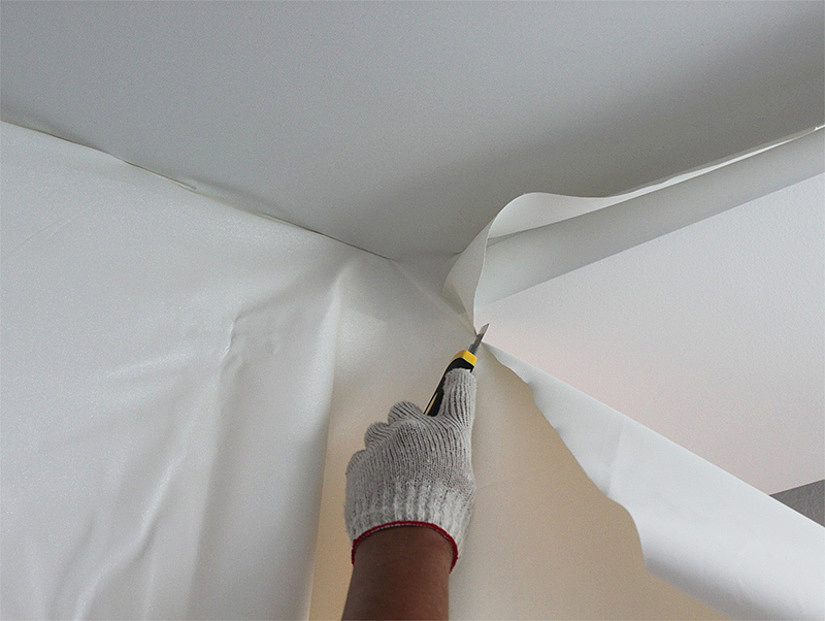
- The last stage of work with the main canvas is trimming and final fastening. Gradually pull up the canvas, align and pull it to an elastic state. Surplus needs to be cut off with the help of a mounting knife or scissors. After cutting with the help of a spatula, fill the rest of the fabric into a baguette.
- Well, that’s all, the main part is fixed, now you need to install a decorative baseboard that will close the gap between the ceiling and walls.
- The last stage is the installation of fixtures. To do this, cut holes in the canvas of the required size. Apply glue to the mounting ring. It adheres to the canvas in place of the lamp so that the centers coincide. After setting with the fabric, the material in the ring must be carefully cut. Adjust the height of the lamp so that as a result it is at the level of the canvas. Only then screw in the lamp. It is advisable to use simple lamps up to 60 watts or halogen up to 35 watts. This will avoid strong heating and deformation of the canvas in the area of the lamp.
Stretch fabric ceilings may also be mounted on wooden bars installed around the entire perimeter of the room. In this case, the fabric is fixed to the guides using a construction stapler. After the fastening place, you need to close the baseboard or baguette made of polyurethane.
Draped ceiling mounting tools
Unlike smooth, draped ones do not need to be pulled tight. They can form waves or folds. You can collect the fabric in the center of the room and get a tent. You can pre-mount the frame on the ceiling and give relief and bends in certain places.
In order to do the installation of a fabric ceiling with your own hands, you will need such tools and materials:
- Wooden blocks with a size of 20 x 40 or 40 x 40 mm, depending on the density and weight of the fabric, as well as the dimensions of the room.
- Drill, hardware for fastening the bars to the walls.
- Electric jigsaw.
- Level, roulette.
- Fabric (you can use either one type or several).
- Tape or elastic for curtains. It will allow you to make perfectly flat folds.
- The stapler is construction.
- Decorative polyurethane baguette, small nails for its fasteners.
The most important task is to correctly calculate the size of the fabric for drapery. In order to prevent mistakes, it is recommended to draw a sketch of your ceiling in scale. After that, you can cut out of soft paper at the same scale canvas. Fold them in accordion and place them on top of the drawing. The more folds, the denser the drapery. It is also necessary to leave allowances for fastening to the guide elements.
The ceiling is prepared before installing the draped fabric in the same way as when installing the tensile structure. If the fabric is semitransparent, and the ceiling is heterogeneous dark in color, it is better to pre-dye it or at least putty it with a light composition. Marking the walls under the guide bars is carried out according to the technology described above.
Installation Instructions for Drapery Ceiling
And now we will talk about how to do the installation of a stretch fabric ceiling with your own hands. A step-by-step instruction is something like this:
- Cut the bars and mark. Drill small holes in them, a step of about 40-50 cm. Through them, then mark the wall. To do this, attach the bar with the bottom edge to the line drawn in advance.
- Now fasten the guide bars. According to the marking, drill holes in the walls and hammer the dowels into them. After this, fasten the bars with screws. If you need to create a complex shape of the ceiling, make a frame from the bars.
- Prepare the ceiling for work. Cut fabric. In order to make the usual longitudinal drapery, on two opposite sides of the fabric sew a simple linen elastic. She will help to fold the fabric. To arrange the ceiling in the form of a tent, you need to cut out several strips of fabric of the same width. Canvases of various shades are allowed - this can give the tent charm. One side must be assembled, the second evenly distributed over the entire width of the sector.
- Now proceed to the fasteners. Grab the corners of the fabric to the bars with a stapler, evenly distribute the folds. Fasten the canvas around the perimeter. For thick materials, use a stapler. Thin cloth is best pressed to the bar with a wooden plank and beat with small nails.
- The last step is the installation of decorative baguettes. They will allow you to close the gaps between the ceiling and walls. As you can see, the installation of a fabric stretch ceiling with your own hands is quite simple, but you have to follow certain requirements.
How to paste the ceilings?
Pasting with a cloth is almost no different from wallpapering. Preparation only needs to be done more carefully, otherwise the fabric will not be able to hold. The pasting material must be strong enough. It is best to choose natural or artificial silk.
It is necessary to purchase and prepare such materials and tools:
- Satin or silk fabric.
- Mastic or glue.
- Paint tool for puttying and leveling.
- Foam roller for applying the composition and hard for leveling;
- Scissors, tape measure, level.
Installation of a fabric stretch ceiling with your own hands is performed in the following sequence:
- Thoroughly prepare the surface. The fabric that adheres to the ceiling will subsequently reveal all defects and irregularities. Therefore, you will need to carefully prepare it. First you need to remove the old coating, and then close all the seams and cracks. Level the ceiling with putty. Dry and apply a primer.
- Prepare the fabric. , . , . . 5%, . . .
- . . 10 . , , , . . , . .
, , . . . . .
Glue the next strip end-to-end, carefully roll the seam. Cut off the rest of the fabric near the walls. Dry the glue or mastic according to the instructions. The joints of the walls and the ceiling are finished with a decorative baseboard or baguette, and they are also fixed on the adhesive structure. At this installation of the fabric ceiling do it yourself.