The weather vane was invented long ago as a meteorological indicator of the strength and direction of the wind. Later it began to be used as a decoration at home or an advertisement of some institution. For example, a shoemaker installed a weather vane with an image of a boot at his entrance. He spun from the wind and attracted the attention of passers-by, luring him into the workshop. The barber used a vane-scissors, the miller - the image of the mill.
Variety of weathercocks
The manufacture of weathercocks attracted many craftsmen. They were made forged and carved, wooden and steel. Artists came up with plot pictures with moving figures. In olden times, people were so carried away by such an occupation that almost every building had this decoration. The types of weathercocks impress connoisseurs so far. In Soviet times, the manufacture of such products has quieted down a bit, but now the tradition is reviving.
Nowadays, the quality and variety of materials is very high. They are made by professional craftsmen and ordinary people. Knowing how to make a weather vane, a child can perform this operation. Children already in kindergarten make simple windmills from paper. But schoolgirls or parents together with children can make a weather vane from plastic bottles.
Weather vane "Yula"
To make a weather vane with your own hands from a plastic bottle, you need to have a 2-liter empty bottle, you can take a colored one. Cut it in half. In the center of the round bottom, you need to punch a hole and scroll in it several times with a heated metal rod. From the temperature, the plastic will melt, and the hole will be with a beautiful even edge. This is necessary so that the weather vane rotates freely around its axis.
The next step is to cut the fringe of the same length on the lower and upper half. Leave 5 cm to the edges. After this, the strips need to be smoothed towards the base so that a flower is obtained. Next is the process of gluing them together. In order to get a volumetric weather vane, you need to flip one of the strips when gluing and move it by one. As a result, we have the shape of a Christmas lamp.
You can decorate the stripes with a pattern. To do this, draw horizontal lines or circles. It remains to put the bottle on a stick and hammer a nail through the lid . They hammer it loosely so that the bottle spins freely.
Two-tier weather vane
In order to make a homemade weather vane from 2 tiers, you need to have a very sharp blade or clerical knife. A two-liter plastic bottle is taken, 2 strips of parallel strips in the upper part and 2 strips in the bottom are marked with a felt-tip pen. The distance between the strips is different, for example, between the upper strips - 5 cm, and between the lower ones - 10 cm. Then the most laborious process begins. It is necessary to measure the perimeter of the bottle with a round meter, divide it into equal parts, put points on the top and bottom. Between the strips, using a pattern, draw semicircles, connecting the opposite points.
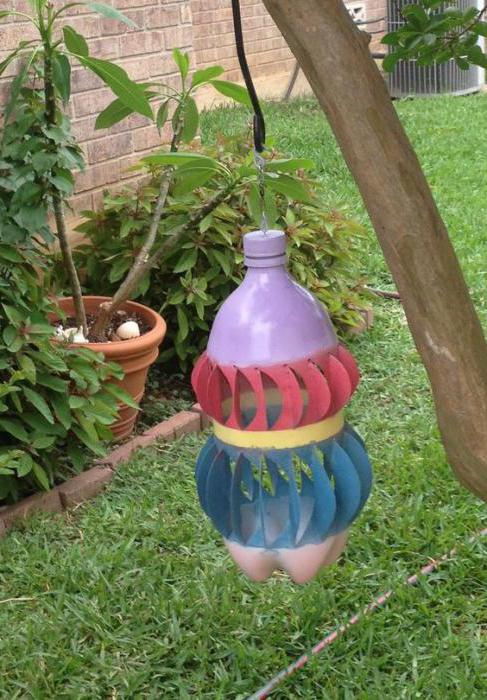
Do the same with the bottom two stripes. It remains to properly incise the marked semicircles. However, it will be difficult to do with an empty bottle, so it is better to fill it with something dense, for example, sand. The resulting arcs will need to be smoothed by bending in the opposite direction. Further, you can optionally color the upper arcs with one color, the lower ones with another, and seal the strip between them with colored tape. Then the procedure is completely repeated, as in the first weather vane. It is necessary to punch a hole in the bottom of the bottle and pass the lace through the hole, hanging it on a branch.
"Ferris wheel"
At each summer cottage there is an old children's bike from which the child has long grown. We will use it in order to make a weather vane with our own hands from a plastic bottle. Although several bottles will be needed, an even amount is desirable. For an aesthetic appearance, you can take bottles of different sizes and colors. For example, large bottles will be yellow and small bottles green. Next, let's mark the wheels.
To do this, draw a drawing of a weather vane with dimensions. First circle the wheel on a piece of old wallpaper. To mark the center on the resulting circle and divide it into equal sectors so that there is an even number of radii. At the junction with the circle, put the points. After marking, transfer everything to the wheel. Then we drill holes in a circle, insert a bolt into each and fasten the bottle cap so that the thread is outside the wheel.
The next step is to prepare the bottles. Small ones are screwed directly through the wheel onto one wheel, and large ones cut off part of the side wall. It turns out a blade that will repel air when the wind vane rotates. Then we also screw them into the remaining places. The blades should look in one direction.
It remains only to make a holder for the wheel. Here you can use a wooden block on which a bicycle wheel is mounted on top of a long bolt.
Horizontal pinwheel
One of the fastest ways to make a weather vane with your own hands from a plastic bottle is the manufacture of a horizontal turntable. To do this, you need to take an empty 1.0- or 1.5-liter bottle, preferably a colored one. From above, at the beginning of a flat surface, mark out equal width strips. The distance between them should also be the same. We cut along the lines received to the end of the flat part of the bottle, to the lower rim.
Next, we make incisions of the strips from below, through one. We leave one strip in place, and the next one needs to be cut from the bottom and bent in the opposite direction. The edge of the strip is better to round. Further in the lid we make a hole for a metal rod. We insert one part of it into a wooden block, and the other into a bottle through the lid. We decorate the blades as desired.
The easiest weather vane
This option will show how to make a weather vane simply and quickly when there is absolutely no time for it, and the child urgently needed it. We take a plastic bottle, preferably a two-liter bottle, and make incisions in the form of a square bracket.
The resulting rectangles are bent to the side until a right angle is formed. It remains to make a hole in the bottom and insert a thin rod. The product is ready. At the same time, since the baby already made you work, then you, in turn, give him the task to decorate the weather vane beautifully.
Plastic scared
Sometimes gardeners and summer residents, in order to preserve the fruits on the trees, use weathercocks, which spin in the wind and scare away the birds. The last version of the weather vane needs to be put on a pole in the middle of the garden, and your crop will be saved. To do this, take two identical 1.5-liter bottles and cut off their bottom. Then we glue them together. You can use hot melt with a gun, or you can wrap it with transparent tape several times. It turns out a long cylinder.
Next, you need six bottoms from small plastic bottles of the same size. We also take hot glue and glue 3 bottoms for the side surface, at an equal distance around the top of the cylinder. We do the same from below. The bottoms should look in the same direction with the open part. It remains to take paints or multi-colored self-adhesive and draw facial features to our scarecrow. Then we make holes in the covers and put the structure on a long metal rod.
As you can see, making a weather vane with your own hands from a plastic bottle is a simple matter. You can come up with your own options.