The circular saw is a convenient and productive tool that is used for construction work. Using this equipment, you have the opportunity to use the qualities of maneuverability, as well as speed. However, when cutting large batches of lumber, it is quite difficult to work with this tool. The table for a circular saw greatly facilitates the task , it can be made with your own hands without any difficulties.
Execution Features
The design can be based on plywood or board. In this case, the tool will need to be installed in the lower part of the tabletop, while the toothed disk will have to be located in the opening of the desktop. The element used for cutting will extend beyond the rectangular hole.
After the saw is turned on, the disk will rotate, and when the material is fed, it will begin to be sawed. The greatest thickness of the processed material will depend on the dimensions of the disk, as well as the power of the tool. When choosing equipment, you need to take into account the thickness of the countertop, to which the saw will be attached to the bottom.
Features of the choice of "circular"
If you do not already have a circular saw, then it can be purchased, taking into account some characteristics, among which you can highlight the power of the equipment. If the tool is supposed to be used for domestic tasks, then a power of 800 watts will be enough to make a table for a circular saw with your own hands. This indicates that the volume of work will be average.
It is important to pay attention to the depth of cut, the maximum thickness of the processed material will depend on this. Semi-professional or professional class hand saws, as a rule, have a cut depth in the range of 40 to 70 mm.
Technology of work
Holes in the surface of the desktop must be drilled through the markup through. Marking stiffeners when you make a table for a circular saw, you need to carry out until the moment of cutting. Fixing the ribs to the countertop is done using wood glue, the elements after joining should be compressed with clamps. In place, you need to identify the location of the lateral stiffeners, which then need to be sawn and glued in the same way.
Features of the work
If you decide to make a table for a circular saw with your own hands, drawings you can be prepared independently. After gluing the clamps, it is not worth removing immediately, the design must be additionally fixed using self-tapping screws that are installed in the holes. They need to be prepared from the bottom so that the fastener caps are recessed in the structure. After the glue has dried, the stiffeners can be removed from the clamps. On this we can assume that the countertop is ready.
Leg recommendations
A table for a circular saw with your own hands should be made using legs, which should be made of a board 50x100 millimeters. The height of these elements will be determined by the height of the master, as a rule, this parameter is 110 cm. The board needs to be cut along the axis at an insignificant angle on one side. Further, the workpiece is applied to the countertop, so that when installing the legs are somewhat spread out. The fastening of these elements must be carried out from the outside of the stiffeners, it is recommended to use bolts.
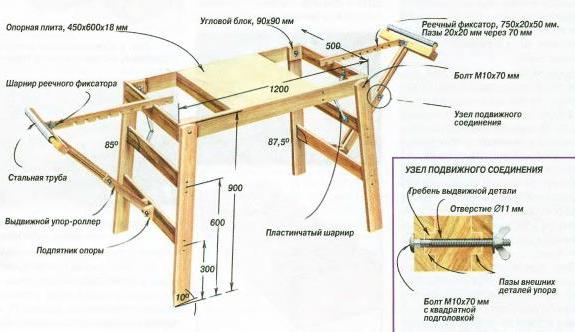
Making a table for a circular saw with your own hands, a photo of which can be examined previously, you need to try to increase the stability of the structure in parallel with the mounting of the legs. To do this, you can perform a screed, which is made from a bar with a section of 50x50 millimeters. The hand-held circular saw must be installed in the prepared groove on the underside of the work surface. The sole should be secured to the bolts, and the toothed disc should be installed in the slot. Marking can be applied to the table, which will greatly facilitate the cutting of materials.
The very surface of the table to protect against moisture can be varnished, which is applied in several layers. When a table for a circular saw is made, after applying the first layer, it is necessary to wait for it to completely dry, only then you can start coating the surface with another layer. This approach will eliminate the effect of sliding lumber on the work surface.
Turning the saw on and off
Making a table for a table circular saw with your own hands, you must at the last stage solve one important issue. It consists in the task of turning the saw on and off. If the master has a sufficient amount of experience and knowledge in electrical engineering, then he can bypass the power key, and then take out the control buttons on the outer surface of the stiffener, which is located in front. If this scheme is too complicated for you, it will be enough to pull the key, using the wire. But you can turn the saw on and off using the power cord.
Making a table in the form of a trolley
If you want to make the table mobile, then its upper part can be made in the form of a trolley. As its side walls, which will be located behind and in front, you can use chipboard, its thickness can be equal to 16 millimeters. The legs of the table will be bars, the cross section of which is equal to 50x50 millimeters. The supports for the wheels of the structure will be represented by boards whose thickness is 35 millimeters. In order to increase the quality of table stiffness, the back and front walls need to be reinforced with a board whose thickness is 20 millimeters. All parts must be assembled using self-tapping screws and optional PVA glue. Wheel support boards must be secured with metal angles.
To mount the cart on the table surface in the supporting boards, you need to make shallow recesses, the radius of which will be equal to the radius of the wheel. For fastening to the surface of the ladder table, you need to install two elements in the form of inserts, which must be mounted on a single plate. On this, we can assume that the do-it-yourself table for the circular saw is made, and it can be started to be used in tandem with the main tool, which at least once was necessary for every home craftsman who likes to work with wood.
Finally
If you decide to make a table for a circular saw with your own hands (DP 2000) using this technology, then the process of work will not be accompanied by unnecessary difficulties. Any home master, even one who does not have certain skills in doing this kind of work, can handle this. If you have a desire to significantly expand the functionality of a desktop designed for a circular saw, then you can increase its safety indicator. You can make the design more complex, it all depends on your skill, and most importantly, the desire to explore new horizons of construction work. I wish you success and successful new solutions!