"Knitted" manicure is one of the most interesting novelties in nail art, which managed to gain some popularity among domestic fashionistas. Modern masters know many options for its implementation. Thanks to the periodic change of patterns, you can give your hands a stylish and well-groomed look. After reading today's article, you will understand how to make a "knitted" manicure.
Key Features
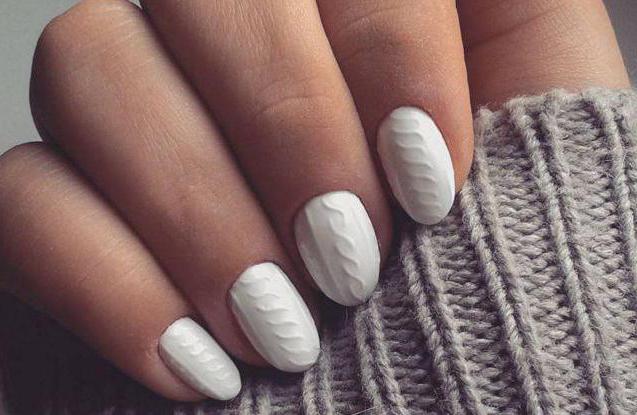
In the process of performing such a manicure, a textured pattern is applied to the nail , which can be felt by running a hand over it. For this, you can use not only ordinary, but also gel polish. And in the second case, you can achieve a more winning result. Of course, you can use ordinary varnish. But then the coating will have a simpler appearance, without volumetric effect.
This design looks especially good on short and medium nails. To make the pattern look more natural, it is performed in one color scheme, lightly sprinkled with acrylic powder or velvet sand on top. Often, decorative elements like sparkles or rhinestones are placed on a white, light blue, pale pink or beige background.
Application Methods
Those who are trying to figure out how to make a “knitted” manicure will be interested to know that today there are several ways to do it. The most popular is the classic technology, which involves coating all nails with the same varnish. Thanks to this, it is possible to avoid sharp contrasts and emphasize the sophistication of the image.
In addition, there is a so-called youth technique, which suggests that an identical ornament is applied to several nails. In some cases, the master decides to create a foundation and pattern using varnishes of different colors.
Among domestic fashionistas, a method involving the application of multicolor patterns is no less in demand. This subgroup can include a unique ombre technique.
The main advantages of this design
Those who want to understand how to make a “knitted” manicure will probably be interested to hear about the advantages of such nail art. The main advantages of this technique can be attributed to the fact that it looks equally impressive on both short and long nails. A correctly applied elongated pattern visually extends the plate, giving the hands a more aesthetic appearance. Stripes, chains and pigtails look especially beautiful on short nails.
In addition, a “knitted” manicure does not have to be done on all fingers. They can be decorated with one nail on each hand. Manicure with several types of decoration looks quite impressive and fashionable. For example, one finger can be decorated with a “knitted” textured ornament, the other can be completely covered with silver or golden sparkles.
How to make a "knitted" manicure gel polish?
It should be noted that the basic technique, which will be discussed below, is so simple that even a layman can easily cope with it. First of all, you need to do the preparation of nails. The cuticle is removed from them, polished, given the desired shape and degreased. After that, the plate is coated with an acid-free primer, providing high-quality adhesion of subsequent layers.
Then, the base is applied to the nail and dried under a UV lamp. In the next step, the plate is painted in the desired color and the weaving begins. Those who want to understand how to make a “knitted” manicure with gel polish can be recommended to use a thin brush for these purposes. It is very easy to weave the desired ornament with it.
A straight line is drawn along the nail, it is dried under an ultraviolet lamp and the manipulation is repeated again. This is necessary to obtain volume. After that, at a slight slope to the textured line, short strokes are applied so as to obtain a herringbone-like pattern. In this case, each layer of varnish is dried with ultraviolet light. On the other side of the line they put dots. Top nail is covered with top, dried under a lamp and the sticky layer is removed.
How to make a "knitted" manicure ordinary varnish?
This technology is very simple, and therefore enjoys increased popularity among modern women who monitor their own appearance. She is good because it does not require any specific skills from you. You can implement such an idea not only in the salon, but also at home. Before you make a “knitted” manicure, see if you have everything you need on hand. To create a textured ornament, you need varnish and velvet sand. It is advisable to use several harmoniously combined shades. Thanks to this, you can achieve a brighter effect.
Before making a “knitted” manicure with ordinary varnish, the plate is covered with top. This will make subsequent layers more even. Then the nails are painted with varnishes of different shades and, if necessary, repeat the procedure. After that, the desired ornament is drawn on the surface of the plate. It is more convenient to do this with a thin brush. They did not have time to dry the coating, sprinkled with velvet sand. In order not to violate the soft effect of binding, the finish should not be applied to the nails. Just wait for the layers to dry completely.
Useful Tips
Having figured out how to make a "knitted" manicure at home, one can not help but mention several important nuances. Knowing these subtleties will allow you to achieve a more impressive result.
To prevent the pattern from spreading over the surface of the plate, you need to thoroughly dry the base. For the convenience of applying the ornament, it is advisable to use a very thin brush. To get a three-dimensional pattern, you must do this in at least two or three layers. Only in this way you will get a knitted textured manicure.
Pattern (how to make, can be seen a little higher) optionally decorated with rhinestones, sparkles and other decorative elements. It is not recommended to apply volumetric ornament on acrylic nails. To obtain a smooth surface, it is advisable to use a matte fastener. When working with acrylic powder or velvet sand, you can refuse the finish layer.