You can make a beautiful manicure on nails of any length. A girl should understand that well-groomed hands are half the success of any image. Therefore, do not think that nobody will notice your small marigolds. Better apply red nail polish on short nails and flaunt a wonderful manicure.
French
The simplest design in a non-trivial design looks playful. Do you think that only owners of long nails can do French manicures? Nothing like this. You can also enjoy the contemplation of a popular manicure in your own hands. Having made a french jacket in a non-trivial design, you will attract increased attention to your hands. Therefore, make sure that the manicure is neat and without any defects.
Where should you start creating a manicure? Red varnish on short nails should be applied only after you file and degrease the nail plates. And so that the color coating lasts longer, you should use a base for varnish as a substrate. Apply color in two layers and dry each one well. After the preparatory work, you can begin to design. To create a manicure you will need special stickers-smiles. Attach them to the nail so that 2-3 cm of the free edge of the nail peeks out from under the white film. Paint your fingertips with silver polish. Remove the stickers and apply the finish to the manicure. Beautiful and simple design is ready.
Strips

Do you draw poorly or don’t have special brushes in your arsenal? It's not a problem. An interesting design can be done using improvised tools. There is definitely scotch tape and scissors at your place. From tape you need to cut strips of different lengths. They will act as a stencil for such a manicure. How to create it? Saw and then degrease the nail plates, and then cover them with a base. Apply red nail polish to short nails. Paint one of the nails in white. If the varnish is liquid and the coating is loose, it is necessary to apply color a second time. After that, you can start design. Stick on previously prepared strips of adhesive tape on a white nail. Press the blanks well to the varnish so that the new layer does not flow under the tape. Apply a layer of red varnish on top and dry it well. Remove the tape and apply two layers of top. Your task is to compare two levels of color so that there is no difference. Otherwise, you will have an uneven glare on the top of the nail.
Hearts
Simple and cute manicure is suitable for daily wear. If you don’t have a dress code at work or at school teachers do not find fault with their appearance, you can afford to paint your nails with bright varnish. A beautiful manicure will ennoble your hands and make them one of your strengths.
A simple manicure with hearts is done as follows. Nails are filed and degreased. Then a base coat is applied. The next step is applying red varnish to short nails. One of the fingers does not need to be painted. The design will be applied to it. Red varnish is very moody, so if necessary, apply it in two or even three layers of color coating. The preparatory process has come to an end and you can begin to design. Take dots or a cotton swab. Use these tools to create a zigzag out of dots. Armed with a toothpick, turn the dots into hearts. To do this, you need to draw a point from top to bottom with a sharp movement. To make the design more interesting, smaller dots can be placed between the hearts. Do not forget to cover the result of your activities with a finish.
Gradient
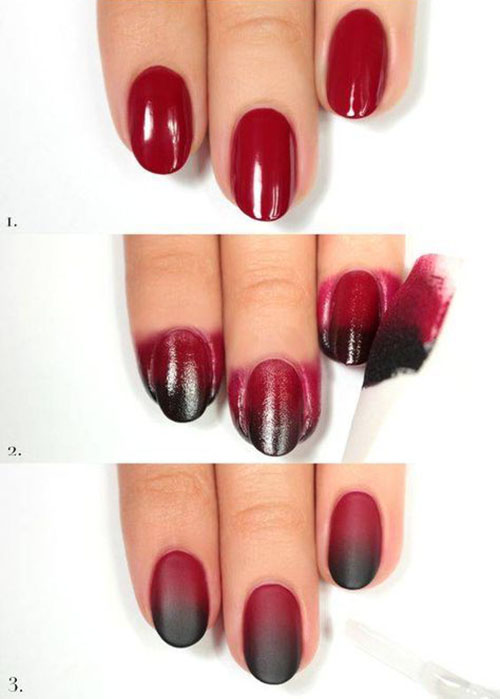
A smooth transition from color to color, called the gradient, is considered one of the fashion trends in nail design. In a similar style, you can decorate nails of any length. The gradient will be interesting to look at the expense of its smooth transitions. If you are just learning to make smooth stretch marks, then choose colors that are in the same key. Let's take an example. Before applying red gel polish to short nails, they need to be washed and degreased. Next, be sure to cover the nail plate base. Only then should color be applied. It is advisable to apply red varnish thickly to fit in one layer. Gradient is a multilayer manicure and it absolutely does not need extra thickness. The color substrate is ready, you can proceed to the design. Take a sponge, apply red and black varnish on it . Blend them with a brush, and then print a gradient on the nail. While the varnish is dry, wipe it off the side rollers. If the color transition is not too obvious, then when the first layer of the gradient dries, you will need to apply the second. Ready manicure should be covered with a top.
Points
Red gel polish on short nails looks very good in addition with beige and pink tones. And the white shade helps the bright color look more expressive. Knowing all these nuances, you can create an interesting manicure with dots. The sequence of activities will be as follows. Saw and degrease nails according to standard technology for preparing plates for work. Apply base and only then color. Cover all but one of the nails with red pigment, and apply pink shiny polish to one nail. When the coating dries, a second coat can be applied. Armed with a dots or a cotton swab, we proceed to the design. In a chaotic manner, we put red and white dots of different sizes. You need to draw points with good pressure so that they turn out to be pigmented. The final step is to finish.
Bows
Even a girl who is just beginning to master the art of manicure can make a simple manicure for short nails with red gel polish. A similar design is suitable for everyday wear, and for a festive event. If you want to impress friends with a good taste, then boldly follow the design with bows.
Before starting work, gash and degrease the plates. Apply the base on the nails, and on top - two layers of red varnish. See that the surface of the nails is evenly painted. Otherwise, you risk making your nail tuberous. Particularly careful should be the girls who work with gel polishes. After drying the colored substrate, you can start drawing. With a thin brush with white varnish we draw two triangles that connect with their sharp centers to each other. The junction of the triangles should be closed with a dot set using the dots. If you wish, you can decorate one of the nails with small white dots or rhinestones. Be sure to fix the result of manicure with a top.
Triangles
Today, all fashion trends strive for simplicity and conciseness. Therefore, simple geometric shapes are in fashion. This trend was especially fond of novice manicure masters. Designs are made in a similar technique, but look spectacular. How to make an interesting red design with gel polish for short nails? You need to start with preparation. After filing and degreasing, apply a base coat. It is advisable to use camouflage for this purpose. Then you do not have to apply another pink layer to the nails. If you do not have a base with pigment, use transparent. Using a thin brush, red varnish, draw a triangle, which on one side will be adjacent to the cuticle. The triangle must be left unpainted, and the rest of the space should be tinted with red varnish. To make the manicure original, you can apply a matte tone to the triangle, and make the red space glossy. If you do not want to make unnecessary gestures, cover the entire manicure with a glossy finish.
Sliders
You don’t know how to draw, but you want to flaunt a manicure with beautiful pictures? Then use the sliders. If you buy high-quality stickers, few will be able to distinguish your simple design from professional brush painting. How to make a stylish manicure for short nails with red varnish? Start by preparing. Saw and degrease the nail plates. Then apply the base and color in two layers. The finger on which the slider will be located should be painted in white. Most stickers on a light substrate look better than on a dark one. Take the sticker and cut the pattern to the shape of your nail. Dip the workpiece in a container of water for 15-20 seconds, and then stick it on the nail, with a previously applied finish layer. You can stick the slider on a dry nail, but then it will be more difficult to straighten it. Dry your nails and cover the manicure with another layer of the top, well sealing the end of the nail, which is decorated with a sticker.
Strips
Do you think that to make a spectacular manicure in 30 minutes is unrealistic? You are wrong. Geometry and simple shapes are in fashion today. This means that popular designs will correspond to these fashion trends. What kind of design can I make? Red nail polish on short nails looks expressive, it can be supplemented with simple geometry from stripes. Doing a manicure follows this scheme. Saw and degrease the nails, then apply the base and color. The design should combine red and white varnish. When the backing is ready, grab a thin brush and start painting. On the middle finger at the free nail, draw a triangle. The remaining fingers should be decorated with contrasting thin strips. It remains to fix the result with the finish and dry the manicure.
Strawberry
Above is an interesting photo. Red varnish on short nails can make an unusual design in the form of strawberries. Not only an experienced craftswoman, but even a schoolgirl will cope with this task. The design is very simple to execute. How to repeat it? File the nails and apply the base on them. Red color all fingers except one of the middle fingers. On a nail without design, with a thin brush, draw a silhouette of half a strawberry. Fill the outline. It remains to draw the leaves. At a lying strawberry, draw foliage at the free edge of the nail, and on one of any other fingers draw leaves at the cuticle. To add the similarity of the picture with a real berry, small seeds should be made in white. Finish the result.
Rhinestones
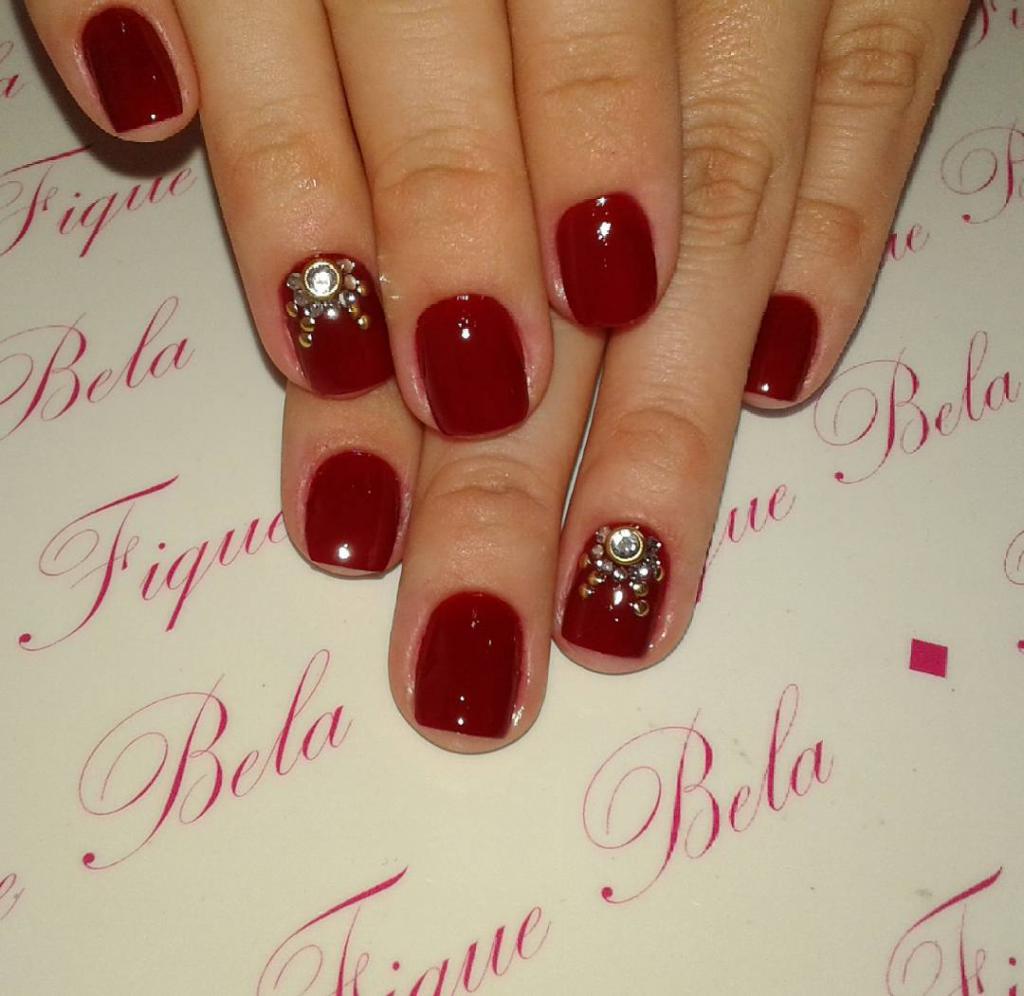
An interesting design is presented above in the photo. Gel-polish on red short nails is coated and complemented with manicure lined with rhinestone pattern. Despite the simplicity of manicure, it looks spectacular and even festive. If you need to quickly make a beautiful design, select this option for decorating nails. The prostate is in trend today, so manicure will fit perfectly into modern trends. How to create a design with rhinestones? Red nail polish on short nails should be applied after the standard preparation procedure. Saw, degrease and then cover the base of the nail plate. After covering the fingers with color, apply a top on all nails. To use a topcoat you need one that has a sticky layer. On one of the fingers should be laid out with rhinestones. In the center of the cuticle, put one large pebble, and from it, glue small rhinestones in different directions with rays. Rays should be located symmetrically. Dry the manicure and fasten the rhinestones with another layer of the top.
Rhinestones and sparkles
If you rarely work with rhinestones, then try to implement this idea of manicure. It is simple to execute and by performing a simple design you will be able to learn how to install rhinestones on top. How to apply red nail polish on very short nails? After preparing the plates, apply the varnish with a brush from the bottle. You need to start painting the nail from the cuticle. Put the brush flat and flatten it so that in one stroke you immediately cover most of the nail. After that paint over the edges. Using the same technology, first apply a shiny varnish on the ring finger, and then cover all the nails with the top. It remains to glue rhinestones. Glue a strip of rhinestone on the index finger with tweezers. Dock the pebbles so that there are minimal gaps between them. When the strip is ready, dry the layer and use a thin brush to finish the base of each pebble with a finish coating.