In the cool climate of our country, when it is cold outside for seven to eight months a year, I especially want to be warm. Sauna is an ideal option to warm up and relax after a hard day. Not everyone can afford trips to such places. Some of these events can not afford, while others do not have enough time. An ideal option for such busy citizens is to make your own sauna on the balcony yourself. You can learn the methodology for creating such a room and see the photo in our today's article.
What you need to consider before creating a sauna on the balcony?
Converting a balcony in an apartment is quite simple. To do this, you need to think in advance all the details of the adjustment and take into account the nuances. For example, it is important to know how the electrical wiring should go. An equally serious issue is the supply of ventilation to the selected room.
You must be able to equip steam protection, as well as reliable thermal protection. Waterproofing is the most problematic issue in this case. If you manage to resolve all the issues, you can get a good steam room. The dimensions of the sauna on the balcony, made by hand, are usually small. It all depends on the layout of the house.
What should be the preparatory work for the arrangement of the sauna on the balcony?
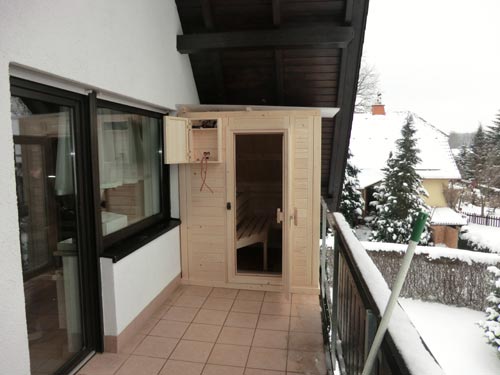
In stores for the home you can find ready-made steam rooms that can be installed on the balcony or loggia. They are easily mounted in the selected room, but for people with average incomes they are very expensive. It is much cheaper and more convenient to construct a sauna on the balcony yourself. It takes a lot of effort and free time to do this, but if a person likes to bathe in a sauna, then it's worth it. The most troublesome job is laying the ventilation. If everything is done according to the instructions, then you can get a steam room, where there will be dry air. A photo of the sauna on the balcony, made with your own hands, can be seen in the submitted article.
Often at the preparatory stage, you have to expand the balcony or opening. To reduce heat loss, it is better to make the sauna closer to the main walls of the desired house.
It is worth considering in advance how best to glaze the balcony so that heat does not escape through the windows. There should be no windows in the steam room. Walls must be blank. The remaining space must be closed with double-glazed windows. It is better not to save on the quality of windows, but to take double-glazed windows of good quality. At the same time, it is better to immediately note where there will be a hole for ventilation.
What building materials will be needed?
After the preparation work has been completed, you can stop at the choice of building materials. To make a sauna on the balcony with your own hands, you must:
- Buy mineral wool. It is necessary for warming.
- Polyfoam, as well as a membrane for waterproofing.
- Prepare wood beams. Their thickness should not exceed five centimeters.
- Boards for flooring. The walls can be sheathed with wooden lining.
- Vapor barrier. You need to choose foil.
- Hose.
It is important to have corrugated pipe, special asbestos cardboard.
What is unacceptable for use during work?
In the process, it is better not to use a brick. The same can be said about the stone. It is believed that these materials are very heavy, and their use on the balcony will be an extra surface load. It is better to resort to the use of mineral wool. The layout of the sauna on the balcony with your own hands is done in stages. All balcony work is best to begin with the arrangement of the floor.
How to make the floors on the balcony under the sauna?
Before starting work, it is important to consider how to insulate the entire room. Mineral wool is considered the most suitable material for creating a comfortable room temperature at any time of the year.
The coating is laid on the floor, taking into account the fact that the steam room rises above the perimeter by about fifteen or twenty centimeters. This idea is explained by the fact that elevation is necessary for normal drainage from the film. Thus, the steam room will remain dry, and excess moisture will drain down.
Do-it-yourself floors in the sauna on the balcony in stages:
- Initially, a waterproofing layer is laid.
- It is necessary to install logs made of wood. Their height is approximately eight centimeters. It is important to remember that a step of forty to fifty centimeters is respected.
- Be sure to lay the second layer of waterproofing.
- Floor boards are fastened with nails. They need to be beaten also against walls. It is important to ensure that during operation the steam room does not burn on the head of the nails.
An important point is the creation of a slope of the floor towards the front door. It turns out that excess moisture can easily go away. For interior decoration of a steam room, it is recommended to use boards made of deciduous trees. The degree of shrinkage is equal to ten percent. For the floor, it is good to use softwood boards.
How to decorate the balcony walls under the sauna?
It is better to insulate the sauna on the balcony with your own hands. For this, decoration professionals advise insulating the walls from the outside. Judging by the reviews, polystyrene is well suited. This material does not burden the structure due to its lightness, but ensures the safety of indoor temperature. An important nuance in this work is the choice of insulation thickness. The thicker the foam layer is, the faster the cab will heat up.
The scheme of the interior decoration of the balcony in stages
To make a good sauna on the balcony with your own hands, you must exactly follow the instructions:
- Reiki on the walls are beaten with a shutter speed of five hundred millimeters. The cross section of the board should be no more than five square centimeters. The place where the steam room itself will be located needs to be beaten around the perimeter with plywood. The insulation should be as close to the wall as possible.
- Between the bars should remain openings. It is necessary to lay a vapor insulator in them with the side of the foil, and the foil should go out.
- Mineral wool sheets should be prepared. They should be about five centimeters wider than the required size. Such an increase in footage is necessary so that the insulation lies more tightly against the desired wall.
- A layer of insulation is laid in the entire recess between the boards.
- The top layer is laid aluminum foil. It is important to lay it in such a way that the reflecting side is inside. It can be fixed with a construction stapler or with screws to the planks of wood.
- Metallized tape should be prepared in advance. It will be needed in order to seal all the joints.
- After the insulation work has ended, you can proceed to the final stage. The walls are lined with clapboard. Inside the wall of the steam room must be upholstered with slats of hardwood. The remaining parts can be beaten with different types of wood. It is better to observe the same style with a steam room.
A detailed photo of the sauna on the balcony, made by yourself, can be seen in the article.
How to make a ceiling?
When finishing work on the ceiling begins, the main attention should be focused on vapor barrier. It must be remembered that on the balcony (loggia) the steam always goes up. Neither should the neighbors get damp.
First of all, you need to nail the slats with a thickness of not more than five centimeters. It is worth to step back, which is equal to forty centimeters.
There are gaps between the bars. They need to lay a layer of waterproofing. After the insulation is laid, it must be crushed with a small load, for example, with a strap. After this, the layer must be fixed with screws or nails.
A vapor barrier membrane is best fixed in two layers. After completing this type of work, you can start cladding lining. A photo of a sauna on a balcony constructed using the described methods can be seen in this article.
Experts advise not to do ceiling work alone. It is much more convenient and productive to work with an assistant. It is difficult for one to hold the insulation and at the same time try to fix it on the ceiling.
What are the features in preparing a sauna on the balcony?
In addition to finishing work, you also need to think about how the electrical wiring will go. A photo of the sauna project on the balcony, made with your own hands, can be found in our article. Each issue needs to be given time and take these works seriously. Fire safety is the key to peace of mind for the owner of a home sauna.
For electrical wiring, it is better to choose a cable that has good heat resistance characteristics.
First of all, you need to install a separate machine on the dashboard of electricity, most often choose 25 amp devices. It is necessary to install an RCD on the power supply.
On the balcony you will need to add a new outlet, which will work from the distribution panel. To make the connection, you will need a corrugated pipe.
The wires to the lamp must be placed in a metal hose, which is fixed above the ceiling. For saunas, they usually buy specialized lamps that calmly withstand high temperatures up to +120 degrees. This type of light source has a distinctive moisture resistance rating of IP 54.
It is important to remember that switches and sockets must not be installed in the sauna. It is forbidden to install distribution boxes in rooms of this type.
Instead of a conclusion
So, we figured out how to make a sauna on the balcony with our own hands. This room should be not only aesthetic, but also meet all safety requirements. Performing all the work according to the instructions and the above recommendations, you can get a high-quality result. Such a steam room will be no worse than classic saunas. Moreover, it will not cause discontent of neighbors and will pamper you with heat after a hard working day.