Do-it-yourself people pour various ideas into life. Those who have the time and imagination can create many home accessories, including original DIY fixtures. The main thing is to preliminarily think over the design and composition that will fit the overall picture of the interior.
Why should you try to make a lamp yourself
People with high imagination must understand why they are wasting time. Do-it- yourself original fixtures should be done for the following reasons:
- This will save money. After all, designer lights are quite expensive. And having made a lighting device with your own hands, you can use objects that have been stored for a long time in the pantry or in the garage.
- Creating an original lamp with your own hands will help to show imagination and become the owner of a unique lighting device.
- The decision to make a lampshade for the lamp yourself will allow you to pour a piece of the soul into the interior of an apartment or house.
- You can use seemingly unnecessary things, thereby freeing space from trash.
These are just some of the reasons why you should make unusual and original fixtures with your own hands. Each creative person will find advantages in such a solution.
What you need to create a lamp
In order for the work process to be unobstructed and bring only pleasure, it is necessary to prepare in advance the necessary materials and tools that can be useful during the work. The standard set of accessories that should be on hand is as follows:
- The main material for the lamp shade of the lamp.
- The design on which the created lampshade will be installed.
- Fasteners.
- Details for the decoration of the lighting device.
- Scissors or stationery knife.
- Scheme of the future lighting device.
- Ruler or tape measure.
- Pencil or marker.
- Glue for fixing decorative elements and connecting parts to each other.
This is a standard set of materials and tools, which may vary depending on which design will be assembled.
How to prepare for work
To make the assembly process of the lighting device easy and without hitch, you should perform the following steps:
- Free up space for work, so that nothing would interfere with the plan.
- Put in the immediate vicinity all the necessary materials and tools.
These are the basic training requirements. Of course, a person must be in a good mood so that the masterpiece for transforming the interior turns out to be beautiful, and the plan is translated into reality.
Original DIY lamps
There are a lot of options for what shape and from which materials lamps can be. Often the following raw materials are used for work:
- Wood.
- Plastic.
- Various fabrics.
- Unnecessary things lying on the shelves of the pantry or garage.
- Even from cardboard, you can create an unusual and beautiful lamp.
This is not all types of materials that can be used to create a lighting device. In fact, it can be anything, even something that no one could think of.
As for the shape of the fixtures, they can be both standard and intricate. That's why they create original lamps with their own hands in order to pour imagination into the product. In any case, personally assembled lighting devices will please the owner of the apartment or house.
Lamps from different materials
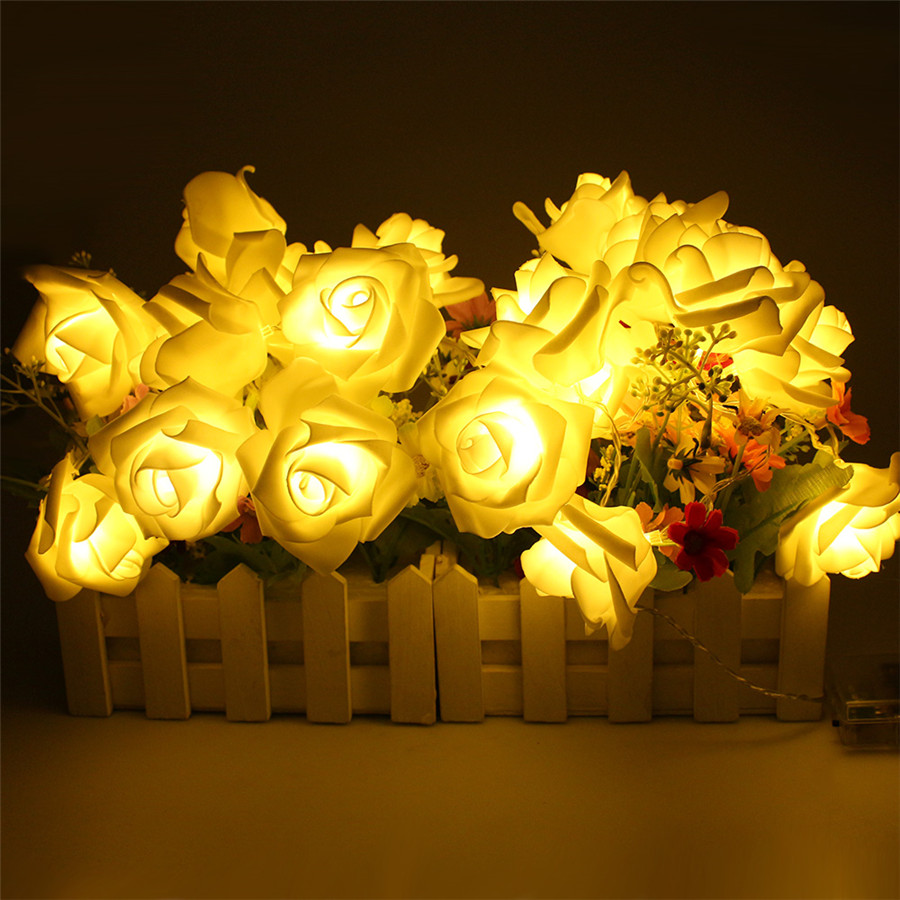
There are a lot of roses, daisies, poppies, flora representatives on the globe. Lamps in the form of flowers will help create a pleasant atmosphere in the room and provide the owner with an excellent mood. In order for the process of creating such a device to give only pleasure, it is worth paying attention to the following details:
- The choice of impressive material.
- Preparation of all necessary tools and parts.
- Thinking over the design of the lamp.
These are the main issues that you should think about before starting work. When all the important nuances are considered, you should act in turn. The sequence of creating a lamp in the form of a flower is as follows:
- Cut the daisy petals from the selected material.
- Then we color them, if provided, and wait until the paint has completely dried.
- The next step is very important, you need to correctly combine the elements in a common composition. For this, bolts or a glue gun will come in handy. It is necessary in a circle to fix each petal around the ceiling. You need to act slowly and carefully.
- When all the petals are in place, it remains to glue the decor elements, install the lamp on the base and enjoy your labors.
This daisy will fit perfectly into any design decision and give a sunny mood even on a cloudy day.
How to make a do-it-yourself lighting fixture from foamiran
The needlewomen find a ton of options on how to transform and decorate the space of rooms. Creating a fixture from foamiran is a great idea that will help to add a twist to the interior design and create a truly magnificent lighting device. Foamiran is a flexible and easy-to-use material. Different shapes can be made from it, making the desired shape using temperature exposure. Flowers from this fabric look realistic and easily transform even the most ordinary lampshade.
To make a decoration for a lighting device, you need to act in the following sequence:
- Choose a material that matches colors. It is advisable to choose one color, but in different shades. So the flowers will turn out realistic and playing on the lighting device.
- Then you should prepare the elements for flowers. To do this, cut out molds from different colors, each of which is slightly smaller than the previous one. Each size needs to be done in several pieces, so that the flower turns out to be voluminous, realistic.
- Then you need to make flowers of a different size, which are slightly smaller than the previous ones, to create a beautiful composition from the finished forms.
- The next step for creating a lamp from foamiran is ironing of every detail. To do this, raise the corners of the flower and press down with a heated iron. Thanks to this manipulation, each petal will become voluminous.
- Then you need to connect each petal in the middle and allow the glue to dry.
- After you can fix the flowers in random order on the lampshade.
Such a lamp with your own hands will create a magical and unusual atmosphere in the room and will be an excellent decoration of the interior.
DIY lighting fixture
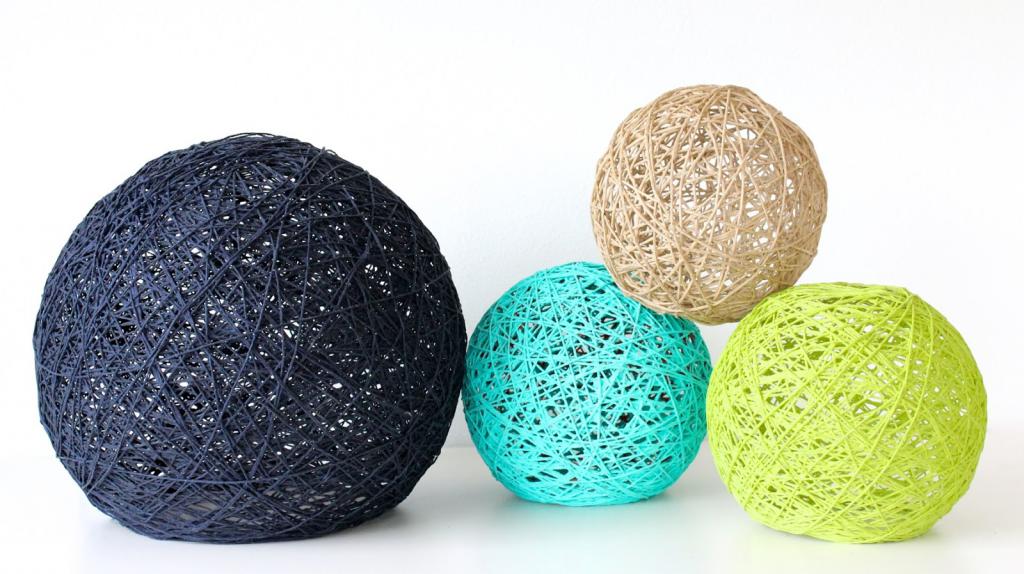
Pendant lamp-ball looks great in the interior. In addition, to create it does not require expensive materials and special skills. The whole process of creating such a lighting process is elementary and simple.
For work, you need such materials and tools:
- A balloon of the size you would like to make a lampshade.
- Half a liter of glue to shape the product.
- Knitting threads of the desired color.
- Cord for hanging lampshade.
- Rubber gloves for hand protection.
- Newspapers for the comfort of work and protection of the surface on which the lamp will be created.
The sequence of actions is as follows:
- First you need to inflate the ball to the desired volume.
- Then take the thread and fix it on the ball with adhesive tape.
- The next step is to impregnate the knitting thread with glue. It is important that the fiber is dipped in glue so that the shape holds and is resilient.
- When the thread is saturated with glue, you can start wrapping the ball. You should carefully follow this process to get a beautiful product. Create various patterns, intersections, winding the thread around the balloon.
- After the main stage is completed, the ball should be inflated as much as possible, because during the drying of the glue, latex and rubber may decrease in volume. And this can cause deformation of the product.
- The pendant lamp must be dried during the day. It is desirable that the room is warm, so that the surface becomes durable and resistant to various influences.
- When the glue is completely dry, remove the ball from the structure. This must be done by carefully piercing the product and removing it from the inner surface of the lampshade.
- In the middle of a circle of threads in the upper part, you need to cut a small hole into which a lampshade from below will be inserted. Around the lampshade you should wrap a dense wire and fix it in the inner side of the lampshade. Thanks to this manipulation, the plafond will hold firmly in the structure.
- Then you need to fix the cord to the ceiling, which will be attached to the ceiling.
Such a lampshade will create cosiness in the room and harmoniously fit into any design decision.
DIY light fixtures in the shape of flowers
For creative people, the flight of fantasy is high enough. Therefore, they will not stop at the banal options. Do-it-yourself growth roses-lamps can be created from different materials. Isolon is most popular for this purpose. This material is a thin sheet, which in thickness can be from 0.2 millimeters to 1 centimeter. To make a rose for a growth lamp, a thickness of 2 to 3 millimeters is most suitable. The sequence of work is as follows:
- You need to cut the petals of the selected shape.
- Then, under the influence of temperature, give them the desired volume.
- After the rose petals are connected together using staples or hot glue.
- In the middle of the flower is a ceiling mounted. This can also be done with liquid glue.
- After that, the ceiling itself is fixed on a long leg, which you can do yourself or buy a workpiece.
- To complete the composition, you can make the petals of the desired size and fix them on a leg or spin under a flower.
- Such a lampshade will decorate any room and become a real decoration of the room.
Do-it-yourself fixtures give a special feeling. Therefore, it is worthwhile to devote time to this process and pour a piece of the soul into the space of your apartment or room. And also such lampshades can be a great gift for any holiday.