If we talk about how to install a countertop, then it is very important to pay attention to the fact that the solution strongly depends on what material is chosen for installation. Today, independent work often uses chipboard, MDF and stone materials.
Features of self-installation
When the time comes to decide whether to entrust the installation of kitchen furniture to specialists or whether you can do it yourself, you need to remember that installing a countertop, as the craftsmen do, is not so simple. In addition, it is worth taking into account several more factors.
- Firstly, you can carry out this procedure yourself only if the technology is precisely known to the owner. Otherwise, there is a great chance that the countertop will be spoiled and it will be undesirable to use it or not at all.
- If the installation technology is still known and the question of how to install a countertop does not cause problems, then you need to know that most often with your own hands you can mount a device made of chipboard, MDF, veneered wood. Some make it out of stone.
- You can independently install furniture made of concrete, and then tiling it with tiles, for example, but this option is also possible only if you have the necessary skills. It is worth saying that such options for countertops last a very long time.
First steps
If a decision is made on independent work to resolve the issue of how to install a countertop, then you should start with a plan. Usually it looks like this.
First you need to dismantle the old version of the furniture. After that, a measurement and cut of the new option are carried out. A separate step will be the processing of edges. Next, you can proceed to the direct mounting of the countertops, as well as to the connection of two sheets, if necessary. After that, you can begin work on sealing and installing the baseboard. The next step will be to cut out holes for devices such as the sink and faucet.
It is worth noting that the finished product with holes must be moved very carefully and only if absolutely necessary, since at this moment it will be very fragile, and cracks may appear at the cut points.
Materials for work
How to install a countertop with your own hands? The question is actually quite simple, but a lot depends on what material was chosen for work.
- The first option is a laminated particleboard. In fact, this is an ordinary chipboard, only pasted over with a very durable laminate. The complexity of installation when working with this type of raw material is only in the cut. It must be done very carefully, since with mechanical damage on the coating will remain clearly visible traces.
- The most traditional and long-used material is wood. Of course, such material needs periodic processing, but it will look quite attractive. In addition, it can be sanded to return to its original appearance, if necessary.
- Recently, metal materials for countertops are becoming more popular. Their advantage is that they are very easy to connect. However, it is also very easy to leave scratches and other marks on them that will have to be sanded.
- The last variety is a stone countertop. Here you can use both natural stone and artificial. The advantages of this product are resistance to moisture, scratches and temperature extremes. However, here you need to take into account the other side. The weight of such a product is large enough, which makes installation difficult, in addition, cutting holes and making stone cutting is much more difficult, and this requires skills. Stone countertops are a good choice for those who know how to work with stone.
First installation steps
It is important to say here that the principle of installing countertops made of stone, chipboard, MDF is one and the same. In addition, the installation of the product involves the mandatory installation of such additional things as moisture insulating materials, corners of aluminum and plastic, etc. These additional structural details will be required for both chipboard and stone countertops.
Beginning of work
When all preparations are completed and the material is selected, you can begin to work.
The first step is to take measurements, as well as cut a sheet of the selected material. It is important to consider that the length is measured taking into account the bar, which is superimposed on the ends. As a cutting tool, you can use both a hacksaw and a jigsaw. It is also important to add that if there are protrusions, then all of them need to be cut at this stage.
In order to install the countertop in the kitchen, as experts do, you must not forget that the ends should be lubricated with silicone sealant. After that, an aluminum or plastic strip is superimposed on top. Additionally, you need to fix the plan with small screws. If excess silicone comes out, they are removed with acetone.
Mid installation work
When installing countertops yourself, you need to remember that there is an edge to the surface that remains closed, it also needs to be processed. For this, a decorating edge tape is usually used. To successfully attach this device, you need to warm up the tape, stick it, and then cut off the excess, and grind the edges.
The next step is the adjustment of the legs of the floor stands. For this, the construction level is usually used. If the legs are not adjustable, then adjusting wedges or plastic gaskets can be placed under them.
When installing countertops made of chipboard or other material, it is important not to forget to apply sealant to all the necessary places. The back edge of the countertop is liberally greased with a substance. Also, after that, you need to immediately take up fixing plastic or metal corners in the cabinet, which is located under the sink.
After all this, you can start laying countertops on cabinets. There are two options. Either it fits close to the wall, or you can leave an indent of about 5 mm. You can choose any option. Usually, the decisive factor here is how strongly the countertop should protrude above the cabinets.
Completion of work
How to install an artificial stone countertop? There is no difference between the installation of a product made of chipboard, or a stone of natural or artificial type, and therefore you can be completely guided by the proposed plan.
After the countertop is placed and installed on the cabinets, you need to go to the mount. In order to connect the stacked fixture with the cabinets, it is necessary to screw in the selected places the screws under the countertop. Usually for this, fasteners with a length of 30 and 16 mm are selected. The next step is the installation of the baseboard between the apron and the countertop on the sides. It is worth paying attention to the fact that if the surface is installed in a corner, then the corner connection must be additionally closed with an aluminum profile.
The final step will be cutting out the hole for the sink.
Surface replacement
We should also pay attention to such work as replacing the countertops. This operation is carried out in a slightly different way, since the coverage on the already completed headset changes, and everything is not collected from scratch. How to install a kitchen worktop in this case?
- First you need to remove the old countertop in such a way as not to damage the kitchen. You will also need to remove the sink, baseboard and all joints.
- A new product must necessarily be fitted to the wall in the same way as the previous one, and it is also necessary to adapt it to the existing dimensions of the kitchen furniture.
- It is very important to choose and control the height correctly. This plays a decisive role, since the countertop must be evenly supported by all structural elements.
- All edges that result from this must be sealed. This should be done regardless of what material is used to make the new coating. This is especially true if there is a laminated surface, since the ingress of moisture under it will entail the destruction of the layer.
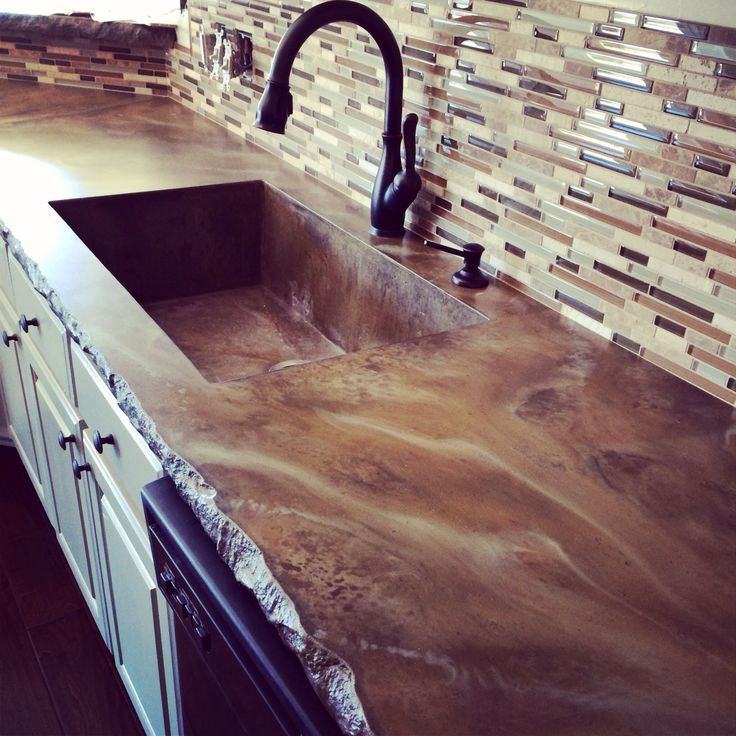
Concrete worktop
Separately, it is worth mentioning the concrete product. A different execution algorithm is observed here.
- It is necessary to align all the lockers at one level, after which the base is laid on top of them. It can be plywood or chipboard.
- Next, you need to fix the base well. After that, formwork is installed on its sides.
- To seal the formwork, a plastic film is used, and fittings are laid inside. It is necessary to protect the place where the sink will be mounted. Usually, a metal fence is used for this.
- The preparation of cement mortar is carried out from the following components. Cement grade M400, sand and gravel. The proportions of these bulk materials are 1: 2: 2, respectively. Be sure to add a plasticizer to the solution.
- If you need to make an imitation of stone, then you need to add dyes to the solution as well.
- The rest is simple. The finished solution must be poured into the formwork, covered with polyethylene and left to dry. Usually it takes about a week to do this.
Benefits of doing it yourself
Carrying out all the installation work with your own hands, you can get a number of certain advantages. The first thing most people pay attention to is cost. To make this device with your own hands is quite real and does not constitute a big problem, but it saves a good amount of material resources. In addition, a do-it-yourself appliance is usually more reliable and lasts much longer.
Separately, it is worth mentioning that there is the possibility of choosing any design that the owner wants to make. In addition, all purchased options are mainly made of chipboard, and this material without very high-quality processing is highly susceptible to moisture.