Chickens can be carried in the cold season no worse than in the summer. However, for this, the farmer must create the right conditions. It is important to ensure not only the optimum temperature, but also lighting, ventilation, the correct location of perches and other elements inside the building.
The winter coop should be built in accordance with all the rules. There are no trifles in this business. It is necessary to take into account all the requirements that put forward for such a winter building. They will be described in detail below.
Requirements
Ready-made winter chicken coops are made in accordance with all the requirements that poultry farming makes. They are designed to make their inhabitants comfortable. Hens rush well in the summer. At this time of the year they are not only warm, but also fairly light, since the days are long and the nights are short. In the chicken coop, the temperature should not fall below +10 ° C.
Chickens will need to provide adequate nutrition. It should not be excessive. To ensure comfortable living conditions for chickens, it is necessary to collect an insulated building. You will also need to provide it with enough light. You can build such a chicken coop from scratch or re-equip an old building without insulation.
The dimensions of the internal space should be sufficient so that the birds do not interfere with each other. There should be 2-5 hens per square meter of space. More densely populated is not recommended. Therefore, it is worth considering that a winter coop for 50 chickens should not be less than 10 m² or even more.
You will need to correctly distribute the space inside the building. It is necessary to establish a sufficient number of perches. You can create a multi-level chicken coop, where the perches will be located one above the other. This does not interfere with the layers.
Near the chicken coop, the territory should be fenced, since the bird walks on the street even in frost to -15 ° C. At the same time, not only the laying hens, but also the farmer, who will have to maintain the building, should be comfortable in the house itself. The height of the chicken coop should be at least 1.5 m.
Seat selection
Before proceeding with construction, you need to prepare schemes or drawings of the winter chicken house with your own hands (or use ready-made ones, they are presented below). Here you should indicate the size of the building (in accordance with the number of chickens), as well as all its elements both inside and outside. First of all, you need to properly position the house on the site.
So that the noise and the specific smell from the house do not interfere with rest in the country or in the cottage, you need to equip the chicken coop in a distance from home. You should find such a place in the area where the space is reliably protected from wind and drafts. Also, direct sunlight should not fall on the building. It should be in shading. However, hens need sunlight, so you should choose a place where trees and bushes grow. This will create a very small shadow. Behind the wall of another building to build such a structure is not recommended.
When designing a winter coop scheme (it’s easy to make it yourself by reading our instructions), you need to provide enough space before building for walking the birds. This space must be fenced off with a metal mesh. The cells should be small enough. Harm to chickens can be caused by domestic cats, wild animals. It should be borne in mind that protecting the fence should protect the inhabitants of the building from rats. They can also harm birds.
A place for walking also needs to be fenced so that hens do not disperse throughout the territory. Its height should be about 2 m. Even with clipped wings, layers can fly up to such a height.
Conditions inside the building
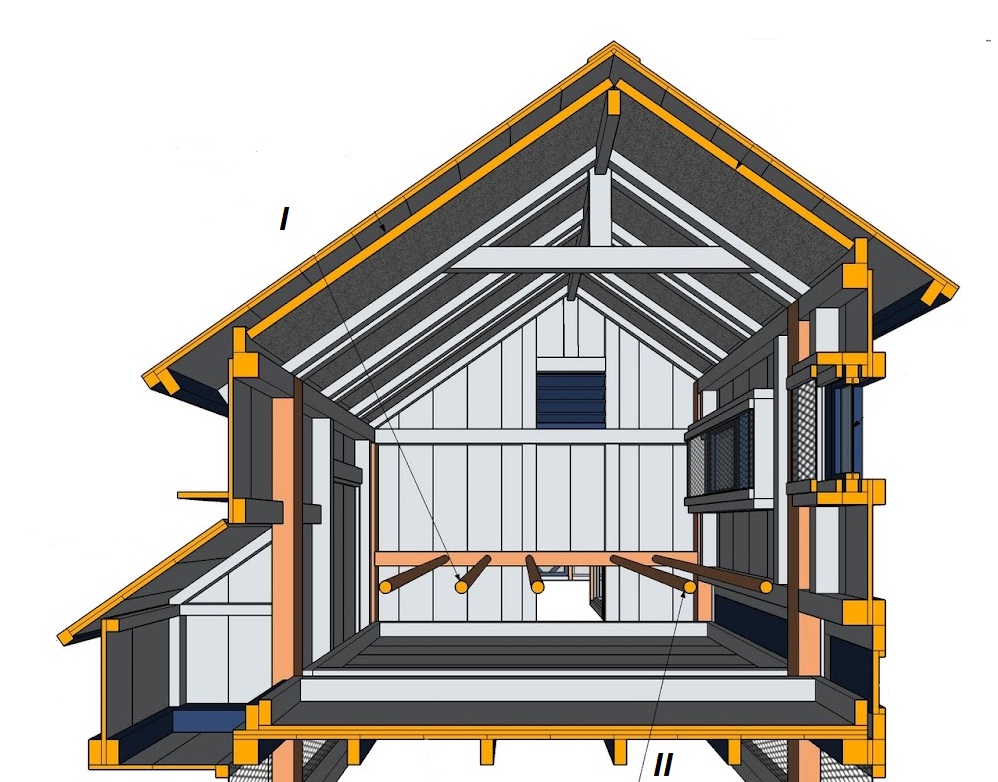
Drawing up a drawing of a winter chicken house for 20 chickens or a different number of birds (presented below; in the figure, the perches for chickens are indicated by numbers I and II), you need to create the right conditions for keeping chickens. It is considered optimal if the temperature is 15-28 ° C. If it gets colder, the performance of the layers decreases. And in the summer it should not be too hot. For this, the chicken coop is aired. In winter, it will be necessary to reduce the maximum amount of heat loss. It is also necessary to provide for additional heating.
Walls with a thickness of at least 20 cm should be created. It will be necessary to properly insulate the floor, roof and walls. It is necessary to seal the room as much as possible. All the cracks close up. This will minimize heat loss. Be sure to have a window in the chicken coop. It is needed for ventilation. It should be positioned so that in winter the sun's rays penetrate through the building as long as possible. In summer, the window is shaded.
You also need to consider quality ventilation. It can be natural. Heating in the room can be done using different heating devices. It is better to give preference to infrared varieties. Ovens cannot be used. This does not comply with the requirements of fire safety regulations.
One of the good options for heating will be a UV lamp. However, experts recommend using an infrared warm floor. In this case, you can maintain the required temperature in the chicken coop. The temperature regulator will allow you to spend exactly as much electricity as you need to maintain the temperature set by the owners. At the same time, the lower tier will be warmer than the top.
Arrangement
The drawing of the winter coop should contain a plan for the arrangement of all components of the internal space. In such a building, there must necessarily be feeders, perches and drinking bowls. For layers, the presence of nests should be provided.
The winter coop pattern suggests that perches should be installed on the side that will be on the opposite side of the entrance. Their size corresponds to the breed of chickens. To arrange the nests, you need to find the shaded place in the chicken coop. There should not be drafts. Their size is also determined by the breed of chickens.
Feeders and drinking bowls should also be placed correctly inside. They should not interfere, stand in the aisle. Feeders should be designed for different types of feed. They are placed in different parts of the house. Access to the feeders must be open from all sides. To do this, you need to purchase or create several containers on your own. For dry food, an elongated wooden trough is suitable. Access to its contents should not be difficult. For wet food, a plastic container is suitable. The grass is laid out in a mesh of metal wire with a small mesh size.
In the chicken coop, it is necessary to provide for the presence of a hole through which the hens will fall on the street. The winter coop also needs such a hole. It will need to be properly insulated.
Electricity and ventilation
They build a winter chicken house with their own hands for 50 hens or another number of birds, taking into account the relevant requirements. For such a structure, it is important to ensure proper lighting. If daylight hours are 12 hours, the productivity of chickens is greatly increased. However, this period is not worth doing anymore. In this case, the birds will hurt, weaken.
In winter, the sun is not enough. Therefore, it will be necessary to create lighting artificially. For this, different lamps are used. Most of all, energy-saving lamps are suitable for these purposes. Their power may be small. The shade of the glow should be neutral. It is most consistent with daylight. The number and power of lamps are selected in accordance with the size of the chicken coop, the height of its ceiling. So, it will be necessary to provide lighting of about 20 lux / m². When choosing lamps, it is worth considering that some varieties increase the temperature in the room. This must be taken into account when calculating the power of heating equipment.
Ventilation must be of good quality. However, drafts cannot be allowed. Therefore, in winter, the window is carefully insulated. To create ventilation, a pipe system is used. One of them is installed at the bottom of the building (at a distance of about 10 cm from the floor), and the second is near the roof.
Foundation
Must have a do-it-yourself winter coop for 30 chickens or other poultry stock. Its type is chosen in accordance with the materials that are used in construction. If the walls are made of bricks, blocks of different types (shell rock, slag or foam blocks), create a pile or tape shallow foundation. For relatively light buildings (with wooden, frame walls), you can create a columnar base. The same option is also simpler to execute, as well as less costly.
If a columnar foundation is being equipped, the supports should be placed in the corners of the building. They should also be separated from each other at a distance of about 2 m. Also, the columnar foundation allows you to create a ventilated base. It will require additional insulation.
To create such a foundation, you need to mark the area in accordance with the prepared drawing. Pegs are installed in appropriate places. The top layer of the earth is removed along the perimeter. Need to mark the notches. The depth of the pit should be 30 cm, and the length and width should be 40 cm.
At the bottom of each excavation, you first need to fill in the sand, and then crushed stone with a layer of 10 cm each. Then pour 5 cm of concrete. On it will be laid out blocks of brick. They are fastened with cement mortar. Each column must be plastered and covered with a layer of bitumen insulation.
Walling
How to build a winter chicken house with your own hands? The answer to this question can be given by professional farmers. They argue that the walls of the chicken coop, which is operated in the cold period, must be strong and thick. For this, a thick beam is used. Wood is easier to process, and it also has high thermal insulation qualities.
You can also erect walls using frame technology. In this case, the design will be light, but very durable. However, heat keeps such walls inside worse. The walls are erected with a height of about 1.9 m.
On the prepared pillars of the foundation lay waterproofing (roofing material). Stack the first row of bars. Their ends need to be connected in half. On the created harness, you need to lay logs in increments of 60 cm. For this, cuts need to be made in the timber. Next, lay the next row of bars. Fixation takes place according to the "groove - spike" system. Between them, it is necessary to lay a heater, which is a linen cloth.
You can use pins (wooden rods) for additional fixation of the beam. They are buried at a distance of 1.5 timber. The distance between the pins should be about 1.3 m.
When erecting the walls of the winter version of the chicken coop, you need to lay a window on the south side. The doorway is on the adjacent wall. Windows and doors need to be properly insulated. Thermal insulation covers the walls outside. For this, polystyrene foam or foam sheets are used.
Floor
Considering the technology of how to build a winter coop, you need to pay attention to the correct construction of the floor. It is mounted on prepared logs. First, they make flooring from boards with a cross section of 25x100 millimeters. A layer of windproof film is laid on them. Between the lags, the space must be filled with insulation. For this, mineral wool is used.
Further across the lag you need to sew boards. Their cross section should be 50x150 millimeters. Between the boards make small gaps. When the temperature changes, the wood can slightly change its dimensions. Next, a plywood sheet is laid on top. You can lay a heating film on it. Cutouts are made in plywood to deepen the joints and channels for wires, thermostat sensor. The film is checked for performance (using a multimeter), and then cover it with moisture-proof plywood.
Roof
The winter coop should also have a warmed roof. It can be of different configurations. Most often, the roof is made single or gable. The angle of inclination depends on the amount of precipitation in the area. The snowfalls are more plentiful in the winter, the slopes should have a bigger angle of inclination.
Shed roofs are easier to manufacture. However, gable varieties are more functional. They protect the chicken coop from temperature changes. In the space under the roof in this case you can store feed, equipment.
First you need to install ceiling beams to create a ceiling. These are horizontal logs from a bar. Rafters set at an angle of an average of 45 °. They are mounted crate. Next, a waterproofing layer is laid. Mineral wool insulation is laid on it. Next, you need to lay the roofing material. It can be corrugated board, tiles and so on.
The ceiling on the inside of the chicken coop is sheathed with a sheet of plywood on both sides. Between them in the interval between the lags you also need to lay a layer of insulation.
Completion of construction
After creating a winter coop, you can begin to equip it. First do the ventilation. This will require two pipes with a diameter of 140 mm (plastic or galvanized). They are installed on different sides of the chicken coop. One of them is installed on the floor. Through this pipe, air will enter the chicken coop. The second pipe is needed to extract moist air from the building. It should go through the roof and rise high above the building. This pipe should be away from perches and nests.
Then they conduct electricity, equip the lamps. The floor is connected to the network (according to the manufacturer's instructions). After that, perches, nests, feeders and drinking bowls are placed inside. The area around the building is fenced. After that, it can be operated.
Having considered how to properly build a winter chicken coop, you can build a structure with your own hands.