Modern designs on the nails are stunning with their diversity. The ideas for such a manicure and the ways to do it are countless these days.
Despite the fact that fashion lawmakers argue among themselves how nail art is relevant today, young women of fashion and adult ladies continue to apply these works of manicure to their nails.
Before, following the instructions, to perform a step by step drawing on the nails, it is worth deciding on the choice of the drawing itself. A woman should evaluate for what case this manicure is done, whether he will fit into her image, whether it will correspond to a “dress code” at work, and so on. Such nuances are very important, because it depends on whether the drawings on the nails are a worthy decoration of manicure, or whether they will become a vulgar and inappropriate detail.
Is it possible to make drawings on the nails yourself?
Looking at the magnificent and finest work of the masters, any girl at least once wondered how to make drawings on the nails. At first glance it seems that this is a very painstaking work, which only talented craftsmen can do. Now you can not waste time on unsuccessful attempts to independently make home drawings on the nails. It’s enough to pick up a drawing you like and then watch a master class. They show in detail how to make a step-by-step pattern on nails.
If you know how to draw well or even professionally wield brushes, this will be a huge plus. But technology and tools these days allow you to perform wonderful drawings yourself, even if you do not know how to draw. This is done according to the instructions, step by step. Drawing on nails can be absolutely for every taste.
What tools are needed for nail art?
Before you start painting on nails, it is worth familiarizing yourself with the basic tools necessary for high-quality and beautiful drawings. At first, independent drawing may seem overly complicated, but, having adapted and gained experience, any girl will be able to create stunning and unique patterns.
In order to perform a step-by-step drawing on nails, first of all, you need good dense solid varnishes, gel nail polishes or acrylic paints.
What is dots
Homemade drawings on nails can be no worse than drawings made by a professional in the salon. For the simplest, dots are used. The name comes from the English "dots", that is, the point.
Smooth and neat circles are applied to the nail with the help of ball-tips. Also, using dots, you can draw beautiful curls by stretching a drop of paint. Usually, this tool has balls of different diameters on both sides, which allows you to create interesting patterns.
Kits for printing on nails
Stamping for nails will help to create complex, clear and perfectly even patterns. The stamping kit is metal disks with drawing grooves extruded onto them, stamps and a scraper.
Such printing on nails requires a little experience, skill and accuracy when applying, but the result exceeds all expectations. Lacy, delicate and geometric patterns, small small drawings, complex plot images - all this is stamping. No professional can do such a jewelry job with a brush so quickly and at the same time. When buying stamping, it is better to give preference to branded sets, since it will not work to do a good drawing with a low-quality fake.
Nail Art Stickers
To create drawings, you can buy a very simple option - nail stickers, or a slider design. The advantages of such nail art are accessibility, relative ease of application and beautiful, sometimes three-dimensional images. The downsides are that, firstly, the stickers themselves can look childish and cheap. Such nail art needs to be modified with other details. The second minus of the slider design is its fragility. A very delicate film can be easily damaged at the stage of fixing the picture.
Nail brushes
Of course, you need brushes to draw. They require more craftsmanship compared to other tools. For starters, you can use the usual thin brushes that are at hand, but gradually each girl will come to the conclusion that it is most convenient to use professional brushes designed specifically for nails. In specialized stores there are many different brushes, each of them has its own purpose. Brushes are indispensable for drawing thin curving lines and performing complex artistic techniques.
Dots Design Ideas
If there is no dots, you can use any improvised item with a thin and symmetrical tip, such as a pencil or pen. The simplest option is to apply a straight series of dots, or to combine and layering peas of several different colors. But you can create other dots on the nails. Step by step we will analyze how simple decor is done using dots.
- For starters, dots are placed on a dry background with dots. These are future flower petals. Until the paint or varnish is dry, with a needle we “pull” the drops to the center of the flower.
- Small dots additionally decorate the drawing, highlight the details. For a greater artistic effect, the dots should be slightly different in size, and the lines of dots should begin with the largest pea and evenly decrease. To do this, you need to once dip the tip of the dots in the paint and draw a line of dots with tangential tangential movements, gradually weakening the contact between the dots and the nail plate.
- For laconicism of the picture, another dot is placed in the center of each flower with a dot, and simple lines are drawn. In this case, a thick varnish with sparkles was used.
Even more interesting will be a drawing made by dots on a gradient background or on the background of French manicure.
How to draw nails with paints step by step
Let's try to complicate the task. In order to paint the simplest petals with a brush and create patterns of flowers on the nails, you need at least 2-3 colors.

- First you need to consider in which order the colors will be applied. It will be better if you practice on some surface before you start drawing a flower on your nails.
- On the prepared background, apply the middle of the petal with a brush. The middle is not necessary to draw perfectly, since at the next stages the imperfections are masked.
- Then, depending on the order of the layers, the borders of the petals and light highlights are drawn with a thin brush. Light colors highlight areas that we want to visually push forward, and dark, on the contrary, “deepen” the details. The greater the play of colors made in the figure, the more realistic and voluminous it will look. In this case, the picture shows the simplest option using just two colors.
- This pattern is perfectly complemented by dots. Dots or rhinestones can decorate the middle of the flower and decorate the picture.
Gel drawings on nails are made in the same way as paints.
Stamped flower print on nails
Recently, drawings of flowers on nails are more and more often carried out using printing. This procedure does not require special skills. If in general terms we talk about how to perform drawings of flowers on nails step by step using stamping, then the following main points should be highlighted:

- You should prepare the background for the pattern, and wait for it to dry completely. The background can be made gradient, plain, French, or the natural color of the nail plate. It all depends on the desired result.
- On the metal plate with the desired pattern, the varnish of the color you want to make the pattern is applied.
- Then, with a scraper, the varnish from the plate is completely removed, after which the paint should remain only clearly according to the drawing, in the engraved grooves.
- With a stamp, with a confident single movement, we roll over the paint remaining in the grooves of the plate. Make sure that the drawing is completely clearly transferred to the stamp.
- In the same confident single movement, you should roll the stamp roller over the nail plate. If you roll this roller back and forth, the whole picture will be damaged.
- Small drawings made using the stamping technique can be supplemented with any other decorations, and on solid patterns, such as in the picture above, you can insert rhinestones in the center of the flower. The main thing is that the end result looks stylish and harmonious.
- Remove fingerprints carefully with a cotton swab dipped in nail polish remover.
It is better to start familiarizing with stamping with small drawings, gradually introducing larger and more complex patterns. The subtlety of printing on nails also lies in the fact that the pattern needs to be put on the nail plate in the right direction, and this requires some experience. If you learn to perform stamping step by step, the pattern on the nails will turn out amazingly clear.
How to create winter designs on nails
Any technology described above is suitable for drawing winter motifs. Winter drawings on nails, as a rule, have a cold color scheme, however, there are exceptions. For example, drawings that imitate the ornament of a winter sweater look very stylish. Also, many girls love the New Year and Christmas theme, mottled with red and gold shades. Consider how to make a classic version of a winter drawing, step by step. The pattern on the nails should be clearly visible, so make sure that your background and the color of the pattern do not merge with each other.
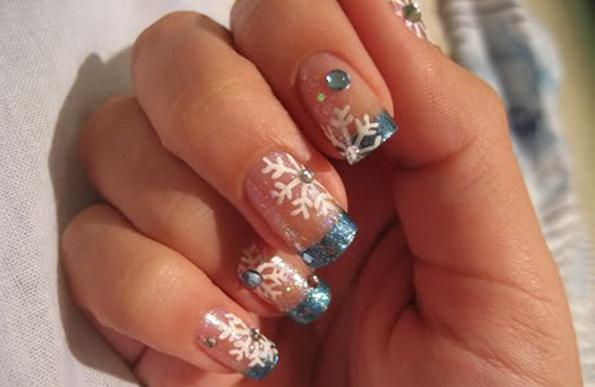
- Having prepared the “frosty” background, gently draw a snowflake with a brush . This pattern is not
requires special skills, but if you can’t draw by hand, you can use stamping. - After the drawing has dried, you can add a few dots.
- In the center of the snowflakes, put the dot with a dot of silver lacquer, and it would be better to glue a strazik. If the rhinestone is not on an adhesive basis, put a drop of transparent varnish in the center of the snowflake and glue a stone to it.
Useful tips and completion of the procedure
If you are just starting to learn the art of nail art, it is best to initially perform drawings on one or two nails on each hand. By the way, in Feng Shui, it is believed that the middle and ring fingers are responsible for attracting wealth. Perhaps that is why recently it has become popular to distinguish nails on these fingers. Do not forget that the right color scheme is the basis for a beautiful picture. A well-thought-out composition and accurate execution is the key to a magnificent drawing on the nails.
The drawings that harmoniously combine several techniques look more professional and interesting. Stickers, printing on nails, rhinestones and other decor can be very successfully combined with painting with brushes and dots.
Now you know how to draw nails. Be sure to fix the picture at the end of each procedure. You can take the usual transparent varnish, but it is better if it is a professional top-coat fixing coating. If the gel was made on the nails, then the finish should be from the same series, polymerizing under the lamp. Fixer should be especially carefully applied if acrylic paints or stamping were used for the design. Such drawings should be barely touching the brush, cover with a thin layer of fixative. It is advisable to do this in 1-2 movements, so as not to smear the pattern all over the nail. And after drying, it will be possible to safely apply the second layer, because nothing will deteriorate.
After applying the top coat, the entire picture will merge into a flat image, it will look organic, solid and neat. The quality of the "top" in many respects depends on the durability of the manicure.