Fantasy manicure has long become not just a familiar accessory for any lady, but also a way of self-expression. For creative natures, decorating nails is a pleasant many-hour process of creating nail masterpieces, but for the most busy and practical beauties, the world industry has provided a faster and easier option - a stamp for nails. How to use this wonderful set?
The question is so simple that even a child can figure out this technology, you only need to practice a bit, following the advice of experts. The acquisition of skills will help to create clear, vivid drawings and significantly save on the services of a salon nail master.
Himself an artist?
A wonderful adaptation of the stamp for nail design helps to apply an even and beautiful drawing without any artistic abilities, the ability to draw and create the smallest details of patterns! It is easy to use, with it you can quickly, effortlessly decorate the nails with an exquisite design. Stencils help in this simple matter - metal plates with patterns carved on them from simple ornaments to complex compositions: flowers, natural motifs, animals and abstract textures.
They can be purchased both in sets and each separately, having been selected in accordance with your taste and style. With the help of ready-made decors, you can create a unique mosaic on each nail or complete your image with a modest artistic accent on one or two fingers. At the same time, connoisseurs of spectacular nail art take no more than half an hour, and those who often practice nail decoration with stamping can do it in 10 minutes!
Stamping technique. What do you need to have a newbie?
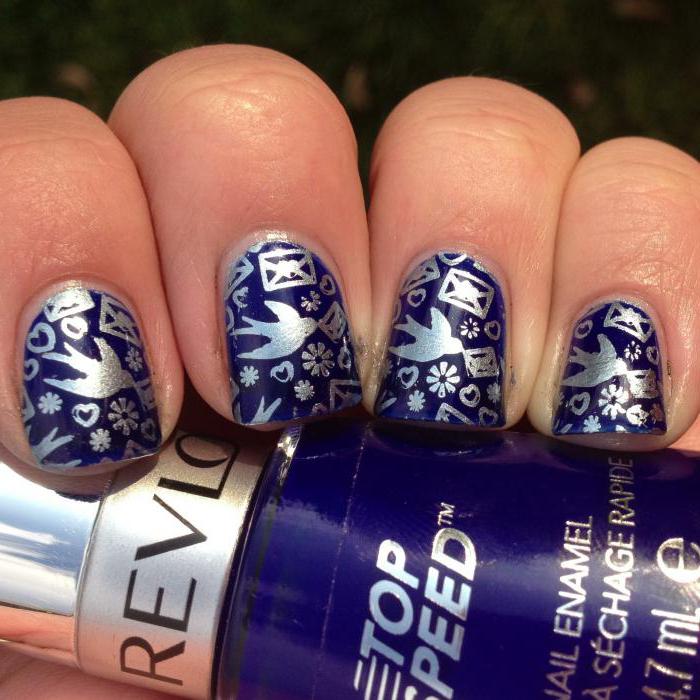
The standard stamping kits, in addition to metal discs with patterns engraved on them, include a silicone or rubber stamp for nails, how to use that everyone knows who ever stamped documents; a scraper (scraper) that helps to remove excess varnish from the disk surface, as well as special acrylic paints for drawing a pattern resembling varnishes, but with a thicker texture. It allows them not to spread, and craftswomen with the help of such paints can create clear contours. On one stencil (round, hexagonal or rectangular) there are usually several print options (4-8, 7-9 or 8-10).

Knowledgeable ladies-masters are advised to beginners to purchase a ready-made kit first, and then buy discs and paints of interest. The sets of the South Korean company Konad are considered the most popular and high-quality today, but there are more budget options, for example, such as Fix Price (China). In the reviews you can find recommendations to start with the best disk manufacturer, and then, having filled your hand, move on to more affordable stencils. Otherwise, the desire to save on templates can lead to disappointment and negative experience in the stamping technique: soft Chinese plates with fuzzy contours can cause sloppy nail prints. Scrappers (or scrapers) can be equipped with a metal insert, which is easier to clean excess paint from the plates. However, it can also cause scratches and other unwanted damage to the disc. Experienced craftswomen often use old plastic cards instead of scrapers, they ideally serve for this purpose. In addition, a nail stamp has a different configuration and size. How to use this tool with a rectangular shape (for long nails) or a small round one (for applying to short nails), it is better to think in advance. Large patterns for small nails will be excessive, and small patterns on long nails do not look so harmonious.
Stamping technology
Precise adherence to the rules and knowledge of several secrets of skill will help turn stamping from a painful and futile lesson into pleasure (not only from beauty, but also from the process of creating a high-quality professional manicure). Preparation before stamping is no different from caring for nails before manicure: first you need to degrease the surface of the nail plates, then a nail file and an orange stick need to be given the desired shape of the nails, gently pushing the cuticle. Next, you need to apply a base coat of firming varnish. It will help to evenly distribute the decorative layer and protect the nail from its coloring pigments. At the same time, due to good adhesion to the plate due to the base coating, the pattern will last longer. When the base dries, you can cover the nail with a background color. After waiting for the complete fixation of this layer, before using a stamp and a scraper for nails, fill with a contrasting varnish based on acrylic the pattern you like on the plate. At the same time, it is necessary to ensure that the entire pattern is filled with paint, otherwise a fuzzy pattern will appear on the nails. Holding a scraper or an old plastic card at an angle of 45 degrees, you need to remove excess varnish with a quick and firm motion of your hand after it “seizes”. Next, to transfer the picture, you need a stamp for nails. How to use this tool?
We set it perpendicular to the surface of the disk, slightly pressing it down, with a roll we remove the paint from the engraved notches, so that the pattern is clearly fixed on the silicone or rubber cushion of the stamp. Then we transfer it to the nail plate, pressing the nail to the working area as tightly, with the exact movement, and trying to completely print the pattern. Next, lightly roll the stamp without moving it and without smearing the
contours of the drawing. Particular care and speed of response requires a silicone stamp pad. When the stencil for nails is filled and slightly dried, a stamp from this modern material needs to be quickly printed
on the nail. For this, seasoned advise to place all the tools as close as possible in order to manage to transfer the print to the nail before it is firmly fixed on the silicone. The final stages of a simple nail decoration will be a design correction using a dart board, cotton swab or toothpick with a small amount of cotton wool and nail polish remover, which will help to accurately remove errors from the side rollers and cuticles, as well as a fixing layer with a top transparent coating.
Knowing how to use a nail stamp correctly, you can repeat these steps as many times as you need to draw patterns on your fingers. After all, stamping is not just a lesson in creativity, but a great way to create masterpieces without resorting to the services of professional nail designers.
Stamping Tools: The Right Care
Before using all stamping tools, make sure that they are absolutely clean. Removing the film from the stencil, you need to process the plate with an acetone-containing agent. The die should also be thoroughly cleaned. Any oil products form the thinnest film that adversely affects the quality of stamping masterpieces. They can also be removed with a liquid with acetone in its composition.
Stamping Features and Common Errors
An openwork ornament with thin lines dries quickly enough, so after 0.5-1 minutes it can be covered with 2-3 layers of top coating. And you need to do this with neat, quick movements so that the picture does not turn out to be blurry. A full imprint of the ornament should be obtained already the first time. The density and saturation of the varnish play a big role, so you need to purchase only special acrylic varnishes. The usual one is too liquid - it will pour out from the stencil and spread on the nail.
Too thick varnish will not occupy all the voids in the template and will not adhere well to the background coating of the marigolds. Particular attention should be paid to how to use a stencil for nails with a stamp from too hard or excessively soft rubber. A low-quality rigid base of the stamp will not translate the drawing, and a too soft pillow will displace the paint from the template, and the pattern will be fuzzy.
Creative natures
If stamping seems too simple for you, then you can use it as a basis for artistic painting, giving free rein to imagination. For many craftswomen, the small elements on the discs become a real find to revive French or any other classic manicure.
Reverse stamping: stamp for nail design. How to use?
Another modern technique for those who are bored with plain manicure - reverse stamping. It will take a little longer than usual practice. Its essence is just as simple: a layer of black or colorless varnish is created on the stamp, then when it dries a little, a small pattern from the plates is added on top of it. After drying the sticker-film, it is removed from the stamp and transferred to the nail, pre-coated with a top or plain varnish.
It is better for beginners to do this with a small pattern so that they do not have to trim it. Specialists with a full hand can create whole mosaics from individual drawings from different plates.
Reviews
Opinions about this revolutionary technology in nail art, as a rule, are only positive. Anyone who has tried stamping at least once cannot remain indifferent to this practice. Fast, convenient, easy in the conditions of a total deficit of the most important resource - time, this technique is simply irreplaceable!