DIY is not only extremely interesting, but also very useful. In addition, it is quite profitable. After all, with the right approach, it will be possible to create an original and even unique thing from improvised materials. Or even one of those that are unnecessary and lying around at home, suitable only for the bin. For example, in this article we will find out how to make a great ottoman with our own hands.
Moreover, the presented instruction will appeal to both men and women. Very often the fair sex is faced with a serious problem. They want the new interior item to be individual, built according to their own plan, project. But the girl or woman herself is not able to make furniture for obvious reasons. However, this design option is incredibly lightweight. And the materials for it will require quite unexpected, but the most affordable.
Where to begin?
To make the original ottoman with your own hands, you will have to work hard at the preparatory stage. To do this, you need to temporarily switch to the use of the same sparkling or mineral water. It is possible that a smart reader has already guessed what it is for. If not, we will explain.
The easiest and most affordable way to make a ottoman involves the use of ordinary plastic bottles. But in order to ensure that the design is smooth and does not squint on one side, it is important to assemble the main materials of the same size. For this reason, each time going to the store for soda, one particular brand and volume of the bottle should be preferred.
Let us explain that excellent and very comfortable ottomans can be made from different bottles. Two-liter vessels are, of course, best suited. But also some masters manage to refine the "five-parsley" and even bottles from the cooler. It all depends on what size and width the ottoman you want to do with your own hands.
What materials are needed?
So, if this condition of our reader was not embarrassed and he still decided to independently construct the original ottoman for home, garden or cottage, he needed to prepare the following materials:
- plastic bottles - 15-25 pieces (depending on the desired size of the ottoman and the vessels used);
- transparent wide adhesive tape - adhesive tape;
- two pieces of dense cardboard, their width should be equal to the diameter of the desired ottoman;
- cotton wool, foam rubber, a small blanket or pillow to sit on the received interior item was comfortable and convenient;
- PVA glue or “Moment”;
- a simple pencil;
- compass;
- ruler;
- scissors;
- needle with sewing thread;
- desired fabric - it is necessary for covering the do-it-yourself ottoman made by hand.
Stage One: Skeleton Formation
So, having prepared all the necessary materials and having decided on the design of the future unusual interior item, you can go directly to translating ideas into reality. To do this, the first thing we do is take the bottles. From them, the frame of our ottoman should be constructed. To do this, you must:
- To get started, take prepared bottles and arrange them in a circle, forming (if possible) the correct geometric shape. Then fill the middle with the remaining vessels. If necessary, we correct, we correct the bottles so that each of them fits snugly against those standing next to it.
- As a result, we get a “plastic guard”, which when viewed from above resembles a hexagon, like a cell in a honeycomb.
- Suppose our reader took thirty-seven identical vessels to make a ottoman from bottles with his own hands. Each one and a half liters in volume. Then it turns out that each of the six sides of the resulting figure will consist of four bottles. That is, in the first row, starting from the top, there are four vessels, then five, then six, in the middle line seven, after which they again decrease - in the fifth row - six pieces, in the sixth - five, in the seventh - four.
Stage Two: Strengthening
Having finished with the construction of the frame - a regular hexagon, we move on to the next step of the instructions on how to make a ottoman with your own hands. For its implementation, we need to “arm” with tape. After all, it is he who will help us securely fix our product. Getting started:
- Keeping our design, carefully (so as not to break apart and not start work again) we wrap it with duct tape for the first time.
- If it suddenly does not work out, then we ask for help from a friend, another family member. You can even attract a pet, if only there was a sense.
- If no one is around or the reader wants to surprise the household, fasten the vessels with four pieces of scotch tape, or first pull them together with a rope, rag, belt from the bathrobe, and only then connect them with duct tape.
- We fasten our construction very carefully. To do this, you will have to go around it several times. You may need to spend the entire roll of tape. Or two or three if you plan to make a large product.
- When everything is ready, we proceed to the next step of doing the ottoman with our own hands from plastic bottles.
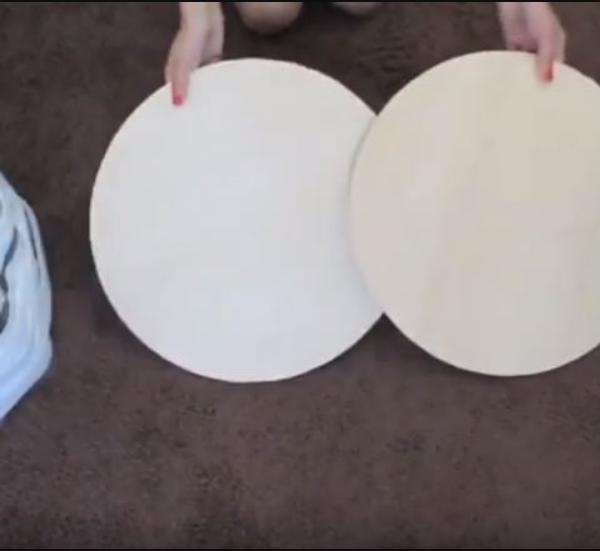
Stage Three: Cardboard Base
Now we get down to the cardboard. On it we need to draw a circle, which will subsequently serve as the bottom and seat of our future ottoman. To do this, we should perform the following manipulations:
- We take the first sheet of prepared cardboard and put on it the construction constructed according to the instructions (presented in the previous paragraphs).
- Now with a simple pencil we outline it. As a result, we are likely to get a slightly crooked circle.
- Put the frame for the ottoman aside. And pick up the compasses. With this tool we can correct the circle. It is necessary to make it correct, clear in shape. And then the do-it-yourself ottoman made of plastic bottles will turn out smooth, as if from a store, will not tumble to the side.
- On the eye, we determine the middle in the resulting circle. We put the sharp end of the compass into it, and then stretch it. Important! The pencil, which will draw the details for our ottoman, should be located a couple of centimeters further than the previously outlined contour.
- When all the necessary actions are completed, carefully, so as not to bring down the line, draw an even circle.
- Now we take the scissors in our hands and cut out the resulting circle. Then we outline it on the second sheet of cardboard. And also cut it out. If the cardboard is too thick and it is inconvenient for the reader to cut it with scissors, you can pre-purchase a stationery knife in the store. However, it should be managed with extreme care!
- The resulting details are set aside for now. And we proceed to the next paragraph.
Stage Four: Cotton Frame
To make the ottoman made of plastic bottles in appearance as close as possible to the store version, and to sit on it was very convenient, comfortable and soft, it is important to build around a cotton (or other chosen by the reader) frame. For example, an old unnecessary blanket and a small pillow are quite suitable for its implementation. The first material should be wrapped on the side of the ottoman, and the second should be laid as a seat.
If a piece of foam is used, it is necessary:
- Using a ruler, measure the height of the side of our ottoman.
- Then mark the resulting value on the fabric.
- Then measure the circumference, that is, the distance equal to the circumference of our frame made of plastic bottles.
- Also transfer it to fabric.
- Cut off a piece of foam necessary to wrap it in our ottoman.
- If desired, you can cut another one. Then the finished ottoman will become even more voluminous and softer.
Stage Five: Seat
The do-it-yourself ottoman ottoman workshop shows us that it’s not at all difficult to make all the details, and the frame of the product itself. Therefore, the implementation of the seat will also be very simple. And our reader will be able to verify this further:
- We take in our hands a cardboard circle, made earlier, and a pair of compasses.
- We find a hole in the very center of the drawn circle, put a sharp end into it and measure the radius - the distance to the edge of the circle.
- Now on a flat surface we spread a piece of foam and outline the outline of our seat on it.
- Cut out. If you want to get a very soft seat, you need to prepare several foam rubber circles.
Step Six: Build
Well, that’s practically it! Thanks to the instructions presented in this article, which describes how to do the ottoman with your own hands step by step, the inside of our product is almost ready. Now all that remains is assembly and cladding.
So, to collect our original piece of furniture, you need:
- Take the frame from plastic bottles and place it on a flat surface.
- Then, with glue, attach two cardboard parts to it. One to the bottoms of the bottles, and the other to the necks.
- Leave to dry well for several hours.
Step Seven: Sheathing
At this time, we pick up a needle with a thread and prepared foam parts:
- If our reader can make the sidewall and seat multilayered, the first thing to do is to sew their circles and strips together, gently sweeping them around the edge.
- Then fasten together. To do this, “hug” the bottle frame with foam tape. Sew the vertical edge.
- Next, we put a soft circle (or several, fastened together) on the upper surface of the future ottoman and sew it to the side part.
- You can, of course, immediately sew the sidewall and seat, and only then put everything on the frame. However, it will be quite difficult for a beginner to do this. After all, only an experienced master ottoman with his own hands will perform easily and almost effortlessly.
Stage Eight: ottoman decor
So, until the completion of our original piece of furniture, the final touch remained. And he is perhaps the most interesting and creative. After all, it all depends solely on the imagination, tastes and preferences of the reader. Therefore, you can decorate the ottoman at your own discretion. However, it is important to make the right pattern. But with this we will certainly help:
- We take a compass and measure the radius of our circle with it.
- Then we draw two identical circles on the prepared fabric. This must be done from the wrong side.
- Then, using the already familiar technology, we sketch the side.
- Next, cut out the details. Important! Not along the contour, but stepping back a couple of centimeters behind it. This is necessary so that after stitching the cover is not small.
- Now sew the first circle to the strip. We put it on the ottoman. If necessary, we straighten and correct defects.
- When the result is satisfied, turn the product upside down and sew the second circle. This is necessary so that the interior item looks complete and the cover does not come off during use.
This is just a general instruction on how to decorate a step-by-step ottoman from plastic bottles with your own hands. If desired, the product can be made more elaborate, decorate with braid, ruffles and other accessories. If the reader plans to use the ottoman in the garden gazebo, it is more reasonable for him to replace the fabric with leather or ordinary oilcloth.
What else can be made from plastic bottles?
One way or another, but in our house there are constantly various plastic vessels. But we throw them away, without even thinking about the fact that you can just turn on your imagination and build something unusual, new, creative. But in fact it is so simple! And the master class described in this article, we hope, convinced our reader of this. Therefore, he will not in vain get rid of the necessary material, but he will figure out how to make something of it.
Knowing the principle of how to make a ottoman with your own hands using a lot of plastic bottles, you can create a bench, a table and even a whole bed, but in this case you will need to collect much more vessels. But we still buy them, so the preparatory phase will not drag on for a long time!