Training to create a pattern on the nails for beginners and improving the status of the master, and a useful skill. Even experienced nail masters resort to the simplest techniques in design, since in many respects they remain basic. Sometimes it is useful to recall the undeservedly forgotten simple patterns, which turn out to be very effective in the performance of gel polish.
The first fashion for drawings in manicure appeared in the eighties of the last century. As soon as the gel nail extension appeared and the drawings gained great popularity. Schemes were printed in women's magazines, and every fashionista could flaunt a design.
In the nineties, the fashion for naturalness came, and the drawings receded into the background. But with the advent of gel polish, old tricks again became in demand, the new century brought a lot of materials for decorating nails and, in the end, a new art appeared - nail art.
Pattern Tools
How to make patterns on the nails to make the lines thin and elegant? Masters use a synthetic hair brush, its number 00, length is number 5. Synthetic brushes can often be washed in any solvents, natural ones will not stand this and will break off. In order to get a beautiful thin line, the brush is well impregnated with varnish, squeezed in a circular motion and take a little material on the tip.
To draw round lines and monograms, the brush is held perpendicular to the surface of the picture. Do not try to draw a full circle, not even all masters can do this. Combine the semicircles into a pattern and you will see how simple it is.
To draw long straight lines (mesh, lattice, squares, abstraction), a long hair, or liner, is suitable. It is used by laying on the surface almost horizontally. To create a gradient, a fan brush is suitable. It is also used for applying sparkles.
For setting clear points, there are dots. This is a metal tool with a ball on the end. Dots are of several sizes, the smallest, largest and one of the medium ones are required.
What are the patterns on the nails
In nail design, there are many tricks that have come from decorative art. Monograms are used in Khokhloma painting, the use of foil is a technique for decorating products with potholes. Matryoshka dolls with golden kokoshniks - it was from there that the foil came from. Alfreya painting has long used marble surface painting (in Peterhof, wooden columns are so decorated). The talented master Yekaterina Miroshnichenko discovered several techniques: liquid stones, casting, reptile skin, fabric and lace.
But even a novice master can make some beautiful patterns on the nails. They will be discussed. First of all, patterns are characterized by repeatability of the motive, and the motive itself (picture element) can be very simple. Mesh, frills, lacing, peas, abstract lines and rings look interesting. These drawings are done on a dry background.
A chain of hearts, peacock feathers, cock tails, flowers and bouquets, car tread prints are made using the “wet varnish” technique. Previously, patterns were made on nails with a needle, a regular sewing needle, mixing drops on the nail. Now there is a dots tool for this. In this technique, you can perform a dancing ballerina, the Eiffel Tower, a girl entering the sea, a sailboat, dolphins and much more.
What to choose for beginners
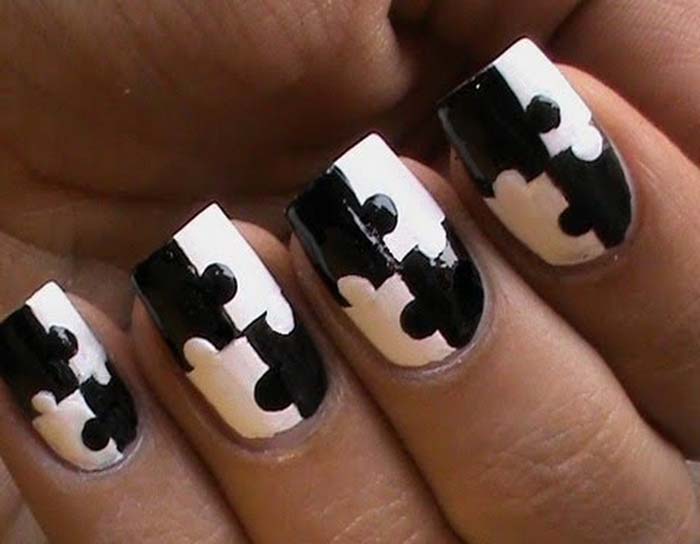
While the hand is not set, it is better not to tackle the thin lines, but restrict oneself to simple patterns on the nails. Everyone loves to collect puzzles. Here they can be depicted. This design is done on a dry background. That is, the varnish should lie on a dry surface. The more contrast the tones are selected, the more effective the pattern will be. The surface of the nail is varnished in a lighter tone. Then it is mentally divided into four squares and two diagonally lying ones are varnished with a darker color. Then dots with a large number are taken and dots of the corresponding color are set. This motive can be repeated: on nails of sufficient length to perform twice.
In wet technology, a favorite technique is drop by drop. Nail polish patterns are made very quickly so that the drops do not flow much. They put a few drops of the same color, add a different color to each, take a needle or the smallest dots and draw a line through the drops. At the entry point of the dots, a separation is obtained, at the exit point, a narrow cape. It looks like a heart.
You can draw two hearts: one is white with a red middle, the other is red with a white middle, a line is drawn so that the capes turn out side by side. This is one of the classic wedding designs. And you can perform a chain of hearts.
Lacquer technique
This method of drawing got its name even before the appearance of gel polish. The meaning of the lacquer technique is to change the drop. The varnish has the ability to make thin lines when carried drop by drop with a needle. It is used in leaves, petals, curls. If the needle is directed to the center of the drop, the varnish surrounding the drop immediately takes up the trace of the needle, a beautiful concave line is obtained. This technique is used to create beautiful patterns on nails: six-leaved flowers, hearts, it is used in dividing the main color with a thin line and in drawing veins of leaves and petals.
Principles of varnish technology:
- Never draw on a dry background.
- Work quickly until the varnish has frozen.
The same principles apply in work with gel polishes and bitogels.
How to apply varnish technique in gel polish
Principles of gel polish technique:
- Also do not draw on a dry background.
- Work fast until the pattern spreads.
- Polymerize the patterns with one finger.
The possibilities of gel polish allow polymerizing the pattern several times, applying layered designs. This may be the Double Smear technique, in which roses, peonies, irises, and a gradient are painted.
Nail patterns at home
The technique of “wet varnish” allows you to make unique designs on each nail. They will be all different, but in the same style. When carrying out a dots on droplets of varnish (or gel polish) it is important not to repeat one movement twice. Even if the plan did not work out, one should not try to correct the line.
Very beautiful patterns on glass draws frost. They are obtained due to the flow of warm and cold air. In the process of drawing patterns on glass, frost, figuratively speaking, does not erase those that he did not like. It is important to remember and apply. Here are some winter patterns on nails for beginners recommended by an instructor in a training nail studio.
So that the pattern does not turn into a palette of the artist, which resembles an explosion in a colorful factory, it is very important to repeat the motives. It’s better to stop on time than to redo it later.
This design is done by gel polish. Even a novice master can afford to buy the necessary kit: a UV lamp, a rubber base, a hard top and several colors of gel varnishes. But then in front of him will open many options for light patterns on the nails. For example, "reptile skin."
Imitation reptile skin
To create an intricate pattern of snake skin, you need to prepare a manicure UV or LED lamp, light and dark gel varnishes (for example, one pale pink, the second raspberry) and, of course, the base and top. After cleansing the nails, they polish with 240 grit buff, degrease and treat with an acid-free primer.
How to make patterns on the nails in the form of snake skin:
- Apply and dry the base (in UV - 2 minutes, in ICE - 30 seconds).
- Apply two layers of pale pink gel polish with drying each in a lamp. In UV - two minutes, in ICE - thirty seconds.
- Apply a layer of raspberry gel polish, but do not send it to the lamp, but make a design.
- Top with the help of dots put points on the dry layer of gel polish. They begin to spread slowly over the surface, increasing. Points should be placed in even rows: first in the middle, then on the sides. Drops should be placed side by side. After filling the surface with drops, send a hand into the lamp for two minutes.
- The surface of the nail is once again covered with a top and dried.
Patterns for short nails
Many believe that a manicure with patterns on short nails looks vulgar. This is not entirely true. Indeed, large contrasting patterns with an abundance of sparkles are contraindicated for such nails. But if you choose calm nude tones, apply a lace pattern only at the very ends and put small diamond crystals in the cuticle area - this will be a worthy wedding manicure.
Short nails look good if they are squared and coated with black varnish. In this case, beautiful clear lines of nails will make them neat and stylish. In the case of long lengths, such nails look too aggressive. On a black tone of gel polish make a design "cat's eye" and a mirror rub. You can rub it on a regular black varnish, rubbing it in a semi-dried state.
Now many periodically wear short nails: caring for the baby, housework, playing musical instruments do not leave an opportunity to increase the length. But this is not a reason to abandon the design. In the case of small nail plates, stamping helps.
Stamping
First, stickers were invented. They made it possible to replace the drawing by hand with a decal. But their possibilities were limited. There are no thin lines in this technique. They have to be painted on manually, which not everyone can do. And now Conad launches the first stamping kits. The pattern on the nails for beginners has ceased to cause difficulties.
Conad uses a super-drying formula in his paints, which allows you to not wait for the drawing to dry and immediately cover it with top. In the case of using acrylic paints for painting nails, this was not.
Principles of work with stamping:
- Special paint covers the necessary pattern on the disk.
- Remove excess paint with a scraper.
- Very quickly rolling movement transfer the pattern to the stamp.
- Immediately imprint the pattern on the nail.
Sometimes it is easier to draw something by hand, especially in places where you can’t print identically on all fingers. An interesting technique for nails for beginners, reminiscent of lace, is available even to those who can not draw. This type of design is performed on a dry background.
How to draw lace: 8 steps
The photo shows all eight steps of drawing lace. For clarity, contrasting colors are selected. Usually this pattern is made with white gel paint, which gives a very thin line and does not spread like gel polish. After drawing, it is polymerized in a UV or LED lamp for a minute. The same drawing can be done with a gel pen, but the lines will be thicker. To begin with, apply and dry the background.
Lace, or how to draw patterns on the nails:
- Draw an arc line in the zone of the hole (you can use a stencil).
- Use a large dots to place a point along the line, and a small dots to place a small dot above each point.
- With the middle dots, put the background color dots in the center of the big dots.
- Repeat the arc line to paint over the base with the background points.
- Draw an arc line next to the pattern.
- Draw an arc line at the cuticle.
- With the middle dots, put dots between two thin arcs.
- Put dots with small dots between the protruding parts of the lace.
Manicure ideas for beginners, photo
You can make patterns that will simulate marble. At the same time, it becomes possible to combine different colors and achieve amazing results. This technique is called "liquid stones" and allows you to embody all types of ornamental stones. It is not necessary to cover all the nails with a stone pattern, you can make a marble french jacket and one nameless marigold.
How to make patterns on nails in marble technique:
- Cover the nails with the main background. If you need white marble, then we take white varnish. To dry.
- While the varnish dries, the nail rollers are coated with PVA glue. This is convenient to do with a brush.
- Drops of the main, transitional and contrasting tones are applied to the nail. For example, white, beige and black. A piece of plastic film is pressed against the dry varnish to mix the colors. Remove the film.
- Remove the PVA film with tweezers from the skin. The varnish that has fallen on the rollers is removed with a brush dipped in nail polish remover.
- Fix the top cover.
This design is also suitable for gel polish, in which case it is dried in a manicure lamp, and the brush is moistened with alcohol. If desired, you can draw streaks. This is done with a thin brush liner and a contrasting color.
Simple patterns on the nails: water manicure
Beautiful patterns are obtained using the “water manicure” technique. To do this, prepare a wide bowl and fill it with water as fully as possible. Varnishes drip onto the surface, trying to get to the center of the previous drop. You can use several contrasting colors. When a rainbow puddle forms on the surface of the water, the tip of an orange stick is drawn through all this beauty, and a pattern forms.
Now, one by one, they lower their nails into a bowl, and a varnish film remains on them. So that it is not difficult to later wash the nail rollers, they are covered with a layer of petroleum jelly. Tip: lower your nails in parallel so as not to stain your fingertips. When the original drawing is deformed, they again make a motion with the stick. She can also collect disparate parts of a puddle for the last fingers.
These light patterns on the nails can be done using varnish and water.
Conclusion
With all the variety of patterns, only two of their types can be distinguished: by wet and by dry background. Cutting a drop with a needle or inserting a needle into a drop are the basic techniques of wet technology. Professionals perform many drawings on a dry background, but this is still ahead for beginners. The main thing is to develop your own style, then you will not need to think how to draw patterns on the nails.