In our eternally rushing somewhere century of digital technologies, sometimes you want to stop, sit in your favorite chair and just relax. It is at such moments that many of us pick up a large family photo album . When looking at any picture, the thought suddenly arises that it would be nice to put it on a shelf or hang it on the wall. But due to the fact that there is no suitable frame, we again send the photo to lie between the pages of the album. Wait, do not rush and hide the picture, you can create a frame from improvised material. From what and how to make a frame? From cardboard. Yes, ordinary cardboard, which is found in every home.
Cardboard frame - a new lesson
So, once in a cozy evening, turning over the pages of an album, laughing to your child about how you used to be a kid once upon a time, you suddenly wanted to leave a couple of pictures in sight, enclosing them in an original frame. Creating a frame of paper and cardboard will help you pass the evening, in addition, this is another great way to teach your child something new, interesting. Feel free to get down to business! Its manufacture does not require large time and financial costs.
Cardboard frame: necessary materials
Elemental Do-it-yourself cardboard frame is made using the most common materials, such as cardboard, ribbons, fabric, wallpaper remains, beads, shells brought from summer holidays, and other items suitable for decoration. Still need scissors, a ruler, a pencil, stationery glue. Raw cereal can be an interesting solution for decoration - it can be peas, buckwheat, semolina or any other. How to make a cardboard frame with the use of cereals, it will be described a little later, undoubtedly, many will like this decoration option.
Simple frame
To make the simplest frame, you will need:
- white cardboard;
- decoration items (in this case beads were used);
- the cloth;
- office supplies.
Two rectangular blanks are cut from cardboard. For a 10x15 photo, they should be 13.5x18.5 cm. Now in one of them you need to cut out a window that should be slightly smaller than the picture itself. You can attach a film to this window, if desired, from the reverse side, for example, a segment from a transparent file to protect the photo from dust. The picture must be fixed at the corners using thin strips of paper between the blanks, the image in the window. Now you can glue the blanks with a cloth, decorate with beads. Do not forget to attach a stand to the back of the frame - a triangle cut out of cardboard or a loop to hang it on the wall. This is how you easily and quickly make a simple cardboard frame with your own hands. Agree, even a child can handle this.
Simple frame decorated with cereals
Creating such a frame is not at all difficult. The principle of its manufacture is the same as in the previous description. Only the way of decoration changes. Grain is glued onto the front billet using PVA. If it is peas, then each pea is glued separately. You can even use semolina, millet, buckwheat. After the glue dries well, the cereal must be varnished, allowed to dry, painted in any suitable color and again coated with a layer of varnish. It turns out to be a very unusual frame made of “cardboard” made in the “cereal” technique. Made with your own hands, it will delight your look for a long time.
Scrapbooking frame
This option is somewhat more difficult to execute than the previous ones, and will require a little more time and effort. The photo frame made of cardboard, decorated with fabric, looks stylish and quite unusual. To make such a thing you will need:
- thick cardboard (binding) ;
- the cloth;
- a sheet of scrap paper 30x30 cm;
- a piece of scrap paper 10.5 x 15.5 cm;
- scissors, clerical knife and awl;
- brads (carnations or buttons with a decorative hat);
- a small segment of synthetic winterizer;
- "Crystal Moment."
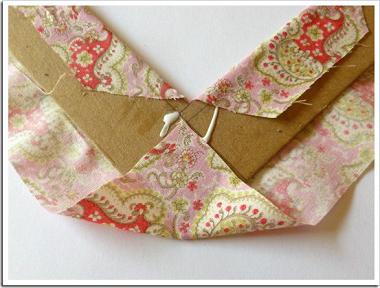
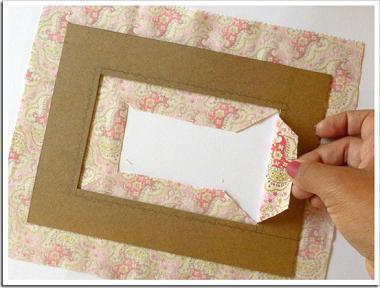
To make such a frame from cardboard, several details need to be cut: the front and back sides (24x18.7 and 18.5x13.5 cm in size), a leg (16 cm). The box in the frame is cut out based on the size of the picture. The cover of the frame is cut out of fabric. When cutting, do not forget to make a small (approx. 1.5 cm) indent from the edge for bends. From the synthetic winterizer, the front part, the one with the window, is cut out. You can begin to form the frame itself. To do this, the front side must be greased with a thin layer of glue and a synthetic winterizer is fixed, a prepared fabric is applied over it, which must be glued, bending the material on the back side, starting from the corners. It should be some kind of pillow. Now you need to make the middle of the frame, that is, that same window. Carefully, not forgetting the small indentation, the rectangle of the required size is cut out, the fabric is bent, glued. To make the frame even more attractive, you can sew its edges on a sewing machine. To decorate the scrap-frame, you can use bows from ribbons, brads, beads and other small items for decoration. The back side is pasted over with scrap paper, in turn, a leg is attached to it for stability.
Cardboard photo frames made using scrapbooking technique differ from all others in their delicate, extremely attractive design and can serve as a great gift.
Coffee frame made of cardboard, master class
Necessary materials:
- thick cardboard;
- coffee beans;
- acrylic lacquer;
- office supplies;
- the cloth.
1. Prepare the basis for the framework. To do this, rectangles, front and back sides are cut out of cardboard. In front of the window, depending on the size of the picture, a window is made.
2. The front side is glued with a suitable color material.
3. The window for a picture is accurately formed.
5. Coffee beans are glued onto the fabric. For this purpose, it is better to use the "Crystal Moment" or liquid nails.
6. After all the grains are glued, you can cover them with two to three layers of varnish with intermediate drying of each layer.
7. A variety of little things can serve as a frame decoration - such as satin ribbons tied in beautiful bows, coffee cups and spoon figures.
8. The desired photo is fixed in the window.
9. The front and back parts are glued together.
10. The frame support will be a rectangle cut out of cardboard, which is fixed on the back of the product.
Egg shell frame
You can also decorate the cut out base for the photo frame with eggshell.
It turns out a certain effect of aging with cracks, or mosaics. Before sticking the shell on cardboard, it must be properly prepared. First rinse thoroughly. Secondly, remove all internal films. Thirdly, it’s good to dry. Only after such preparation of the shell can you paint with acrylic paints in any colors, let the paint dry and break the shell into small pieces.
The front side of the future framework should also be painted in a suitable color. It is not necessary to use paint of one shade. For example, bright pink, bright blue, raspberry and white colors are perfectly combined with each other. Playing on their contrast gives a stunningly beautiful result. Shell fragments are glued to the front side in random order, folding into a kind of mosaic. In such a simple way using improvised material, a cardboard frame is made with your own hands.
Good luck with your ideas and success!