Those temperature records, which often break recently in the summer days, make many people think about buying an air conditioner. After all, only its use will allow you to create a comfortable temperature in the walls of the home in the hot season.
Air conditioning, like many large household appliances, today is no longer a luxury item, indicating the welfare of its owner. But at the same time, such an acquisition is not at all cheap, which forces economical owners to engage in its independent installation.
Design features
Various models of air conditioners and split systems have taken a rather solid place in the life of a modern person. Some of them, in addition to creating a favorable microclimate, are able to heat the premises during the off-season.
In order to understand how to independently install an air conditioner (split system) in a house or apartment, you will need to first study the device device. It is also important to familiarize yourself with the principle of its work.
In its device, air conditioning is similar to a split system. The differences between these devices are only in the fact that the first of them are enclosed in one housing, and the second in two blocks. At the same time, the split system works in the same way as a standard household air conditioner of a floor or window type.
What is the design of such units? Arranged air conditioning is quite simple. Its main components are the external and internal unit. The first of them controls the operation of the entire system based on the modes specified by the user. Its components are:
- Fan. This part is used to blow internal parts.
- Radiator. It is necessary for cooling the refrigerant.
- Compressor. Using this component, the refrigerant is compressed and circulated between the units.
- Electronics in the form of a board for automatic control. In models of the inverter class, it is located outside, for the rest - in the indoor unit of the air conditioner.
- The valve is a complex design. It can only be found on models that produce both cold and heat. This valve allows you to change the mirror effect of the blocks when you turn on the heating mode.
- Cap. This part is designed to protect the fittings.
- Filter. Its installation is necessary to protect the device from the ingress of foreign particles into it.
- External housing.
In the evaporator block is:
- Lattice made of durable plastic. The air passing through it enters the device. If necessary, get to the rest of the block grille can be removed.
- Filter or mesh. The main objective of this element is to prevent large dust particles, which are in suspension, from entering the unit.
- Evaporator, or heat exchanger. This component is needed to cool the air flow just before it enters the room.
- Horizontal blinds. They are necessary to adjust the direction of air flow.
- Indicator panel. This part is used to indicate the operating modes of the device. The indicator board displays the malfunction of the air conditioner when its operation becomes incorrect.
- System for fine air purification. It consists of a carbon filter and is designed to eliminate various odors, as well as filtering fine dust particles.
- Tangential class fan. This part is necessary for constant air circulation in the room.
- Vertical blinds. In the design of the device they are necessary for horizontal air intake.
On the back of the unit is an electronics board, microprocessor and fittings, designed to connect copper tubes through which freon circulates.
Manufacturer Options
After purchasing and before starting the self-installation of the air conditioner, it is necessary to check the availability of all its working parts. As standard, as a rule, there are:
- Outdoor unit. Some manufacturers also complete their models with brackets designed for its installation.
- Indoor unit.
- Perforated metal frame. It can have a different shape. Apply such a frame to install the indoor unit.
- Drainage. It is a tube through which moisture is removed to the outside of the indoor unit. In the case when the drainage tube is short, it can be extended with a regular metal-plastic water pipe.
- Nuts (4 pcs.). These hardware products are necessary to lengthen the tube.
- Self-tapping screws with dowels made of plastic, necessary for mounting the frame.
- Remote control.
- Instructions for use of the unit.
It should be borne in mind that for the independent installation of an air conditioner, the standard equipment of the device will not be enough.
The owner will have to buy the necessary materials and stock up with the necessary tools. What do you need to install the air conditioner yourself? Let's consider further.
Materials
Self-installation of air conditioning in the apartment will require:
- Electric cables. What section should they be? To find out this will allow installation instructions. As a rule, these are four-core cables with a cross section within 2-2.5 square millimeters. Calculating their length, it will be necessary to take into account all the bends of the route, adding a small margin of 30 centimeters.
- Brackets. These are the details of the L-shaped form, which must be selected based on the size of the purchased device. On the brackets to attach the heaviest outdoor unit of the air conditioner.
- Thermal insulation. As a rule, this material is a rubber “sleeve” of any color. The length of the material for thermal insulation should be such that it is possible to mount it along the entire route. In addition, you will need to make a stock by multiplying the estimated dimensions by 2.
- Copper tubes. This material must be selected seamless and thick-walled, especially designed for air conditioners. It is necessary that the ends of such tubes be covered with plugs. This will protect them from debris. When calculating the length of the pipe, it will be necessary to take into account the length of the route, all the bends on it, adding 20-30 cm to the obtained value. What should be the diameter of the tubes? It will depend on the specific equipment model. Its value is indicated in the instructions.
- Anchor.
- Reinforced tape.
Instruments
How to install air conditioning in an apartment or in a house yourself? For installation of the structure, you will need to prepare special tools. Their list includes:
- stripping rimmer;
- pipe bender;
- rolling;
- pipe cutter;
- Vacuum pump;
- manometric manifold.
After acquiring all the necessary materials, having acquired the necessary tools, you will need to decide on the place where the air conditioner will be installed independently at home. Some owners do not pay attention to this issue. But at the same time, the cooling efficiency of the premises decreases, and expensive equipment very quickly fails.
Location of the air conditioner in the apartment
How to install air conditioning in a private house or apartment? To do this, you will need to choose the most optimal place for him.
The building structure, on which the air conditioner will be installed independently, must have a margin of safety, which will allow it to support the weight of the device. In addition, the installation point will need to be noted not far from the location of the outdoor unit. When deciding the question "How to install air conditioning in a private house or apartment?" an aesthetic criterion should be considered, taking into account the interior design and the characteristics of the room.
During installation, the risk zone must also be taken into account. It is located at a distance of three meters from the device and concentrates in itself those cold streams that will then be scattered throughout the entire volume of the room. How to install air conditioning in the apartment and in the room? When choosing a place of installation, it is necessary to pay attention to the fact that there are no objects of furniture and interior intended for rest or work of people in the risk zone. In other words, the air conditioner should not be installed opposite the desktop, sofa, bed, etc. It is better to attach the indoor unit to a place of rest or work. In this case, air flows will pass above this zone without directing cold there.
How to install the air conditioning in the apartment with your own hands? When choosing a place for the device, do not take into account the areas located above the cabinets and other overall objects. All of them in the future will not allow normal distribution of chilled air masses throughout the room.
In addition, in order to choose the right place for installing the air conditioner, you will need to observe the distance from the ceiling to the top cover of the indoor unit. It should be more than 15 cm. A shorter distance will not allow air masses to pass freely.
When choosing a place for installing an air conditioner, it is necessary to pay attention to household appliances in the room. They should be located as far as possible from the split system, as they will interfere with its operation.
Air conditioning installation in the bedroom
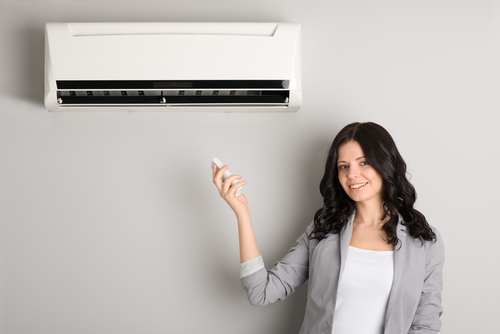
Most often, a split system is purchased to create comfortable conditions in the relaxation room. How to install air conditioning in the bedroom? It is recommended to place it above the head of the bed. Only in this case, when a person is resting, he finds himself in the most comfortable zone of the room. The device directs cold air flows to the opposite wall, where the lowest temperature indicators will be located. It is important to find out how to properly install the air conditioner in the bedroom (see the photo below) before fixing it.
The place against the device within 2.5-4 m is the most uncomfortable. In addition, this location is dangerous for health, as streams of cold air rush there.
Installation locations of the outdoor unit
The area for placing the external part of the air conditioner should be selected so that the installation of the device is as economical as possible. In addition, cleaning, repair and other types of further maintenance after installation should be convenient.
When choosing a place to place the external unit of the split system, you need to pay attention to the following points:
- installation at a short distance from the ground is prohibited in order to avoid theft and hooligan actions;
- installation of protection is necessary to prevent mechanical damage to the device from falling of various objects;
- the distance from the outdoor unit of air conditioners to any objects should not be less than three meters;
- Installation near heat sources is prohibited.
How to install air conditioning on the exterior wall of the building? To do this, you will need to use special brackets, which should be attached with anchor bolts. Such fastening will prevent the vibration of the outdoor unit. Neglecting these requirements will lead to noisy operation of the split system and its rapid failure.
Device mounting
And now let's move on to the question of how to independently install an air conditioner at home. The order of its fastening includes certain steps.
They represent a phased installation of highways and system modules. Installation is performed according to the step-by-step instructions below.
Mounting the indoor unit
How to install the air conditioner yourself?
The step-by-step instruction for installing the system at the first stage of work provides for the following actions:
- You will need to take a steel frame and attach it to the wall in the place that is selected to house the air conditioner. It should be borne in mind that such a design should be located strictly horizontally, which can be checked using the construction level.
- At the next stage, it is necessary to outline the attachment points of the structure.
- To install the frame, holes are made into which plastic dowels are clogged.
- The plate is applied to the wall and fastened to it with screws.
- The indoor unit is suspended on a plate. After that, it is recommended to check the horizontal again.
Communication channel device
What is the next step in installing the air conditioner yourself? According to the instructions, work should continue with the preparation of the channel for the arrangement of the highway. To do this, you will need to make a hole in the wall of the desired diameter through which the power cables, freon tubes, and drainage will be brought out. You can perform such work with a hammer drill equipped with a long drill. It should be borne in mind that condensate must have free flow to the street. In this regard, when drilling walls, it will be necessary to provide for a slight bias.
Outdoor unit installation
Installation of the external part of the air conditioner is considered the most time-consuming process. The main difficulties are caused by the weight of this module, which sometimes reaches 20 kg or more. In this case, the outdoor unit sometimes has to be placed at a considerable height.
How to install this part of the split system? First of all, you need to make a markup by checking its horizontal location with a level. Then, using a punch, holes are made into which the anchor bolts are screwed. After that, brackets are attached to them with the help of nuts. An external module is installed on the finished structure.
Installing the outdoor unit of an air conditioner will require the help of another person. When installed at high altitude it will be better to call climbers for work.
To reduce the vibration of the device, it is recommended to put tight rubber under it.
Communication
After installing both modules, you will need to connect them together. To do this, the following actions are performed:
- The plastic protective covers located on the terminals of the outdoor unit are removed. Next, power and control cables are connected to them according to the scheme, which can be found in the instructions for the device.
- Installation of the track is in progress. Thermal insulation is first put on the tubes of which it consists. Fasten the track to the wall with clamps. At the ends of the tubes put on the union nuts, and then roll their ends. Applying a rimmer, chamfer.
- In the next step, the tubes are screwed to the fittings first of the outdoor, and then the indoor unit.
- Fasten using a plastic clamps drainage tube.
System startup
Above was given instructions for self-installation of an air conditioner without evacuation. Its implementation will be needed to run into the refrigerant system. Performing evacuation will require a gauge manifold and a vacuum pump. The latter is connected through the collector to the filling nozzle and turned on for 20-30 minutes. This time will be enough to remove all air from the system.
Turning on the vacuum pump, you will need to open the handle. You can find it directly under the pressure gauge. After a short period of time, the arrow on this device will begin to fall, going to zero in 30 or more seconds. The time of such pumping will depend on the diameter of the tubes and the length of the line. An arrow at its zero position will indicate that there is a vacuum in the line. However, the pump should not be turned off at this moment. Evacuation will need to be continued for another half an hour. Further, it is necessary to observe the gauge needle for another 20-30 minutes. If it does not rise, the trunk is considered airtight.
After evacuation, freon should be launched into the system. Do this work when the hose is connected to the valve of the service port.
The start-up of the refrigerant system is made by slowly opening the valve of the liquid valve. This work is performed using a hex key. When starting freon, it is recommended to wear gloves and goggles. This will avoid damage and frostbite on the hands and eyes. After filling the system, close the valves of all valves and put plugs on them.
Successful completion of the steps described above allows the split system to be considered fully operational. Nevertheless, at first it should be turned on only for a while, making sure that the line is tight and once again checking all the connections.