Drill - this is perhaps one of the most common in everyday life and in the production of devices for machining materials, which allows you to quickly and accurately make a hole in the surface with a very different structure. Whether it's a hand rotator, an electric drill or a large radial drilling machine, they all use a drill as a cutting tool. It is a hardened carbide metal rod of various diameters, with a shank and a working part in the form of two or more cutting edges, which during rotation select the material.
Drill angle: an individual approach to each material
Depending on the type of surface, the requirements for the quality of processing and a number of other conditions, the shape of the drill can have a variety of forms. The most common option is when its working part consists of two cutting edges twisted together in a spiral, forming a cone at the end of the drill, the height of which determines the angle of sharpening of the drill. Its value depends on the hardness of the processed material and for each material may have its own values:
- carbon steels, alloys of cast iron and solid bronze - from 116º to 118º;
- brass, soft bronze and copper products - from 120º to 130º;
- aluminum and wood surfaces - 140º;
- polymers and plastics - from 90º to 100º.
Conditions for a long and active life of the drill
If we exclude the thoughtless (or hopeless) option of using a drill without victorious soldering for working on concrete or stone (when the tool fails literally in a minute), then the most actively cutting edges are blunt when drilling hard metals. The life of the drill in this case depends on the hardness of the surface being treated, as well as the speed of rotation, the feed force and the cooling of the cutting tool. It is extremely simple to determine the moment of deterioration of the cutting qualities of the drill by the characteristic sharp whistle and the need for more pressure on the drill. As a result, the drill heats up very quickly, the drilling time is significantly increased with a simultaneous decrease in the quality of the resulting hole, and the drill needs to be replaced to continue normal operation.
It’s better to lose an hour and then drill in five minutes
Since drills are considered consumables and have a relatively low cost on small sizes, many simply throw them away, replacing them with new ones. However, this approach can be justified only with a small amount of work, low cost of the part and the proximity of the construction store. It is much more economical and faster to sharpen a drill for metal with your own hands. There are a lot of devices for this operation, and, as a rule, the price of such equipment directly depends on the speed, versatility and quality of processing of the cutting tool.
The right form of sharpening is the key to effective work
As a result of processing, the cutting edge of the drill is given a certain geometry, which is a priority for a particular drill diameter and the structure of the surface being machined. To obtain the desired shape, respectively, different methods of sharpening the cutting edge are used. Separate single-plane, conical, two-plane, screw and cylindrical sharpening types. At home, the first two methods are most often used as the simplest, and in one plane they sharpen drills with a diameter of up to three millimeters, providing a thirty-degree slope of the rear corner. The disadvantage in this case is the high probability of destruction of the working part of the edge due to its thinning, therefore sharpening in the form of a cone is usually used for drills of larger diameter, forming an angle on their tip between 118-120º.
Ways to achieve your desired sharpening quality
In principle, having certain skills, sharpening can be done without an auxiliary tool. The main thing at the same time is to observe the necessary processing angle, as well as the equal length of the working surface of the cutting edges and their symmetrical inclination relative to the axis of the drill. However, to achieve this in practice is not so simple, a very small error is enough for any of the listed indicators, and your drill will not work properly. The use of special devices simplifies the process, but you must agree that it is impractical to purchase an expensive machine for arranging a pair of metal drill bits. In addition, a homemade tool for sharpening drills will help to cope with this task, albeit with less comfort, but also not bad.
With all the variety of options, the principle of operation of all devices of this type is based on the formation of a rigid template or guide along which the sharpened tool is fed to the emery wheel in a certain plane.
Nut, screw, direction - that's all
Perhaps one of the fastest and most affordable options will be the manufacture of a tool for sharpening drills from a nut. Its six faces form an angle of 120º on adjacent planes and can serve as an excellent template for setting the desired inclination of the sharpening of the cutting edge of the drill. The procedure for manufacturing such a device is quite simple and does not take much time. The nut is clamped flat side up in a vice and, using an angle grinder (grinder), longitudinal cuts are made along the line connecting the opposing angles of the hexagon. On one side of the hardware, you can make six recesses (according to the number of vertices), thus forming three guides.
The size of the nut, as well as the width and depth of the guide, are selected based on the diameter of the sharpened drill. After that, the entire outer surface of this simple device is carefully treated with sandpaper or a file to remove burrs.
That, in fact, is all, the simplest device for sharpening drills with your own hands is ready. Now the drill, which requires sharpening, is placed inside the guide (between two opposing angles) so that the machined edge protrudes slightly beyond the top of the hexagon. The fixture is clamped in a vice, tightly fixing the drill in the nut groove with the tip up, and using the same grinder, the protruding cutting edge is gently grinded using the side surfaces of the hardware as a guide, forming a sharpening angle of 120º.
If necessary, the drill in the groove can be fixed with a clamp, and instead of the angle grinder, a grinding machine with an emery wheel is used.
There are never too many hardware: modernization of the nut
This design can be somewhat improved by making deeper (depending on the diameter of the sharpened drill) V-shaped cuts in opposing peaks and welding a smaller nut on the same side of the fixture. The drill in this case can be fixed with a clamping screw screwed into the nut welded on top.
As a result, there is no need to use a vice and clamp (the main thing is not to press the screw so as not to bend the drill). Such a device allows you to successfully cope with the sharpening of drill bits of even a small diameter (up to three millimeters), when it is practically impossible to maintain and control the angle of sharpening without special tools.
Wooden guides for sharpening drills
Now we will consider how to make the device for sharpening drills from bars or thick plywood. The design is a wooden guide rigidly attached to the base. The base part of the device is made of a flat rectangular board (thick plywood) on one side of which a rectangular cut is made, providing access to the side surface of the emery wheel. Then, an overlay is prepared from plywood in the form of a right-angled triangle or trapezoid with a side inclination at the base of 60º (from the top - 30º), which guarantees a sharpening angle of 120º. The dimensions of the guide should ensure the free placement of a sharpened drill along it, both in length and in height.
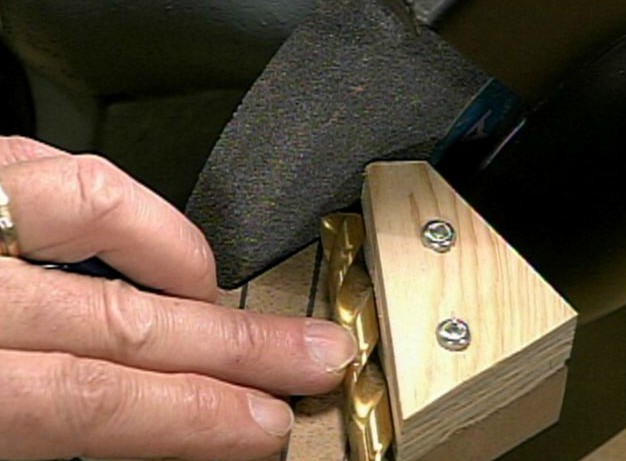
The finished plate with screws is attached to the far edge of the base board with an acute angle towards the emery wheel. Sharpening drills for metal with a device of this type requires its clear fixation along the outer (wide) surface of the abrasive. Each cutting edge is formed separately, by smoothly rolling the drill towards the rotation of the circle, then the same procedure is repeated for the second side, achieving perfect balance. With frequent use on the wheel, a working out may occur, and you will either have to move the tool along the emery or replace the abrasive. This method is good in that it allows you to easily get the required inclination of the cutting edge by quickly replacing the upper guide to the desired size.
Using sharpening guide bushings
Another option for processing drills, actively practiced at home, is a wooden vertical stand with hollow metal bushings of various diameters, which are placed in the bar at the angle necessary for sharpening. As a result of processing, a cone is formed on the rear of the cutting edges, but without the correct rear angle.
Professional solutions: great results for little money
All home-made devices provide an acceptable, but, alas, imperfect result. Even without taking into account the high probability of error in the independent manufacture of sharpening devices, there are still a number of parameters, the non-observance of which leads to a quick failure of the drills. That is why large manufacturers are developing sophisticated devices and even machines to bring the cutting tool into working condition.
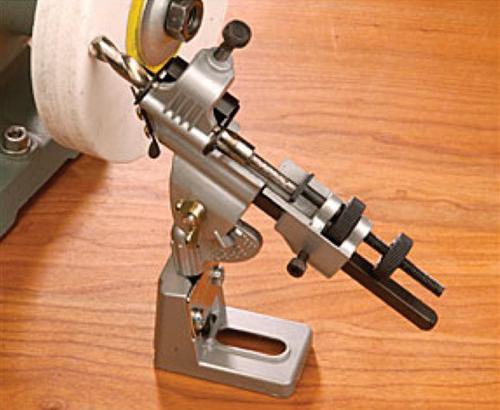
One of such mechanisms is a tool for sharpening drill grinde drills, which makes it possible to restore the sharpness of spiral drills for metal with a diameter of three to nineteen millimeters. The device easily copes with the task of forming the cutting edge of any inclination, while having a scale with standard sharpening angles (98, 118, 136 and 176 degrees, as well as for countersinks). The perfect grinding quality is guaranteed by the precise positioning of the drill thanks to the clamping screws. The heel (the rear corner of the cutting surface) is formed due to the small axial tilt, which sets the arc movement of the drill during processing.