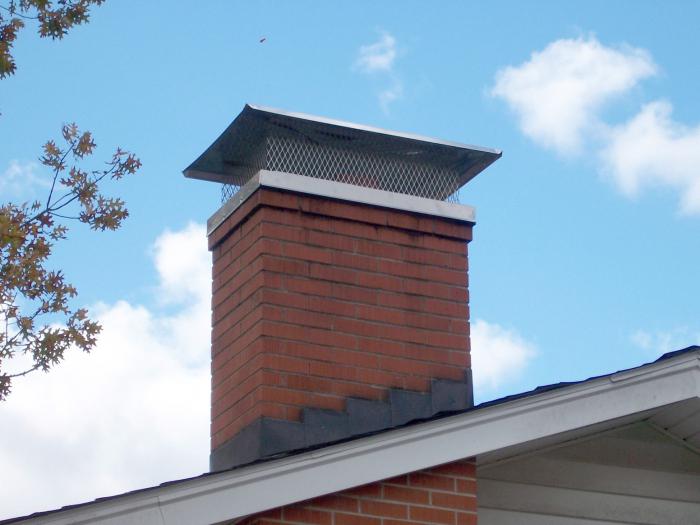
It is simply necessary to install a hood on the chimney pipe . This element acts as one of the most important components of a stove or fireplace. Thanks to the cap, unobstructed and constant removal of combustion products is ensured.
These chimney components are also used to increase traction. If the deflector has the correct design, then it will not allow atmospheric precipitation in the form of rain and snow to enter the chimney.
In addition, the cap prevents the entry of debris and birds. To do this, mount a grid that will not trap smoke at the exit.
Chimney hood components
In order to independently make a cap on the chimney pipe, you need to know what basic parts this element consists of. Thus, in its composition there is a lid, as well as a dropper for water.
Preparation before making a chimney hood
Before starting work, it is necessary to draw up a diagram on paper. The preferred form of construction is in the form of a skirt, this will eliminate the ingress of precipitation on the outer base of the chimney masonry. In addition, it is necessary to initially correctly determine the parameters of the hood, for this it is necessary to take into account the internal diameter of the chimney, which will affect the height of the deflector and the width of the diffuser. Thus, with an inner diameter of the pipe of 120 mm, the height of the deflector should be equal to 144 mm, while the width of the diffuser should be limited by an indicator equal to 240 mm. If the first indicator is increased to 140 mm, then the second parameter will have to have a size of 168 mm, but the third dimension mentioned should be 280 mm. With an inner diameter of 400 or 500 mm, the second indicator should be equivalent to 480 and 600 mm, respectively. Whereas the width of the diffuser must be made equal to 800 and 1000 mm, respectively.
Choice of cap design
The chimney cap can have completely different design features. So, at the base there may be something like a house. This design should have a four-pitched roof. Such a house can also have a gable roof, which has four slopes. In addition, the top may be semicircular or include a weather vane. Another kind of hood is one that has an opening lid.
Preparation of a basic set of tools and materials for work
In order to make a cap on the chimney pipe on your own, it is necessary to prepare some materials and tools, among them it is necessary to distinguish the following:
- a mallet, for which rubber or wood can act as a material;
- scissors designed to work on metal;
- bends;
- small hammer;
- steel bar;
- marker;
- clamps;
- roulette wheel;
- gloves
- steel corner.
In order to make manufacturing simpler, it is necessary to cut corners on all workpieces on both sides.
Chimney hood manufacturing process
The chimney hood must begin to be made with reinforcement by screwing onto the edge of the table of a steel corner. Use with this is necessary self-tapping screws. Why holes in the work surface. The dropper, which acts as an edge and has a width of one cm or more, needs to be bent. Initially it is recommended to bend the edges, and then do the same with the central part. This will eliminate the likelihood of the workpiece slipping from the corner. The workpiece must be bent at an angle that is 45 degrees.
In order to carry out this work, it is necessary to connect the edge of the corner with the bend line on the workpiece. This will allow you to get a workpiece that has the desired shape.
What is preferable to use a mallet. The workpiece in its central part should be bent in the same direction. The folds on the blanks must be bent using bends.
In addition, covers for the cap should be bent on all sides by 15 centimeters. In this case, it is necessary to bend at a right angle. The cover must be fixed on the cap and mark the hole in its central part. This hole must be made so that its diameter is equal to this parameter characteristic of the chimney.
When making a cap for the chimney, at the final stage it is necessary to cut the petals, which are necessary to protect the chimney from the ingress of precipitation. Only then can you start fixing the cap on the pipe.
Alternative cap manufacturing
A do-it-yourself chimney hood can be made using another technology, the principle of which will be described below. In the example, an asbestos-cement chimney with a cross section of 120 mm will be considered. Initially, you should install the struts on the lower cylinder. For what it is customary to use M6 bolts and nuts. Next, it is necessary to strengthen the upper cylinder, which is fixed to the lower clamp. The top cylinder must have a downward extension. After you can begin to assemble the reverse cone on the folds. By means of rivets it will be possible to mount a conical cap. The manufacture of caps and the upper cylinder can be done on their own, however, for this it will be necessary to prepare a riveter and use resistance welding in the process.
The cost of chimney caps
If there is no desire to make a cap for the chimney with your own hands, then it can be purchased. Such designs last much longer than self-made ones, but are not very expensive. So, if you prefer a classic flyugar, which may have a double lid designed for hot air, then its cost can be equal to 2100 rubles. But the two-story hood will have a more impressive cost, which is equal to 4100 rubles. You may prefer a cap on the pipe, which is complemented by radius faces, its cost will increase to 5100 rubles. The design may have an additional cover and will cost 4200 rubles. If you do not like the manufacture of chimney caps yourself, then you can prefer the option that involves ordering the design that you want to see on the roof. Specialists will make a metal product and calculate the price that will have to be paid at the time of purchase.
The choice of material for the cap on the pipe
If you decide to make your own caps for the chimney pipe, photos of which are presented in the article, then you must first select the material. If we talk about copper, then it acts as the most common material for canopies. But it is chemically active, which indicates the possibility of its destruction over time, which especially concerns the case of contact with other elements. In order to add to the lifespan of an element, fastening must be done by means of copper or copper-plated fasteners.
Steel products are inferior to copper in life. You can use them for a period whose duration is limited to 28 years. Before you make a cap on the chimney, you can consider the option of using zinc-titanium, which has a half-century life.