Those who like to make homemade wines and pickles know how important it is to choose the right container for storing this product. Judging by the numerous reviews, for this purpose it is best to use a wooden barrel. Plastic and kapron products are undesirable, since the alcohol contained in moonshine or wine will react with synthetic materials, which will negatively affect the taste of the product. A wooden container for storing wines and pickles can be purchased at a specialty store. You can also make an oak barrel with your own hands. In this case, the home craftsman has the opportunity to save. It will only be enough to purchase supplies. Of course, the process of making an oak barrel with one's own hands is considered rather laborious, because cooper business is a real art. The master will need a decent professional level. About how to make an oak barrel with your own hands, you will learn from this article.
What is a keg for?
Before you make an oak barrel with your own hands, you need to determine for what purposes it will be needed. Pickles, dry products, honey, etc. are prepared and stored in wooden barrels. In addition, strong spirits, wines and beer are well roamed, aged and stored in such barrels. Read more about making do-it-yourself oak barrels below.
Wood selection
For those who are interested in how to make an oak barrel with their own hands, experienced craftsmen advise you to choose the right wood. Of course, the product can be made from spruce, pine, cedar, linden and aspen. These varieties are considered basic. They have both advantages and disadvantages. For example, pine and spruce are easy to process due to their softness. At the same time, they smell like wood tar. Aspen is considered a strong and cheap material with antiseptic properties. The downside is that it swells with moisture. The strength of cedar is practically no different from pine and spruce. In addition, there is no smell of resin. Oak is considered a classic material, according to coopers. This material is an antiseptic, has high strength and flexibility. From moisture, the walls of the barrels become even stronger. For this reason, the operational life of oak barrels is not tens, but hundreds of years. Judging by the reviews of the owners, drinks stored in such a container have a pleasant aroma with a hint of vanilla.
Where to begin?
We make an oak barrel with our own hands as follows. You need to start with the preparation of the details, namely the riveting boards. They are represented by rectangular or tapering sawn or chopped boards at the edges. They are combined into three groups. Walls are made from the main group. The other two are considered bottom. Then you need to determine the parameters of the product: recreate a sketch of the riveting and the bottom, draw up drawings of an oak barrel. With your own hands, making a keg according to the scheme will be much easier.
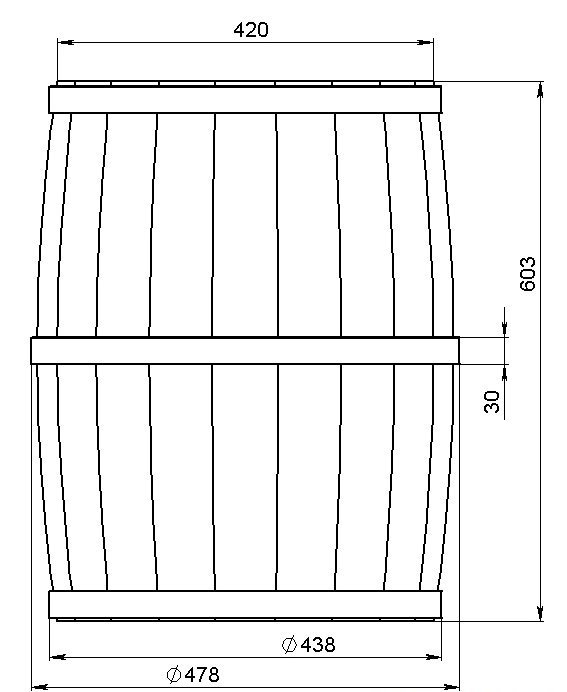
In order not to make a mistake with the exact number of rivets, the following should be done: multiply the radius of the bottom by 2 and by a constant Pi value (3.14) and divide by the riveting width. It is better if the workpieces are from the bottom of the barrel. Next, the trunk is sawn or cracked to get lumps. They should be 7 mm longer than the desired length of the boards. Judging by the reviews, chipped chocks are stronger, since during the splitting the structure of the wood fibers does not collapse. In addition, a self-made oak barrel will have greater impermeability.
How to split a deck?
There are two ways to chop a workpiece:
- Radial. The split will go through the core of the trunk. The process is considered less labor intensive.
- Tangential way. A split will not affect the core. Hardwood is thus not recommended by experts to prick.
It will work much easier and faster with raw freshly chopped material. Those who had the opportunity to use ready-made boards, the masters advise to inspect the annual rings: they should be located on the same plane without cuts.
Preparing chocks
Before making rivets, chocks should be dried. This process will take up to two months. House craftsmen stack chocks in a well-ventilated room with a moderate temperature. It is important that the design adheres to a checkerboard pattern.
In this case, the workpiece will dry on each side. If this procedure is neglected, then cracks will soon form in a self-made oak barrel. Those who do not have time to wait two months can be advised to use the already dried-up preparations. Artificial drying is as follows. Paper is glued to the end parts of the workpiece. Next, the product is placed in the oven. The process will take no more than a day.
How to pull off the rivets?
So that the home-made oak barrel does not crumble, it should be equipped with several hoops. This structural detail is very important because it helps to connect all rivets into a single whole. They make stainless steel hoops. They are fart (located at the center), mornings (placed around the edges) and cervical. The latter are optional, as they are equipped with barrels with a large volume. What size the hoop will have, the master determines the thickness of the product. Making hoops is easy. It is necessary to cut several strips of sheet steel up to 2 cm thick. Next, two holes are punched from both ends in the strip. Rivets will be inserted into them.
Build start
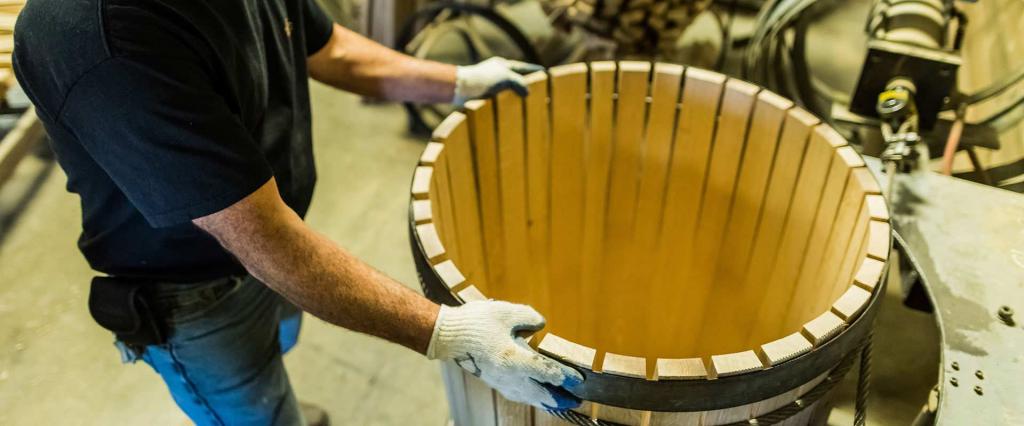
At this stage, the home craftsman will need to pull off the rivets with the help of hoops. Assembly is performed on a flat surface. First, you need to clip three pieces of wood to the outer hoop. The distance between them should be the same. After that, the remaining free space between them is filled with the rest of the workpieces. Judging by the reviews, during the insertion of the last riveting, the master may have a problem - there was too little space and the workpiece simply does not fit. This riveting, in order to attach it to others, will have to be trimmed a little. For the bottom you will need a solid piece of wood. To insert it, you need to slightly loosen the tightening hoop. Having equipped the barrel with the bottom, the hoop is pulled together and with the help of a hammer and a small cone-shaped workpiece with a flat end part is maximally deposited. He should sit as tightly as possible on the skeleton. Then a second hoop with a large diameter is attached to the keg. This structural element is upset, like the first.
Working process
Now it remains for the master to connect the bottom of the product with a hoop. This will only be possible with steamed wood. To do this, place the barrel for half an hour in hot water. According to experts, it is possible that it will take longer to hold the blanks. Everything will depend on such parameters as the thickness and density of the rivets.
When the barrel is sufficiently steamed, it must be turned over with the hoop already fastened side down. Thus, loose rivets will be at the top. They are fastened with a strong thick rope, both ends of which are previously hooked onto a hook driven into the wall. Pull rivets will have a piece of iron pipe, crowbar or wooden stick. To do this, the scrap should be skipped between tensioned and bound ropes and twisted on itself. As a result, the rope will weave even more, pulling together the rivets. At this stage, the master is better to work with assistants. In the end, the rest of the hoops are put on the curved rivets and securely fastened. After performing these steps, the barrel is considered finished. However, it is too early to use it for its intended purpose. The fact is that drinks contained in unprepared containers eventually acquire an unpleasant tart flavor. Moonshine and wine can only be filled with a carefully washed and waxed barrel.
About flushing
The barrel should be washed with clean water without special means. The purpose of this procedure is to rid the wood of tannins. According to experts, it is from them that the drink begins to be bitter and has a tart taste. After thorough washing, they start steaming. The barrel is filled with boiling water for one quarter, tightly closed with a lid and cranked. As a result, the tree will swell, and all the cracks will be tightened in the container. Experienced masters recommend steaming at least 4 times.
About soaking
This procedure is the longest. The home craftsman will have to be patient, because this work will take at least a month. Soaking the barrel is easy: just fill it with water, which must be changed periodically. For example, in the early days every 10 hours. Next, the water changes after two days. At the end of the period, the water is drained, the barrel is rinsed with an alcohol 30% solution. In the end, many masters pour boiling water over it and clean it with soda. To do this, bring a liter of water to a boil, dilute soda (2 g is enough) and pour it into the barrel. Next, the product is again washed first with boiling water, and then with running water. Now the container can be dried. When the barrel is dry, it will be ready for use.
About waxing
If the product with moonshine is left in a warm place, then intense evaporation of the distillate through the walls will occur. To prevent this, you need to expose your own made oak barrel waxing. To do this, put beeswax on a water bath and gradually melt it, at the same time season it with linseed oil and mix thoroughly. Then, using a soft and wide brush, the composition is applied to the surface of the barrel. In order for the wax to lay down evenly and better impregnate the wood, it needs to be slightly heated with a construction hairdryer. If this tool is not available, then you can limit yourself to an ordinary hairdryer.
Burning
Judging by the reviews, some coopers burn their products. Do it as follows. Turn the barrel over to one side. Then, sawdust or shavings are placed inside and set on fire. During combustion, the barrel is slightly rolled so that all walls are surrounded by fire. If sawdust is not at hand, an alternative would be a burner or blowtorch.
Repairs
Judging by the reviews of the owners, if a wooden vessel is not used for a long time, then it will dry out. The reason for this is the ability of wood to absorb moisture and expand. As a result, liquid from such a container will begin to flow out and will have to repair the oak barrel with your own hands. Masters first tighten the hoops and fill the container with hot water. When it cools, it is drained. Next, the procedure is repeated again. According to experts, each time the barrel will flow less and less. At the very end, water is poured into the barrel and left for several days. During the procedure, hoops are periodically tightened. Repair is considered successful if the barrel completely stops flowing. This method is effective for packaging that does not have physical damage. Due to the fact that during the long-term operation the distillate is absorbed into the wood, the owners have a desire to slightly refresh the barrel. Restoration work is carried out using a hammer, coarse sandpaper and oak sawdust.
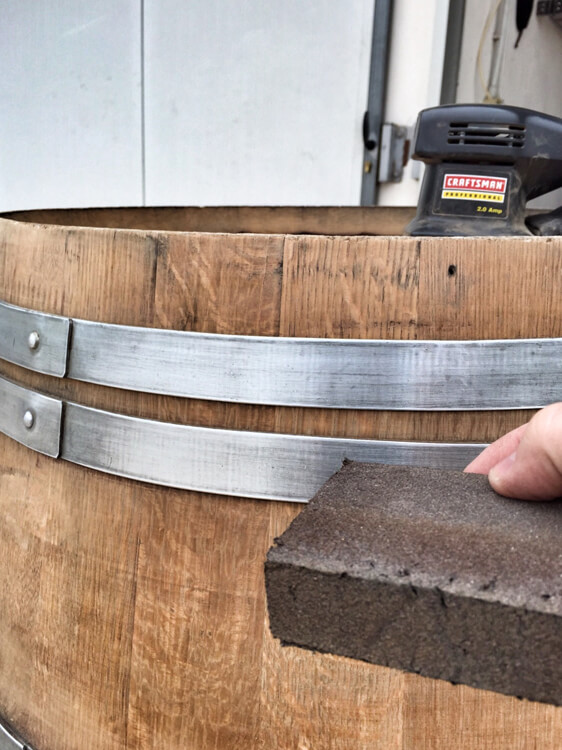
The task of the master is to remove a small layer of wood (1-2 mm). First, the bottom is knocked out. To do this, put the barrel upright. Next, dismantle the fart and cervical hoops. So that the barrel does not crumble, the main hoop is tightly deposited. Now the walls from the inside are cleaned with sandpaper. Next, the barrel is subjected to the roasting procedure: a small bonfire of sawdust is made. After that, the barrel can be assembled and used.