Starting the layout of the design of the bathroom, many owners are wondering about how to carry out facing work. Is it possible to pre-mount a new bath, or is it better not to do this? Both bath installation methods are possible. But still, the installation order depends both on its shape and on the materials from which the plumbing is made. The size of the room is also important. We learn in more detail what will suit you to a greater extent - installing a bath before laying tiles or after.
Install before laying tiles
This method consists in the initial placement of the bath on the floor and its strong fixation. Next, the bath is leveled using a level. In the future, they are starting to finish with tiles. Choosing this method, it is important to understand that the tile in the bathroom lies from the edge of the bath, and not from the floor. A small indentation is made from the edge (a few millimeters are enough), and the resulting gap after the completion of the main work will need to be sealed with sealant or other moisture-resistant material. The tile will go a little on the edge of the bathtub, and from the side everything looks as if the plumbing is connected to the wall.
Install the bath after laying the tiles
This method is more common than the previous one. It is often used in cases where you need to change the bathtub to a more modern and comfortable one. To start work, you need to completely empty the room and dismantle all the old plumbing. The direct repair process is started by cleaning the surfaces. The old tile is removed, the paint peels off. Walls must be carefully leveled and primed before tiling. After facing, you can begin other work.
Paul also needs to be prepared. To do this, first align it with a screed, and then lay the tile or choose another method of decoration. Having completed the main finishing work, you can proceed with the installation of the bath. If you decide to install an acrylic bathtub, the frame for the profile bathtub will be a big plus, since it allows you to install plumbing not at the wall itself, but at a distance. This is very appropriate in large rooms.
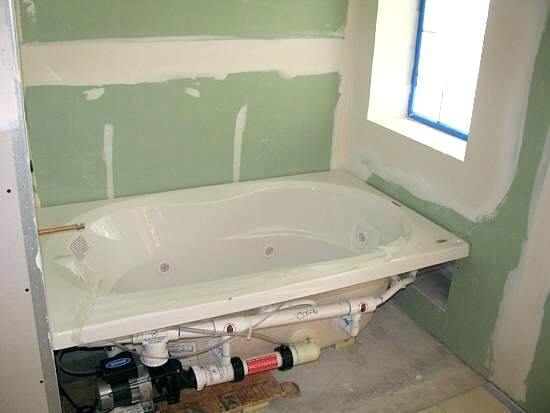
If there is a need for cladding pipes that run in the center of the walls or in a corner, you may need to install a bath in the box. For sheathing the pipe in the corner, two walls will be needed (two more are formed by the walls of the bath itself), and for pipes in the center, three walls will be needed. In the case of installing the bathroom close to the wall, you need to be very careful at the stage of tiling. After all, if you make a mistake in calculating the size, the bathtub just does not fit. Then you need to dismantle the freshly laid tiles from the walls and start all over again.
After installing the bath, seal the joint with sealant or any other moisture-resistant material. To do this, it is better to use silicone sealants. They are sold in special nozzle tubes. To squeeze out the composition, you need a special gun. However, it is inexpensive. As a result, we get a tight and high-quality seam.
In most cases, this method of mounting the bath is chosen by installing an acrylic sanitary ware. The edge is not built into the wall, since acrylic is not strong enough to withstand the load from the tile.
Marking the wall before laying
There is another option. All repair operations are performed in this way: the bathtub is brought into the room and is tried on in the same place where it will be in the future. Having made a marking on the wall, the bath is temporarily removed. Then they begin to lay the tiles, following the marks. Be sure to leave a small gap from the edge and lay the tile from the bottom up.
What next?
After finishing the lining, the bath should be brought back and installed in the marked place. This method is good because laying tiles is quite convenient. After all, you do not have to go around a bulky bath. But in case of an error, the tile in the bathroom will be dismantled. Everything will have to be redone anew.
When performing any installation work on plumbing, you need to know what a standard bath installation height is. The generally accepted norm says that the height from the floor is 0.6 meters. Of course, this standard is often violated by deviating from a digit to a smaller or larger side. You should not place your bath at too high a height, as stepping over a high side will be problematic every time, especially for people aged. The decision to install the bath at a low height will simplify bathing for elderly owners, but it can easily spoil the appearance of the room.
So which option is better - installing a bath before laying tiles or after? To answer this question, it is necessary to take into account such important points as the size of the room, the material from which the bath is made, its shape and dimensions.
Room size
If the bathtub will be in a rather small room and occupy a place under the wall itself, the best option would be to install it before the facing work begins. The fact is that the quadrature of the already small room will decrease due to the thickness of the tile, and the opposite walls converge in such a way that the plumbing simply does not stand between them.
Bath material
Installing a bath before laying tiles or after - which is better? It also depends on the materials of which the plumbing is made. If you have chosen a model of cast iron, be prepared for the fact that a solid weight will interfere with its movement. Even for two or three people of a fragile complexion to transfer such a bath will be a difficult task. It is for this reason that it is advisable to install it before the beginning of the facing work, and only after they finish proceeding with the closing of the side.
The legs for a cast-iron bath need solid and stable. As a rule, they do not allow you to adjust the height of the plumbing, they look squat and reliable. For beauty, cast-iron legs are often made in the form of monograms or decorative flowers. The cast-iron bathtub is not deformed in the process of filling with water, its geometry does not depend on the weight of the one who is in it.
If you choose a bathtub from more malleable materials (steel or acrylic), be prepared for the fact that the shape may slightly change under load, and the edge mounted in the tile may become loose over time and form cracks. Steel or acrylic models are not as durable as cast iron models. Therefore, if you want to change the bath, the lower row of tiles will have to be broken. If you install the bath without connecting it to the wall, you won’t have to do any extra work. To remove this structure from the room, you will only need to remove the sealant.
Bath shape and type
If everything is more or less clear with the familiar form, then what is to be done with models of more complex forms? There are also corner baths with hydromassage, which have not only overflow and drain, but also several additional piping. In this case, do not brick the plumbing into the wall. Sometimes the sophisticated electronic equipment that this type of bathtub is equipped breaks down. It may require free access. Therefore, it is better to establish the design of complex shapes only after finishing the facing work.
Useful Tips
The final decision about whether you need to install the bath before laying the tiles or after may be affected by several more factors. It happens that the repair in the apartment is still underway, but you need to use the bathroom. Here it will be preferable to put it before laying the tile in order to have an elementary opportunity to wash.
In the case of a limited budget that you are willing to set aside for repairs, the best option would be to tile the already installed bathtub, since this way you can save on the number of tiles. After all, it is not necessary to put it behind the bathroom itself. If you decide to use fitting and marking before starting work, be sure to consider the features of the material your bathtub is made of. If the cast-iron model does not react in any way to the amount of water in it, then acrylic and steel products can change shape. Therefore, trying on a bath and marking the wall, fill an acrylic or steel container with water. Water should remain in the bath when sealing the cracks with sealant.