Laminate is a floor covering that has gained extraordinary popularity these days due to its inherent advantages. Its main advantage is accessibility from a financial point of view. It is also practical, has a fairly good service life, and is easy to install. And for lovers of underfloor heating, who value coziness and comfort in their home, the use of laminated panels as a final coating is the perfect solution! But not all systems of underfloor heating can be mounted under the laminate.
Warm floor under the laminate
There are three main types: electric, water and infrared underfloor heating. Which is better, of course, you decide, but the latter type is considered the most modern and modernized. It is such a warm field that will be discussed in our article.
The IR floor under the laminate is the lot of modernity
Electric and water options are gradually becoming a thing of the past. The infrared warm floor under the laminate, or, as it is also called, film, has gained immense popularity among the population. Relatively small thickness and uniformity of laminate panels ensure the effective distribution of infrared rays over the entire surface. And the design features of the film web (underfloor heating system) do not allow radiation to penetrate deep into the base, thus providing a high level of efficiency of the heating system.
The principle of operation of infrared heated floors
The work of film underfloor heating is based on the use of special technology, which consists in the features of compounds from bimetals. When the unit is connected to the mains, current flows through these bimetallic compounds, causing infrared rays to come from them.
Pros and Cons
The infrared film underfloor heating under the laminate has several advantages over its competitors:
- ease of installation;
- the possibility of self-installation;
- availability;
- high-quality replacement of stationary heating (in areas with warm climatic conditions);
- lack of temperature fluctuations;
- economical energy consumption.
Can I install the infrared floor on my own?
The warm infrared floor under the laminate will not only make the coating modern, but will also give it a feature of functionality, which consists in instantly creating a comfortable microclimate in the room / room at any time of the day, both in winter and in summer. Installing an infrared warm floor under the laminate on your own is more than realistic. In this case, there is no need to resort to the use of expensive technologies and make a screed of concrete.
Essential Tools
For work you will need:
- a substrate for a laminate with heat-reflecting properties;
- infrared film;
- temperature sensors;
- temperature regulator;
- electrical wiring;
- a set of fasteners in the form of clips for installing paintings;
- insulation kit for installation;
- a film made of polyethylene, the main purpose of which is protection against moisture;
- duct tape for sanitary purposes;
- wallpaper knife;
- scissors;
- metal ruler;
- yardstick;
- a simple pencil.
Types of infrared film
Infrared film is classified depending on the type of heating element, and it can be of two types:
It is worth noting that the carbon film is considered more flexible and durable.
How to put infrared underfloor heating under the laminate: general installation rules
- Distance The underfloor heating system should be arranged at a certain distance from sources of heating, such as fireplaces, batteries, stoves and others. As a rule, the minimum indicator of such a distance is 50 centimeters.
- Free space. It is allowed to mount infrared underfloor heating floors exclusively under the laminate-free space. The reviews indicate that when the system is installed under furniture or equipment, the heating structure or the entire floor as a whole can overheat.
- Availability. The floor covering should support the ability to control the functioning of the structure and provide access to the system at any time.
- Ventilation. As you know, laminate flooring is characterized by minimal thermal conductivity. That is why it should have high-quality ventilation, which partly depends on the proper laying of the laminate.
Do-it-yourself infrared floor heating under the laminate: installation instructions
The main requirement for laying a warm floor is an even base that does not have any bumps and cracks. Also in the room should be a power outlet that allows you to connect to an electrical outlet of 220 V. After you have verified that these two requirements are met, you should proceed to the following steps.
Preparatory and insulation work
Step 1. Cleaning the base. Conducting cleaning work to eliminate pollution and debris. It is recommended to use vacuum equipment.
Step 2. Measurements. It is necessary to measure the dimensions of the room and make a calculation of the material. It is impossible to overlap the IR film. Therefore, if, due to the size of the room, a certain number of integral stripes cannot be laid, then it is possible to create small gaps between them.
Step 3. Installation of heat-reflecting substrate. Infrared underfloor heating under the laminate during installation involves the use of a special substrate with heat-reflecting properties. Such material is covered over the entire area of the room. In case of size mismatch, it can be shortened.
Step 4. Processing the joints of the substrate. Joints of heat-reflecting material must be glued with mounting adhesive tape from the outside.
Step 5. Preparation of the heating film. Cut the IR film , guided by the size of the room. You can make cuts only in areas that are painted white.
Step 6. Laying the film. The heating film is placed on the floor throughout the room if it is freed from bulky furniture. If there is one, laying should be done in free places.
Step 7. Insulation of tires. Copper tires in the places of film cuts should be insulated with electrotechnical adhesive tape, twisting it through the place of cut. It is very important that no air gets under the tape.
Step 8. Grounding bus processing. The tire, which is usually located in the central part of the heating sheet, must be bent on both sides. In this case, the slices should not touch, in fact, the same way as the remaining white areas.
Step 9. Insulation of the film in the area that is freed from the grounding busbar made of copper. Used electrical adhesive tape. You need to glue it so that there is a bend on the wrong side.
Step 10. Isolate the slices of the IR film with tape, which is glued to ½ of the width and bent through the slice.
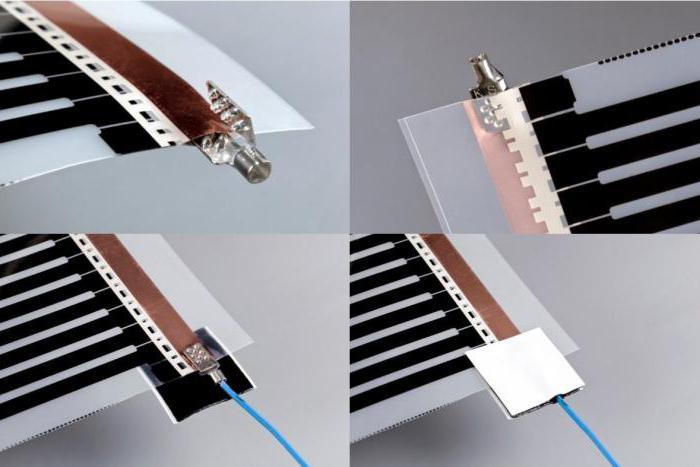
Soldering wires and connecting the thermostat
Step 11. Alignment of the film at the place of installation and its fastening to the substrate from the side that is opposite to the side of the temperature controller.
Step 12. Soldering the wires that connect the individual sections of the film. Bend the film from the side where the temperature control is installed, so that its wrong side looks up. In order to increase the comfort level during work, it is allowed to temporarily fix the film with mounting adhesive tape. Next, the preparation of materials begins: an installation wire, the cross-sectional index of which is 2.5 m 2 , a soldering tool with a power of not more than 60 W, solder. From the tires of the protective purpose, which are located at the edges of the film, by using a heated soldering iron or clerical knife, the insulation layer is removed. The edges of the slice are marked with a soldering apparatus, the insulation melts. After this, it remains only to clean with a knife.
Step 13. The connection of the film sections in parallel by soldering. Stripping of the installation wire from the insulation coating should be carried out accurately on an area that is sufficient for soldering. In this case, the wire core is not cut. Connecting sections of the film, you should be guided by the rule of "phase zero". Based on this, it is more rational to use a wire with a multi-colored insulating coating. During soldering, do not allow the wires to cross or be too stretched. Otherwise, do not avoid damage or breakage.
Step 14. Isolation of soldering sites. Places where the wires are soldered are insulated with electrical adhesive tape.
Step 15. Installing the floor temperature sensor. Such a device is installed under the film, in a recess, which was made in advance in a substrate with heat-reflecting properties. The temperature sensor is placed under the film in the central part of its working area, in the warmest place in the room. Fulfilling the last requirement, the master negates the risk of overheating of the film. The wire that comes with the temperature sensor is laid along the substrate and leads to the thermostat. The latter is fixed to the substrate using mounting tape.
Step 16. Stripping wires, tinning their ends and connecting to specific terminals of the temperature controller. Similarly, you need to connect the installation wire that goes to the heating busbars of the film, and the power cable.
Step 17. Following the previous algorithm of actions, you need to connect the grounding busbars of the film. They are stripped, trimmed and joined by using a strip of copper or cable. The output wires are placed in a corrugated pipe.
Step 18. Fixing the film. You need to fasten the film to the substrate using mounting tape. In this case, it is not possible that individual sections of the film overlap each other.
Testing and laying laminate panels
Step 19. Fastening the ground wire removed from the corrugated pipe to the ground terminal of the temperature controller, and if not, to the ground loop.
Step 20. Check before laying the infrared film floor heating. Installation under the laminate is carried out only after a preliminary check of the operability of the thermal structure. To do this, it should be connected to a 220 V power supply, set the temperature regulator to the middle position and start the heating process by pressing the toggle switch. In this state, hold no more than 1 minute, after which the quality and degree of heating of all parts of the film is checked by hand.
Step 21. Cleaning. Eliminate installation cable residues and other debris. It is considered acceptable to use a vacuum cleaner.
Step 22. Laying a plastic film in order to improve its waterproofing properties. The IR film is covered with polyethylene so that there is an overlap of about 15-20 cm on the walls. The thickness should be more than 160 microns.
Step 23. Laying the laminate.
Say no to the carpets
Remember! It is not recommended to use carpets and other floor coverings as a decor and interior decoration in the room if infrared warm floors are installed under the laminate. Customer reviews confirm this. After all, such things create the effect of delaying warm air, which can cause overheating of the flooring. For example, if the palace is laid where the thermostat is installed, the power relay will systematically turn off, which means that there is no question of the effectiveness of heating the room or room.
Tips & Tricks
Before laying an infrared warm floor under the laminate, you should draw up an appropriate scheme, taking into account the following nuances:
- The temperature controller should be located at a height of 15 cm from the floor in the most accessible and convenient area.
- The surface temperature of the laminate floor as a whole is directly dependent on where the temperature sensor will be placed. Optimal is the location of the device near windows or doors - where the most cool.
- Laying infrared underfloor heating under the laminate prohibited under installed furniture and equipment. If, due to the lack of sufficient space in the room, this requirement is violated, then the creation of so-called air pockets with a minimum height of 10 cm is mandatory.
- The extreme canvases of the film should not be tightly pressed against the wall surface. They should be located at a distance of about 15-40 cm from the wall around the entire perimeter. In this case, the length of the canvas should not be more than 8 cm.
- Cut film heaters should only be in special places.
- The location of the infrared floor system under the overlap of the laminate is unacceptable.
What do users say?
Most people who have laminate flooring opt for infrared underfloor heating. Reviews, however, are both positive and negative.
Some note the effectiveness of such floors as a heating system as a whole for the room. Others complain of an unaesthetic appearance due to the loss of flatness of the laminated floor, as well as instability of the structure. The disadvantages that users talk about can be the result of neglecting one or another rule of installation or operation, since it is very important to correctly install infrared warm floors under the laminate. Reviews when choosing the type of heating for the floor, of course, it’s worth reading, but still they do not need to be taken to heart. It is better to study the technical characteristics of the IR film and the laminated coating itself when choosing, and entrust the installation work to a specialist if you doubt your own abilities.