The pigeon is a well-known urban bird that lives in our area, it does not fly away even in winter, its children know it well. These birds are often depicted in paintings, postcards, wedding albums. Paper pigeons can decorate a room or office space. The image of this bird is used when decorating the premises for the Great Victory Day, February 23, May 1. Doves of peace can be attached to a card dedicated to World Children's Day.
In the article, we will consider several different options for making this beautiful bird from dense sheets. You can make a volumetric pigeon out of paper and hang it on a thread or fishing line in a kindergarten group or school class. We will tell readers in detail how to lay a bird out of a sheet of paper according to the schemes. In the origami way they make different pigeons. Let's start with the simple implementation of work that older preschool kids can handle.
Easiest option
Pigeons from paper, as in the photo below, are made in two ways. The body of the bird is drawn on a white sheet A4, laid out in length on a table. You can give the children a cardboard template. The guys draw a simple pencil around the contours of the pigeon and carefully cut out the main part of the craft with scissors. The wings of the bird are made by folding the sheet "accordion". To do this, you can use both white paper and color double-sided. A flat strip with a width of 1-1.5 cm is bent, the fold is carefully smoothed with fingers. Then the sheet is turned, and a similar strip is folded already in the opposite direction. So do until the end of the sheet. All folds should be strong and well smoothed, then the wings will look pleated.
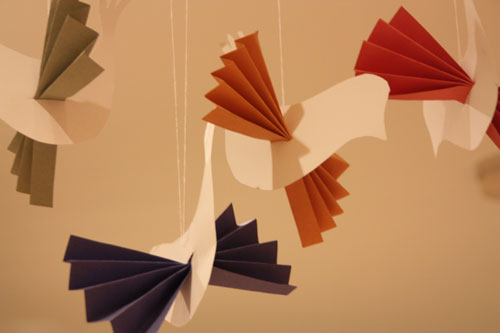
A 2-3 cm cut is made in the center of the body of the bird. Folded paper is pushed into the cut to the middle. On both sides, the wings are neatly spread. If you want to decorate the room with such paper doves, then you can make a hole in the central part of the body with an awl and insert a nylon thread or fishing line. You can hang the birds on the chandelier in the center of the room, on the tree branches on the site of the kindergarten. Original perform such pigeons on Victory Day and present to veterans.
Scheme for cutting
Some craftsmen want to create a three-dimensional bird, but do not know how to make a dove out of paper. First you need to draw a schematic image, the contours of which are subsequently cut out the shape of a bird. Consists of a pattern of two elements. Firstly, it is a trunk with a magnificent tail, and secondly, spread wings.
To make the figure symmetrical, it is more convenient to sketch the paper on a sheet of paper bent in half. A large A4 sheet is taken for work. On one of the halves, a bend of the head and abdomen is drawn. From below it is necessary to leave a place for the tail (a little less than half the sheet). Feathers draw separately how much will fit in a given area. A small arc is drawn on the fold. It is needed so that when folding the crafts the back seems voluminous.
To draw the contours of the wings, you need to carefully consider the bottom of the schematic image in the photograph in the article. The drawing is also performed on a sheet folded in half, but it is already placed in length, and not in height, as in the image of the body. In the center of the pattern draw a corner, along the contours of which the paper is then folded.
Completing of the work
A pigeon blank from paper is neatly cut along the drawn contours. Folded sheet along dashed fold lines gives volume to the figure. The tail bends backward and slightly upward. Two parts of the head are glued to PVA glue.
The wings bend along the dashed lines in the center of the pattern and also stick to a flat part of the pigeon's back. The bird turns out spectacular. It remains to finish the small details: paint the beak, glue the eyes. This craft can be placed on a sheet of cardboard, attaching a base in the tail region to PVA glue.
Flying dove (origami)
Origami art has become very popular in our country recently. Many people liked to fold a sheet of paper, creating objects, animals, fish, birds. Handicraft masters and origami from dove paper did not ignore. There are a lot of ways to make crafts, all the tricks cannot be memorized at once, so novice masters use a schematic step-by-step explanation of the work. It is enough to carefully examine the picture and alternately fold a sheet of paper in the required position.
To make a dove figurine out of paper with your own hands, prepare a square sheet of any color. These birds have a very different color of feathers, so you can make a whole multi-colored flock of birds.
The square is turned to the master by an angle and the workpiece is folded in half diagonally. Then the action is repeated. You should get a right triangle, as in the picture under number 3. This is necessary to indicate the central fold. Then the workpiece unfolds back, and the lower strip bends up 2 cm.
Then the sheet is turned on the back side, and the corners of the front of the triangle are bent down. The workpiece is again rearranged so that the corners of the trapezoid are directed up and down, as in figure No. 8.
The craft bends in half down, then the wings of the dove rise up. It remains to bend a tiny corner on the head of the bird. It will be the beak. The craft is ready. If the paper is chosen thick and the folds were carefully ironed during the work, then origami can be used both for creating pictures, decorating the room, and for children to play.
Dove of peace
The next version of the origami of this bird is similar to the image of a dove of peace. This bird is always drawn in flight, with a twig in its beak. The tail is located below, and two wings are turned back. How to collect origami according to the scheme described in detail earlier, we will not repeat. The assembly diagram is given below in the photo.
The only thing you should pay attention to is that the diagram is not given under the sequence numbers of the work, but is marked with a solid line. Actions are performed alternately, starting from top to bottom. Do not forget that the work will look neat only if all folds are well smoothed. It is better to take thick paper for work, as a thin craft will not hold its shape, and the bird’s figure will fall to one side.
Conclusion
As you can see, creating paper crafts with your own hands is not at all difficult. The main thing is to want to learn something new. Engage your children in manual labor. This will be useful to them while studying at school. After all, work on such crafts nurtures accuracy, industriousness, attentiveness and concentration. Children learn to navigate in space, think and plan. Have a nice learning!