A beautiful and high-quality worktop is capable of creating a special atmosphere in any interior. The countertop in the bathroom made of tiles will make the room more comfortable, thoughtful, give a feeling of harmony and completeness. By design, it can be absolutely any, but products whose surface is covered with ceramic tiles look especially good.
Why choose tiles
Ceramic tile, like any other material, has its advantages (in comparison with analogues):
- Affordable cost. Not everyone can afford to install marble or natural stone countertops in the bathroom, so ceramic tiles are an excellent alternative for many.
- Universality. Tile fits perfectly into any interior, regardless of its stylistic orientation. It can be both classic and modern. Not every material has this property.
- Practicality. Ceramic tiles have a high degree of water resistance, durability, serve for a long time and are resistant to mechanical damage. In addition, it perfectly tolerates temperature changes and the effects of abrasive detergents. The tile is unpretentious in leaving, it is easily cleaned and washed.
- Range. As for this item, the tile can rightfully be put in first place in the ranking of variety assortment. So many forms, sizes, textures and shades can not boast of any other finishing material. This allows you to use tiles to create truly unique designs.
Choice of tabletop type
The countertop in the bathroom from the tile can be as follows:
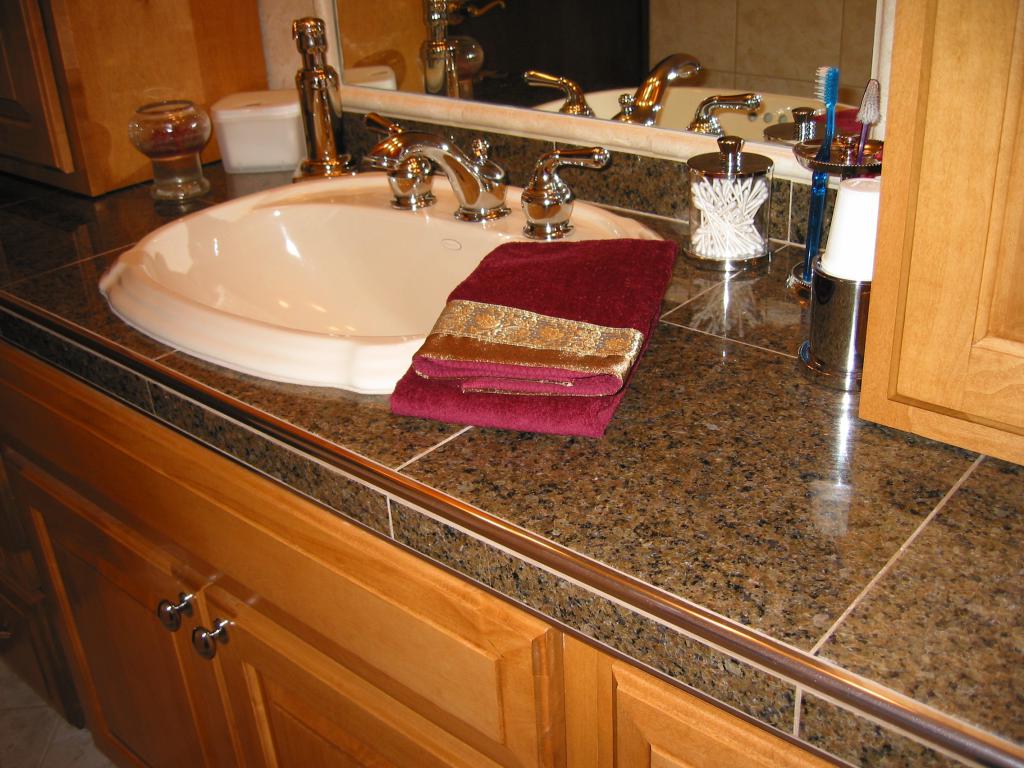
- Monolithic construction with a sink. This option looks very stylish and concise. The room will look more spacious and easier to perform cleaning.
- Built-in design. This type is the most common. A sink built into the countertop made of tiles in the bathroom opens up wide stylistic possibilities.
- Countertop with overhead sink. It looks very original, given the diversity of the range of sinks. An ideal option for those who decide to make a countertop in the bathroom from a tile with their own hands, since it is easiest to install a false sink.
Mounting Options
You can set the countertop in several ways:
- Floor-mounted mount. The tabletop can be installed on a pedestal or legs. This method is the most reliable and stable.
- Suspended structure. The device is attached to the wall on pre-installed brackets. Looks like a countertop in the bathroom made of tiles in a modern and stylish way, creates the effect of lightness.
Tile sizes
The choice of ceramic tile size depends on a number of parameters. First of all, it is necessary to take into account the dimensions of the room itself. If the bathroom is quite spacious, then you can take large-sized material - 30 * 30 or even 60 * 60 centimeters. It is more convenient to lay these tiles, besides they are not whimsical in leaving.
But few can boast of the large size of this room, therefore, most often small-sized products are used to clad countertops - 10 * 10, 15 * 15, 20 * 20 centimeters. The small size of the ceramic tile visually expands the boundaries of the room. In addition, she smothers in a small bathroom is much more logical than large blocks.
Color scheme
The range of tiles presented in stores is very diverse. The variety of color palettes and drawings makes it possible to choose the material for any stylistic decision.
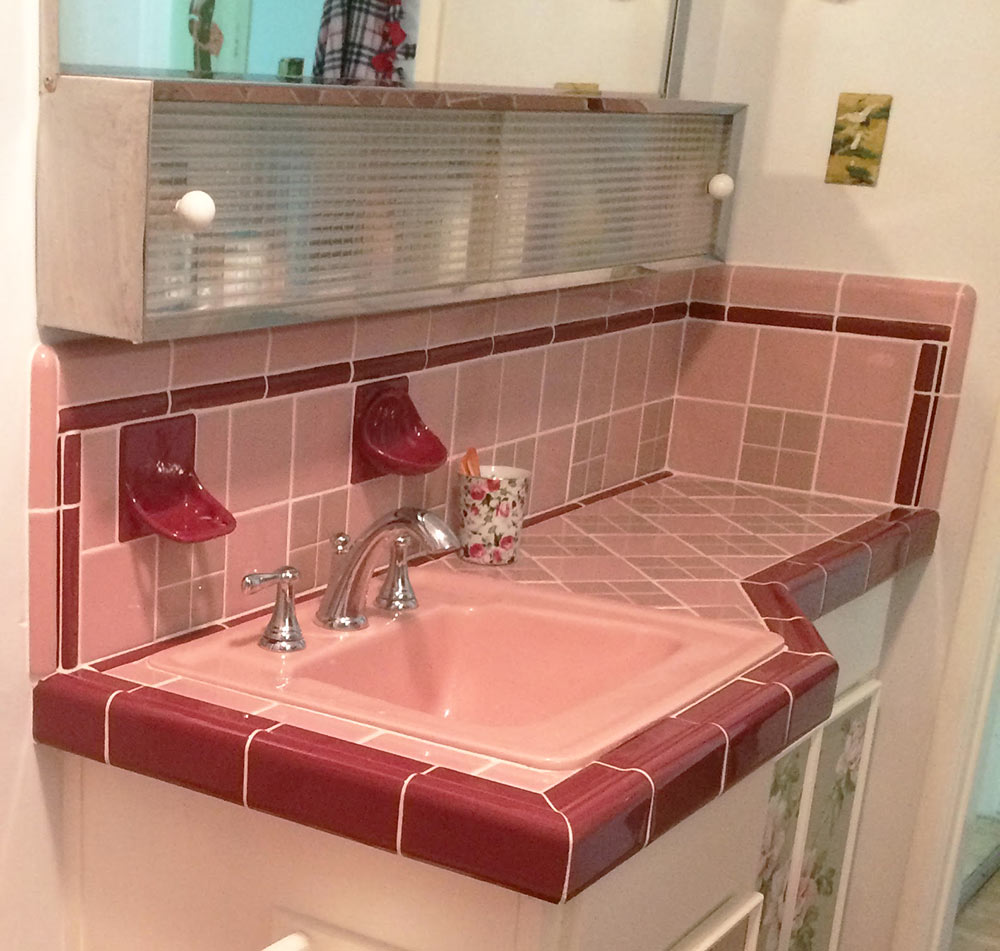
The most popular colors for decorating countertops in a bathroom made of tiles are white, blue and all its shades. Marine theme is always popular in the design of the bathroom. This trend is still in great demand today. This includes turquoise, azure shades, the color of the sea wave and other saturated and dull tones. The countertop can be made exactly to match the wall and floor, or, conversely, become the main emphasis in the room. For this, the product is made slightly darker or completely contrasted.
Neutral and practical shades of ceramic tiles - beige, sand, black and gray, are equally popular. These colors are perfectly combined with furniture and harmoniously fit into any interior style.
The tabletop in the bathroom under the sink made of tiles can be made in monochrome or combine several colors that are close in shade. The most daring choose products in which two or more contrasting tones coexist. Perfectly combine black and white, the color of the sea wave and white, red and black.
Tiles of brighter shades are selected in the case when the countertop made of tiles in the bathroom (photos are presented in the article) is made to match the wall and ceiling. For example, if the room is decorated in lilac and white, then the table under the sink can be made bright purple.
As for the choice of print or drawing, then everything depends on the style of the room. Most often, monophonic canvases are laid out or those that combine no more than two contrasting shades. Some people opt for multi-colored mosaics, but here you should be careful, because using this material is appropriate only if it is already present in the interior.
Selection and installation of countertops for the bathroom
The fastening system and the height of the countertop are determined by the level at which the sink and water supply are installed.
The design of the bathroom, which includes the installation of countertops made of tiles, opens up extensive opportunities for creating a stylish interior. In addition, it allows you to hide communications and a washing machine. The washing area becomes more comfortable and there is a functional area for storing related accessories and other details.
Having decided on the style of the product, you can install the countertop under the tiles in the bathroom with your own hands. When choosing a finished design, you will not need special abilities and skills for installation. Having studied the instructions below, you can easily do the work yourself.
Do-it-yourself countertop to the bathroom from the tile
Designs, covered with ceramic tiles, for the bathroom are very popular because of practicality. But not everyone has the opportunity to pay for the services of the builder for the installation of the product. Therefore, many do this work on their own and lose nothing.
To install the countertops you will need:
- Metal angle.
- Level.
- Roulette.
- Glasses for eye protection.
- Construction knife.
- Screwdriver.
- Electric jigsaw.
- Spatula comb.
- Silicone spatula.
- Sponge.
- A grinder with a nozzle for polishing a stone (turtle disc).
- A device for cutting tiles.
Necessary materials:
- Ceramic tile 30 * 30.
- Plywood sheet, 19 mm thick.
- Cement bonded particleboard, 6–13 mm thick.
- Wood screws.
- Masking tape.
- Tile paste.
- Grout.
- Sealant.
Making plywood base
Not sure how to make a countertop in a bathroom from a tile? First you need to prepare the frame. The base formation process consists of the following steps:
- Dismantling the old countertops. The basis for the construction can be assembled independently new or left old if it is in good condition.
- Check with a level whether the cabinet is directly installed.
- Surface preparation for laying tiles. It is necessary to take plywood and cut the frame, which will be attached to the base. Expert advice: if it is planned to lay heavy tiles, it is recommended to lay plywood in two layers or strengthen the first with stiffeners.
- Frame mount. The cut sheet must be fixed to the base with screws, corners or plates on the underside.
DSP Installation
Due to the large coefficient of thermal expansion, it is impossible to lay the tile directly on the plywood surface. Plywood on top sheathed DSP. Work Stages:
- Preparing a piece of DSP in shape. You can cut the desired shape with a grinder, but in this case there will be a very large amount of dust. It is better to use a knife - make grooves of 2-3 mm and break off along a contour about an angle to any surface.
- Fixing DSP. The finished sheet is attached to the plywood using self-tapping screws. The holes must be countersinked so that the studs are “recessed” in the surface.
- Processing the end face of the countertop. From the DSP, it is necessary to cut a strip, 5 centimeters long, and fix it on the end under the upper part.
- Fixing sheets DSP masking fiberglass mesh.
- Preparing a hole for the sink. It is necessary to take a jigsaw and cut a hole where the sink will be installed. Most modern washbasin models have a template attached. Before you start cutting, you need to drill a hole in the middle of the countertop with a drill, into which the jigsaw blade will be inserted.
A variety of photos of the countertops in the bathroom under the tiles are placed in the article. They can also be used as an example or sample.
Tile layout
The process of laying tiles on the countertop is similar to working with other surfaces. It is performed as follows:
- You need to take a small spatula and apply tile glue to the smooth surface of the comb. Further, it must be evenly distributed over the surface of the countertop. The serrated side of the comb removes excess. This is done so that even glue grooves are formed. Expert advice: the mixture should be applied in areas, as it quickly hardens and loses plasticity.
- The layout of the elements begins with the first row. It should protrude slightly beyond the edge of the base, so that after laying the tile on the end face, the surface is flat. In addition, instead of the initial row, you can install special corner elements.
- When laying ceramic tiles, seams are made, so it is imperative to use plastic crosses.
- It is recommended to constantly check the evenness of each tile with a level. This is done so that you can correct the flaws before the glue hardens.
- After the whole tile elements are laid out, you need to take a device for cutting tiles and make adjustments (substitute or cut pieces).
- As soon as the surface of the countertop is ready, you need to go to the facing of the end. Glue the pieces with a width of 5 cm with tile glue and temporarily fix them with masking tape.
Grout
Despite the fact that the joints between the tiles should have been minimal, the seams still need to be grouted. It is applied with a rubber spatula, and the excess is removed with a wet sponge.
Advice from a specialist: It is recommended to additionally “walk” along the seams with a protective agent. For this, you can use Ceresit CT10 or Atlas Dolphin.
At the end you need to install the sink, pre-treated with a sealant, and you're done!