Food photography is a rather serious and large field in the amateur and commercial filming environment. There are many professional masters in this genre, but it is really not easy to become one, since food shootings include a huge number of little things and rules that can really affect our assessment of these frames. Today we’ll try to learn more about them and understand how beautifully photograph food.
Definition
Let's start by determining what is called correctly when photographing food. On the slang of professionals, it is most correct to call this area the food genre. Translated into artistic language, this trend can be called - still life. It is quite difficult to become a professional in this field; you need to know many composition rules, frame layout rules, and color compatibility.
Let's go through the technique
In order to beautifully remove food, you certainly need a camera or smartphone with good optics. But here it’s worthwhile to understand that if you want to do this professionally, you need to shoot at least on a mirror system with a “crop” format matrix. If possible, use models with a full frame, as they are considered a more professional solution, have a larger dynamic range and, in general, by all parameters slightly bypass the crop camera.
Necessary lenses
As for the lenses. You can shoot on almost any lens, but, again, this is not always correct. Since the food genre is almost a subspecies of macro filming, we can say that macro lenses are best suited for these purposes. Most often, they have a focal length of 85-100 mm and an aperture value of about 2-2.8. They are ideal for these tasks, have excellent sharpness along the edges and center of the frame, and practically do not distort the space, since the angle of view of the lens with focal length a distance of 85 mm is almost comparable with the angle of view of the human eye, so we can say that these lenses simply transmit the image as it is seen by the human eye. At the same time, there are both professional and amateur models.
Lighting
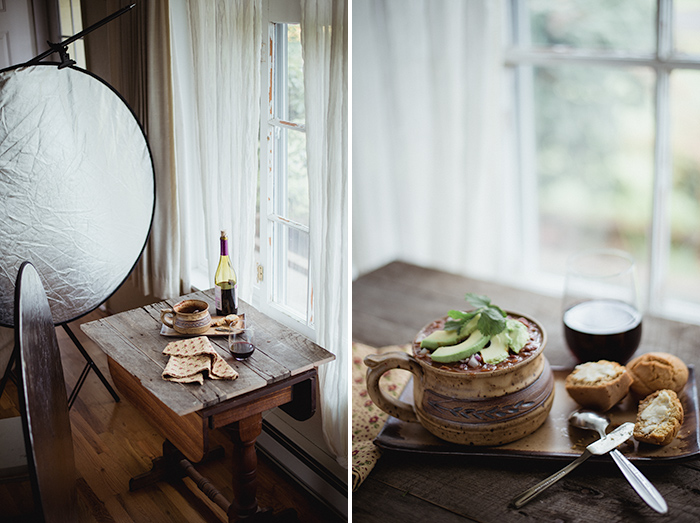
In addition to the camera itself and the lens in food photography, it is very important to have good lighting. There are several types of lighting: soft, diffused light and hard. They are suitable for completely different purposes, since soft light gives us a very nice and smooth picture without unnecessary sharp shadows. Hard light is more comparable to sunlight, as it gives rather sharp shadows and in most cases is not suitable for shooting food. To get the right light at any time of the year, you can buy a synchronizer and a pair of flashes with diffusers. Everything, you are ready to make cool shots, but if you still don’t have enough money to buy the necessary studio equipment, you can use a natural light source, that is, the sun. You can put the pad in front of the window and shoot. But, since we know that sunlight is rather hard, we need a diffuser and some more equipment. Read more on how to photograph food at home, how to create a home studio a little later. Let's learn the basics for now.
Methods of composition
So, we sorted out the technique. But let's think logically, have you ever seen a photograph of food, where in the frame is only the main dish? You will not find a frame where only one object would be in the center of the composition. Have you noticed that in each frame some grains, spices, herbs, beautiful cutlery are added, all this adds vitality and naturalness to the frame, our eye has something to stop our eyes on, and this is the most important, we don’t have a beautiful person here or nature, but the frame should catch the attention of the viewer, make him again and again examine it. Every little thing will help to do this, because it will be interesting for a person to consider the whole composition.
The basis of everything
In order to take a beautiful shot, you need a good background. What for? All this because the whole point of food photography is to add volume to the frame, make it more attractive and mouth-watering, that is, the more textured things we use, the more voluminous our composition will seem. Currently, the masters of creating such sites can simulate almost any surface: concrete, wood, plaster and other materials. Moreover, if you look closely, then among the textures of the backgrounds there are practically no smooth and even structures, almost always it is decorative plaster or aged wood. Such surfaces come in different sizes and do not cost much to save on them.
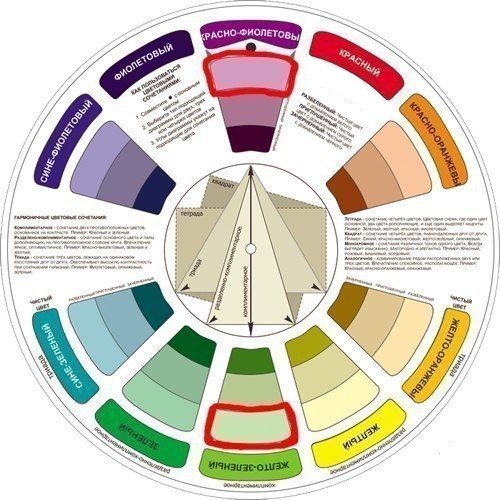
Color circle
But here there are tricks. As you have probably seen, photophones come in different colors, and the question arises which food is best to photograph on a turquoise background. The answer to it can be found in the theory of coloristics. There is such a device as a color wheel. It is designed for people working with the layout of clothes or objects in the frame, so that they can correctly choose the right combination of colors.
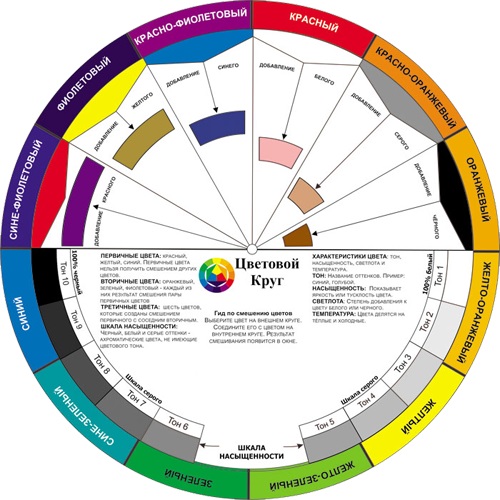
On one side of the circle is a guide for mixing colors, it shows the result of adding one color to another. On some color circles on the same side there is a saturation scale that allows you to calibrate the color, it shows the shades of black and white colors, roughly speaking, the gradient from black to white. On the other side of the color wheel is a color scheme. What does she show? Using this scheme, you can choose one, two or three additional shades to one main. The first way is a complimentary combination. This method is based on the contrast between the two colors, that is, two opposite colors are selected in this circle, which in one composition will look bright and expressive. There is a split-complementary combination when we take one primary and two complementary colors that are similar in tone. This method is also based on color contrast, but here it is not as pronounced as in the first method. There is also a triangular and rectangular combination, thanks to these combinations you can choose two or three additional shades to the main gamut. The color wheel is one of the most important techniques in any genre of photography, and is also the main tool in color.
Home studio
And now about how to take pictures of food at home without professional equipment. We have already found out that if you don’t have the money to buy professional lighting products, you can also shoot using natural light, but the light from it turns out to be pretty tough for our purposes. What to do? There is an exit! First of all, we need to soften the flow of light. To do this, you can use a diffuser, which requires some means. Most often, diffusers cost no more than 3,000 rubles. But if you don’t have any means at all, you can go to the clerical, creative or art store and buy the following things there: tracing paper, white foam board and black foam board, as well as office clips. Why do we need all this? First, we need to cut something out of a white foam board into a kind of frame. No need to throw out the inside! She will still be needed! Next to the size of the frame, you cut out a piece of tracing paper, and attach it to this impromptu frame with the help of stationery clips, and our diffuser is ready. From the inside of the white foam board we get an improvised reflector, since the white foam board perfectly reflects the light. A black sheet of foam board will act as the so-called black "flag", it is needed in order to sift out excess light and take photos in a "dark key". Next, we set our diffuser opposite the window, and fill the shadows formed on the opposite side with the reflector. That's all, your home studio is ready.
Commercial sphere
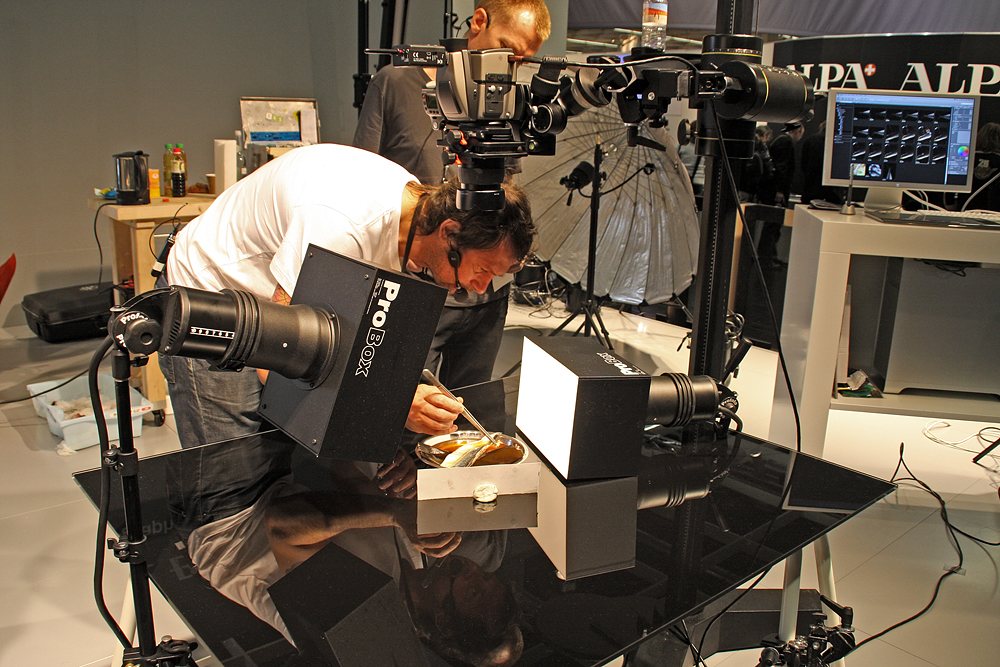
With the commercial field of food filming, things are a little harder. How to photograph food for advertising? To do this, you need to have a fairly extensive arsenal of equipment, all kinds of flashes, nozzles and more. Yes, you may not have professional equipment, but just amateur, but in any case, you should first learn all the techniques of composition, color combinations, as well as retouching and processing programs. How to photograph food for the menu? Usually, when working, a person does not always have the opportunity to use natural lighting, since the institution can be located in a basement or in a poorly lit place. In this case, you have only one way in which you can shoot this session - using studio, artificial lighting, and here it is much more difficult to create soft light that would not give hard shadows. To create it, you will need at least two flashes with softboxes. Most often, such shootings are performed in neutral, solid colors, so that they look harmonious in the menu and are not variegated and multi-colored.
To summarize
In general, food photography is a rather specific genre of art, since it is necessary to choose other equipment. Composition techniques here play the biggest role in creating a beautiful frame. You need to know how to properly arrange each seed or crumbs so that they harmonize with each other and attract our eyes. It is best to start doing food photography from home shooting, to participate in specialized competitions in this genre of filming. The skill comes with experience, experiment, try different patterns of light, shoot a variety of products, since each dish requires a certain approach. We hope that thanks to the article it became clear to you how to photograph food, you learned the basic techniques, shooting techniques, as well as technical details. All this will help you become a true professional in this field of art.