Without a bathroom, comfortable living in the house is out of the question. This room is the "face" of every person. Its appearance speaks of the wealth of the family, the style of the owner and his accuracy. Everyone knows that the central place in the bathroom is the bathtub, which is directly used for hygiene procedures.
It is important not only to choose the right one, but also to set the capacity. Therefore, you need to know how to fix the bath correctly when carrying out repairs in the room. Of course, you can use the services of specialists, but it is quite possible to install the tank yourself.
So, we will consider how modern plumbing is made, made of different materials.
Actual bath installation methods
The installation method of the bath depends on its location. So how to fix the bath?
- Wall and floor mount. One of the common installation methods for angular plumbing. Often also used when installing bowls in a prepared niche.
- Fixing to the floor. In this case, the tank is installed at a distance from the walls.
Depending on the type of fasteners used, there are such ways of mounting the tank:
- On adjustable or unregulated feet. Ideal for fixing cast-iron or steel bathtubs, with which the presence of such supports is often provided in the kit.
- On the brickwork. A universal solution for metal bathtubs, which guarantees the stability and reliability of the structure as a whole.
- On adjustable supports or metal structures. This option is often used to install acrylic plumbing.
Let us consider in more detail the most popular ways to properly fix the bath.
Features of mounting a steel bath
A steel bath is an acceptable option for many apartments and houses. A wide assortment of the selection of these products is presented in plumbing stores. The choice of container parameters directly depends on the area of the bathroom and the wishes of the owners. The standard configuration includes bathtubs with a size of 0.75 m by 1.7 m.
Choosing such plumbing, remember that it is characterized by a large weight. It greatly complicates the installation and makes special demands on the stability and strength of the fasteners.
The product instructions indicate that such a container must be installed on special legs. The presence of these supports greatly simplifies installation. It is necessary to correctly fix the supports, which often come with plumbing. The bathtub is ready for installation.
But often these containers are installed on brickwork. How to fix the bath in this case?
Features of mounting a steel bath on a brickwork
The installation of the bath on the brickwork provides good rigidity compared to using standard legs.
- So, the arrangement of the bathroom begins with the unpacking of the tank itself. We correlate its parameters with the dimensions of the seat.
- Remember, in order to correctly, quickly and efficiently install the container, it is necessary that the distance between the wall and the sides of the bowl is at least 2.5 cm. This requirement does not apply to the installation of corner bathtubs.
- We place the bowl on previously prepared spreader bars. They should be located close to the wrong side of the sides.
- Correctly connect the siphon.
- Using the spirit level (level), we check the location of the bowl relative to the horizon. If necessary, align the container by changing the angle of the struts.
- Brickwork must first be laid out under that part of the bath where the legs of the structure were to be located.
- The last row of masonry must be brought close to the wall of the bath. To do this, use pieces of brick.
- We leave the masonry to dry for several days. After we check the spacers and the stability of the structure.
- Along the perimeter of the brick bath we lay out the screen under the very rim.
Many believe that this is the most reliable and relatively inexpensive way to fix the bathroom.
Do I need a screen?
You can also tile the brick screen to match the walls.
Remember that the screen will perform not only a decorative function. It also provides added rigidity to the entire structure. When constructing the side, try so that the masonry adjoins its lower part along the perimeter. This will avoid misalignment of the bowl, if suddenly the lower supports are not strong enough.
This method of installing a bathroom is relevant only for metal. Therefore, it should not be used for acrylic bowls.
Fixing the bathroom to the wall and floor
Mounting a metal structure on brickwork is quite simple. But how to fix the bath to the wall and floor?
The metal bath must be installed on a standard supporting structure.
It may happen that the pins of the support legs are slightly smaller than the previously estimated size. In other words, if, for example, it was planned to install a container under the height of the sides of 60 cm, and a bathroom with inverted legs reaches a height of 57 cm.
This problem is easily solved by cutting the required thickness of the pieces of tile. The bathtub can be fixed securely by their glued elements at the location of the legs.
After that, it is necessary to measure the location of the lower edge of the side and set the metal profile according to the markup made earlier.
We seal silicone fasteners on the wall. To do this, in the upper part of the profile, stepping 1-2 mm, apply silicone sealant.
We move the metal bath to the wall so that its supports are in place. If you glued additional pieces of tile, you must install the bath no earlier than in a day. After all, silicone must completely polymerize.
With a metal bath sorted out. And how to fix the acrylic bath, which is very popular today?
Installing an acrylic corner bath on supports
Acrylic bathtubs are very popular today. The main advantage is low weight. But how to fix an acrylic bath? To a wall or to regular supports?
The installation of the bath of this material on the supports occurs in the following sequence:
- The product is removed from the packaging.
- It is necessary to lay a blanket or carpet on the floor, which will keep the glossy surface from scratches. The bowl is turned on the covered floor.
- We measure the sides of the bath, correlate them with the size of the seat. The corner bath must always be installed correctly. In this case, the two walls that form the seat must converge with each other at right angles. Otherwise, there will be a gap between the walls and the bathroom, which is difficult enough to cover with something.
- We prepare all the accessories for the manufacture of the bath frame.
- Separately, we lay out all the components. So it will be easier to get to them. So, how to fix the legs of the bathroom?
- At the ends of the legs, carefully insert the plugs. Well click them.
- We screw the studs into the adjusting legs (inside of which there is a thread).
- Screw 2 locknuts onto the studs.
- We assemble the profile from which the frame itself will be made in the future.
- The profile has a hole in the insert. They screw the pin of the adjusting leg into it.
- The first locknut must be screwed close to the profile, the second to the leg. So the design will be not only stable, but also reliable.
- We install profiles on the bowl. We fasten them with screws, which are present in the kit.
- When collecting the second profile, it is necessary to prepare a long and short hairpin.
- The smaller stud must be screwed with locknuts on the same principle as the legs.
- But the pancake pin must be screwed on the side of the profile, which should be located on the side of the ledge of the side of the bowl itself.
- We install plastic legs on both sides on a screwed longer hairpin. Thus, one foot of the bowl should rest on the floor, and the other on the side of the acrylic container.
- After installing the legs on both sides, tighten the nuts. At the same time, note that after installing the support legs on the profile, their caps must be placed at the same level. Using a ruler, you can check the location of the extreme points of the support legs. To do this, it is enough to measure the distance from the surface of the plug to the surface of the profile.
- We can assume that the acrylic bath is ready. The assembled structure can be turned over and installed in a prepared place.
- Using the level we check the position of the bowl. If necessary, align the legs, unlocking the nuts on the supports.
Reinforced acrylic bath mount
The above methods of fixing the bath in the bathroom are considered the most popular. But the acrylic bowl can be fixed in another way. Indeed, the long-term operation of the bath on the supports shows that this installation method has one drawback. Under the weight of a person, the bowl crunches in the area between the fortified profiles. What to do if the bath sways? How to fix it correctly?
This minor flaw is not critical, but it is advisable to eliminate it. For this, it is necessary to prepare standard foam concrete blocks measuring 250 mm by 625 mm.
Having decided to install the bath on the blocks, pay attention to the placement of the profile mounting frame. It must be carried at a distance of 65 cm.
Foam concrete blocks must be installed under the bowl on the mounting foam. After the foam hardens completely, the bath will become motionless and will stop crunching.
This method of installing a bath requires a minimum of financial costs, because you only need to purchase a foam cylinder and several bricks.
Features of the manufacture of reinforced fasteners
So, installation work consists in performing sequential actions:
- Raise the bathtub to its maximum height using the adjusting legs.
- Along the perimeter of the future laying of bricks we blow out strips of polyurethane foam.
- We apply foam on the brick, lay it on the floor.
- We lower the bowl onto the foam using adjustable supports, which we fix with nuts.
- After 24 hours, you can use the plumbing.
For better adhesion of the foam to the floor or brick, it is recommended to moisten the surface first with water from the spray gun.
Remember that when fixing the object, you significantly complicate the repair and installation work as a whole. What else should you pay attention to before fixing the bath to the legs?
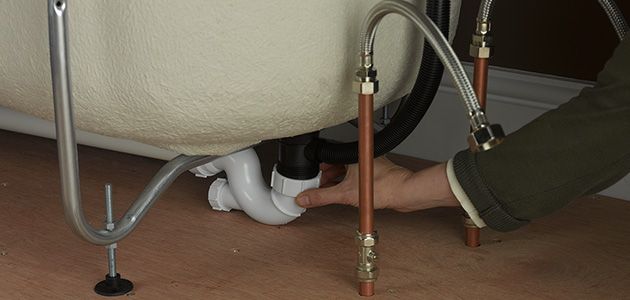
Water stack
The correct arrangement of the water stack is necessary for the normal functionality of the plumbing in the bathroom. It depends not only on the parameters of the siphon, as many non-professionals consider. It is necessary to fulfill the main condition of the stack: all siphon tubes and drain should be located above the level of the sewer pipe.
A large difference in height will allow water to leave faster. Thanks to the fast flow, the fluid can automatically clean the pipeline. As a result, you will have to do repairs and routine inspections less often.
Remember: before mounting the bowl, raise the adjustable legs as high as possible. It is necessary to ensure that the height does not affect the comfort of using the bathroom. The distance between the floor and the sides of the bathroom should be in the optimal value.
Siphon hose selection
Experts recommend replacing flexible corrugated hoses in a siphon with smooth plastic pipes. Of course, it is easier to work with them, because you do not need to observe the dimensions, they can be quickly bent in any position. But in the folds of the corrugation, dirt accumulates, which is difficult to remove by simple washing. With frequent disassembly of the siphon, rubber seals and even threaded connections may suffer. As a result, serious damage occurs that further requires the replacement of the entire device.
And if the bathtub is attached to the floor, then all repairs are extremely difficult. Experts recommend purchasing siphons in which the function of a sump is performed by an ordinary bending of a tube. Since the smell will not fall into the room, blockages will be much less common. And when they occur, you do not need to disassemble the structure, just use a conventional plunger.
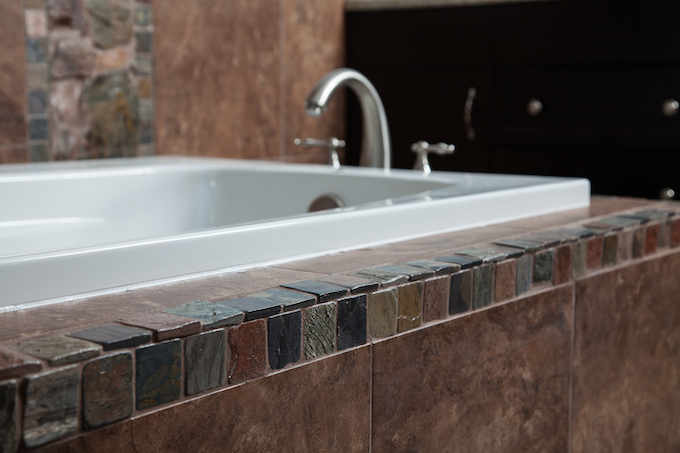
Bath quality
Experienced plumbers recommend giving their preference to foreign manufacturers of bathtubs. Unfortunately, modern domestic bowls cannot be characterized by high quality. This applies not only to the coating, but also to the geometry of the product.
In domestic products, the corners of the sides are rarely straight. And an error of several degrees over a long length can turn into several millimeters. Therefore, often in this case, a wedge-shaped gap is formed between the flat wall and the side of the bowl. It is not recommended to hide it with a silicone sealant, because the error will be too visible. In this case, use ceramic or plastic special skirting boards, which must be mounted on fixed surfaces. Corners come off at the slightest vibration. Re-sticking them is not recommended.
Conclusion
The arrangement of the bathroom is an important task that every owner who has little experience in the construction industry can handle. Now you know how to fix the bath to the wall without difficulty.